Get certified by completing our SPORIFY Users Training course which is available via the CorrIT Training Academy. Contact your local SPORIFY administrator for more information.
General Information
System Overview
The features of the system include:
Functions
-
Provide the ability to match preformatted lists (CSV or Excel) to SPOR Master Data Management Services RMS & OMS and G-SRS Substance List (Target Systems) via a matching module.
-
Provide the ability to create and set Resolution Status to each term on your uploaded list.
-
Provide the ability to assign Tags to Source and Target Data.
-
Export each list you have uploaded along with the associated Resolution Status, Tags, Data Insights and any associated Mapping Data from the matched Target System as applicable to your list.
-
Provide an overview of your activity and Mapping Status via chart-based reports. These reports are known inside SPORIFY as Dashboard, Overview and Data Insight pages.
-
Provide an overview of the information available in Target Systems services.
-
Provide notifications to highlight when Target Information is updated.
-
Follow Favourites: Allow users to follow SPOR RMS Lists or OMS Organisations that are of interest to them.
-
Provide the ability to govern Referentials, Organisations and Substances data records.
Note: Features available are dependent on the subscription plan you have licensed; not all features are available for all subscription plans.
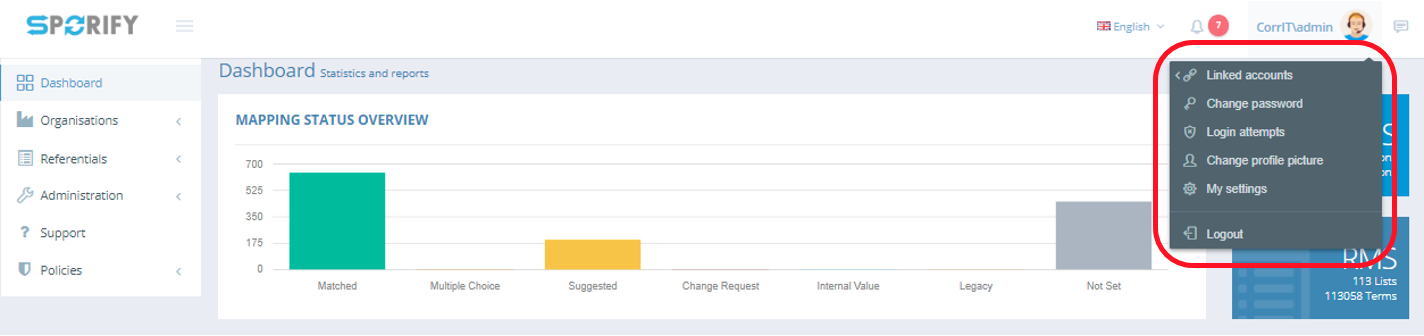
Profile Settings
|
My Settings:
-
User details: Name, Surname, Email Address, Phone Number, Username.
-
Set default time zone information as it applies to your user account.
Change Profile Picture:
-
Users have the option to upload their profile picture to the system.
Login Attempts:
-
View all login attempts by your account.
Change Password:
-
Change your password by entering your current password before adding your new password and clicking the Save button.
Linked Accounts - Manage Accounts:
-
Enterprise customers who have multiple tenant accounts can link their user accounts across their tenant accounts. This allows the user to login to SPORIFY once to work on behalf of multiple tenants if required.
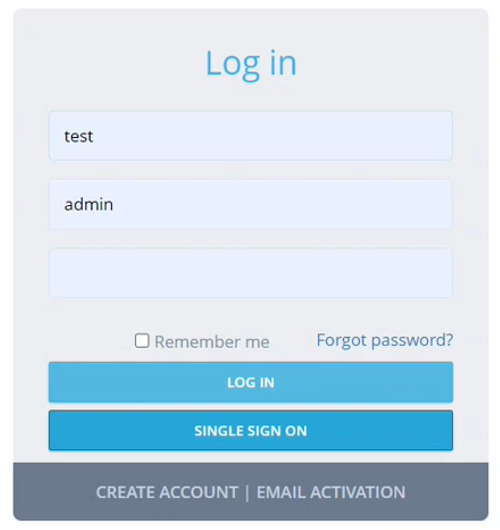
Single Sign On (SSO)
Logging In To SPORIFY Using SSO:
-
Insert the relevant credentials.
-
Click the Single Sign On button.
-
The user is redirected to Okta/Azure/OneLogin.
-
|
-
Login via Okta/Azure/OneLogin.
-
If the user has already signed up, they are redirected to SPORIFY.
-
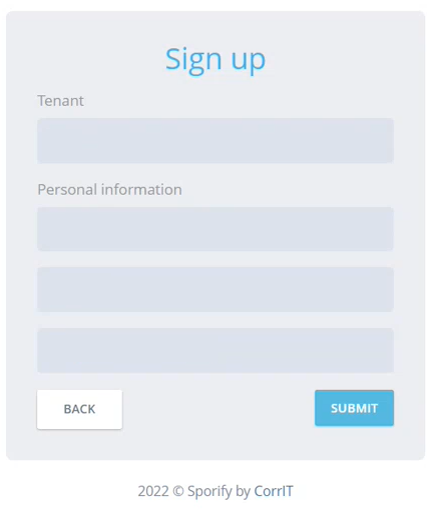
If the user has not already signed up, they are redirected to the SPORIFY Sign Up screen.
-
-
To sign up, fill in the following fields:
-
Tenant
-
First name
-
Surname
-
Email
-
-
Click the Submit button.
-
A confirmation email is sent to the user. Via this email, the user is required to confirm their email address.
-
The user must then wait for their account to be activated by system admin.
-
|
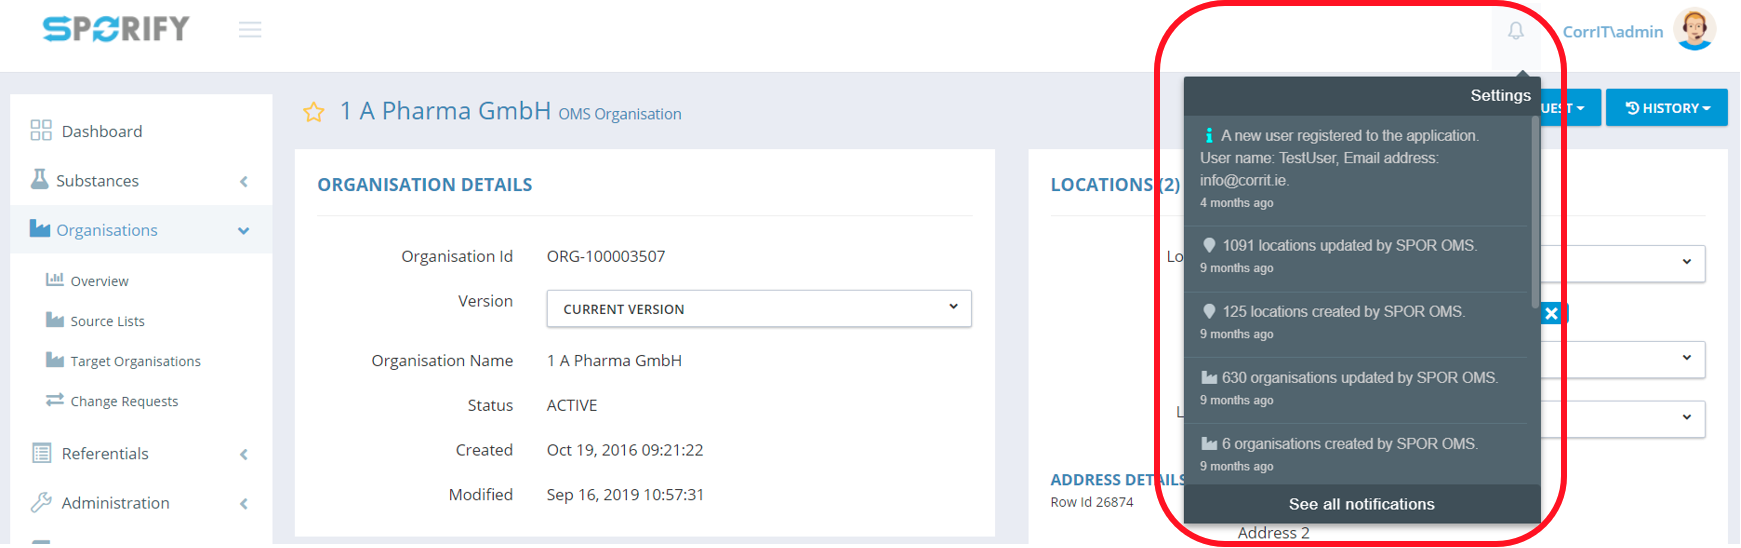
Notifications
|
|
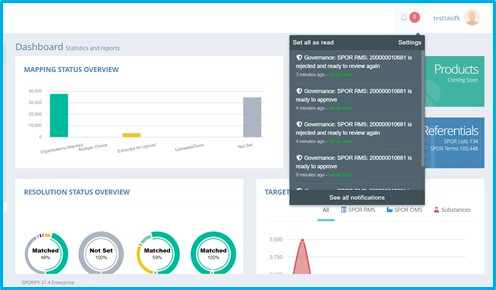
Notification Summary
Latest Updates:
-
Summary of all Target System Activity since you last logged into SPORIFY.
-
The latest 10 are shown in the list, while all others are made available by clicking See All Notifications.
-
Clicking a notification will navigate you to the Target System Activity page which is filtered to display the items the notification refers to.
-
Reset badge icon count by setting all notifications to Read.
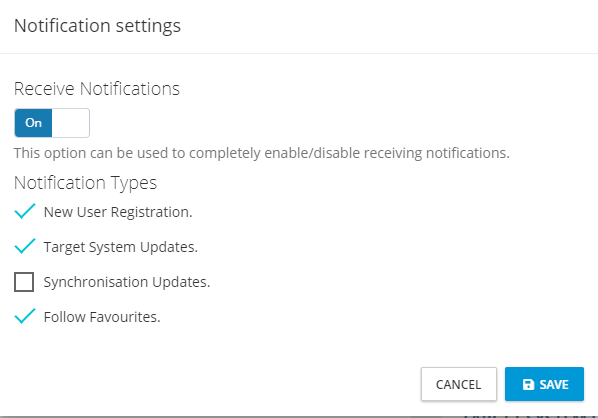
Notification Settings
|
Available Settings:
-
Receive Notifications: On/Off
-
Scroll and view all previous notifications
-
Select the notification types you wish to subscribe to: New User Registration (admin only), Target System Updates, Synchronisation Updates, Follow Favourites
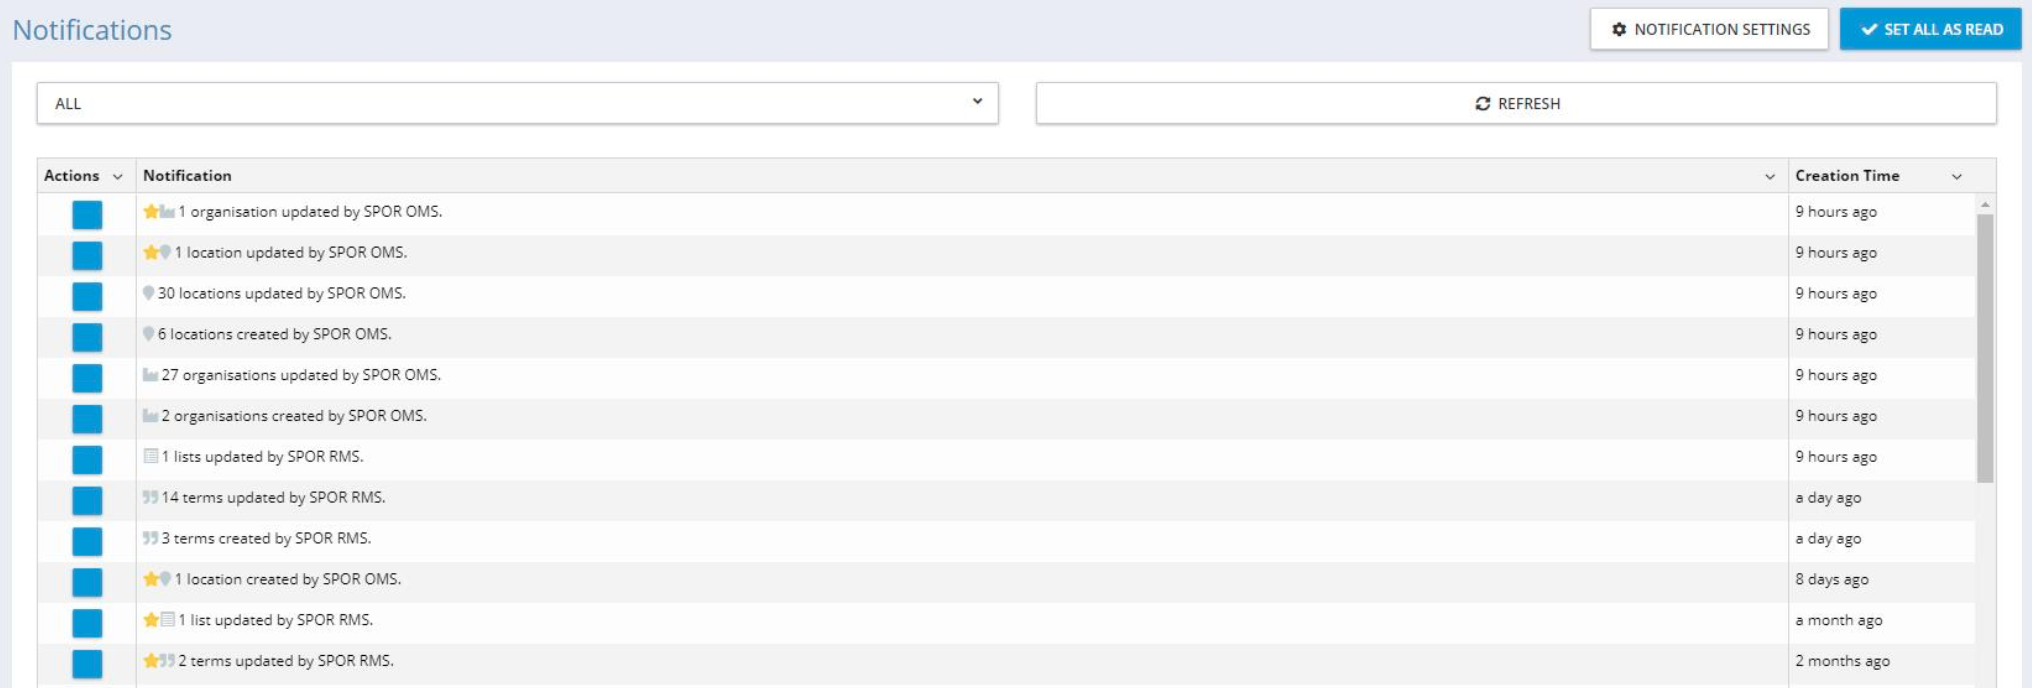
Notification Centre
|
Available Settings
-
Filter by All/Read
-
Refresh notifications
-
Set all as Read
Data Governance Notifications
Notifications are sent to reviewers and approvers during the data governance process. * Reviewers are notified when a record is ready to be reviewed. * Approvers are notified when a record is ready to be approved. * Reviewers are notified when an approver has rejected a relevant record.
|
SPORIFY Dashboard
Dashboard Explained
|
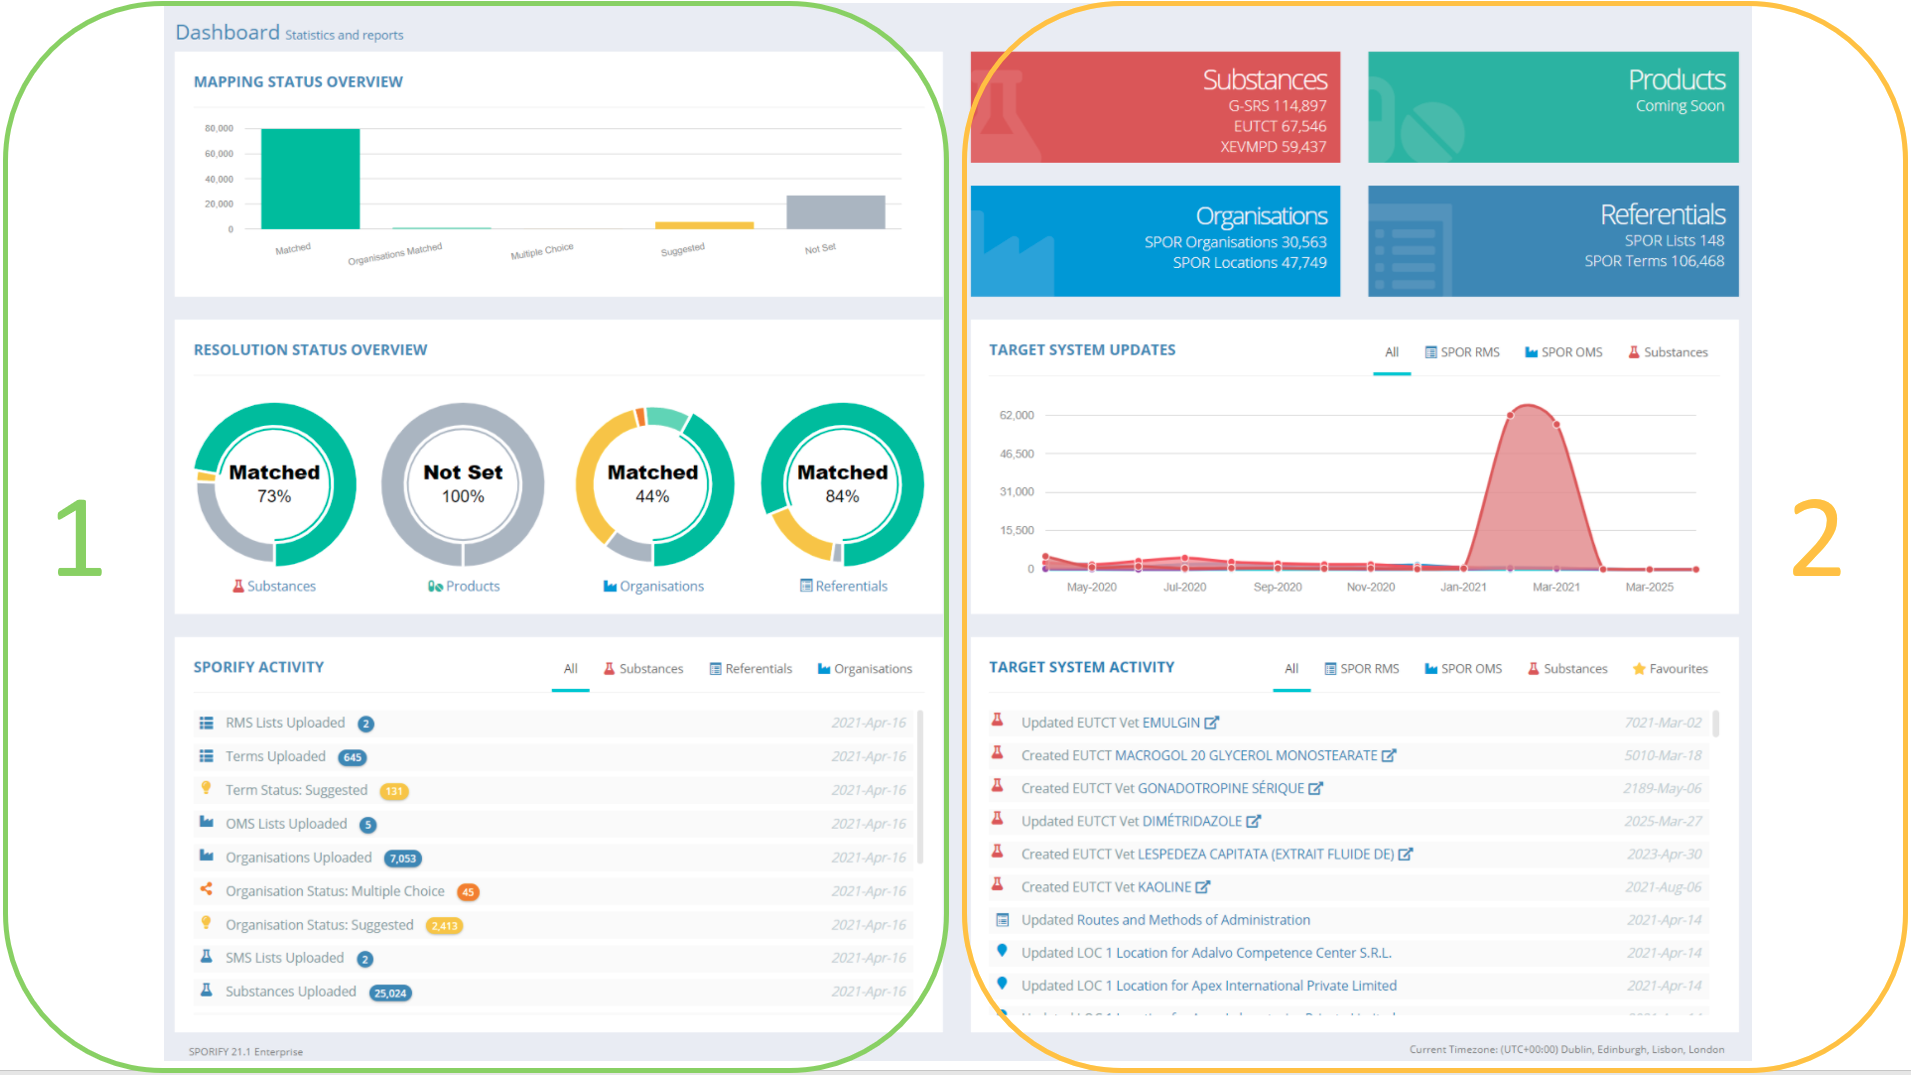
The SPORIFY Dashboard provides an overview of your activity on SPORIFY and external activity on Target Master Data Systems (SPOR & G-SRS). Where applicable the data in charts and activity lists can be filtered to a particular domain of data by selecting the relevant tabs.
Overview Explained:
Panel 1:
-
The left-hand side of the Dashboard is dedicated to SPORIFY activity, showing the activity your users have carried out in the system. The SPORIFY Activity panel shows the activity of you and/or your organisation within the SPORIFY application.
Panel 2:
-
The right-hand side of the Dashboard is dedicated to Target Master Data activity, showing the latest information activity from each Target System available in SPORIFY with options to filter by All, SPOR RMS, SPOR OMS, G-SRS or Favourites as applicable to your subscription..logo .logo-light .logo-dark .image
-
The Target System Activity panel shows the latest updates on subscribed external Target Master Data Systems and provides click-through access to the details on each item listed.
-
If you subscribe to the Target System or to the Follow Favourites feature, you can see the latest updates to the Target System. You can likewise view your selected Favourites in summary and click on each item for more detail.
-
The Target System Activity heading is also a link to the Target System Activity detail page.
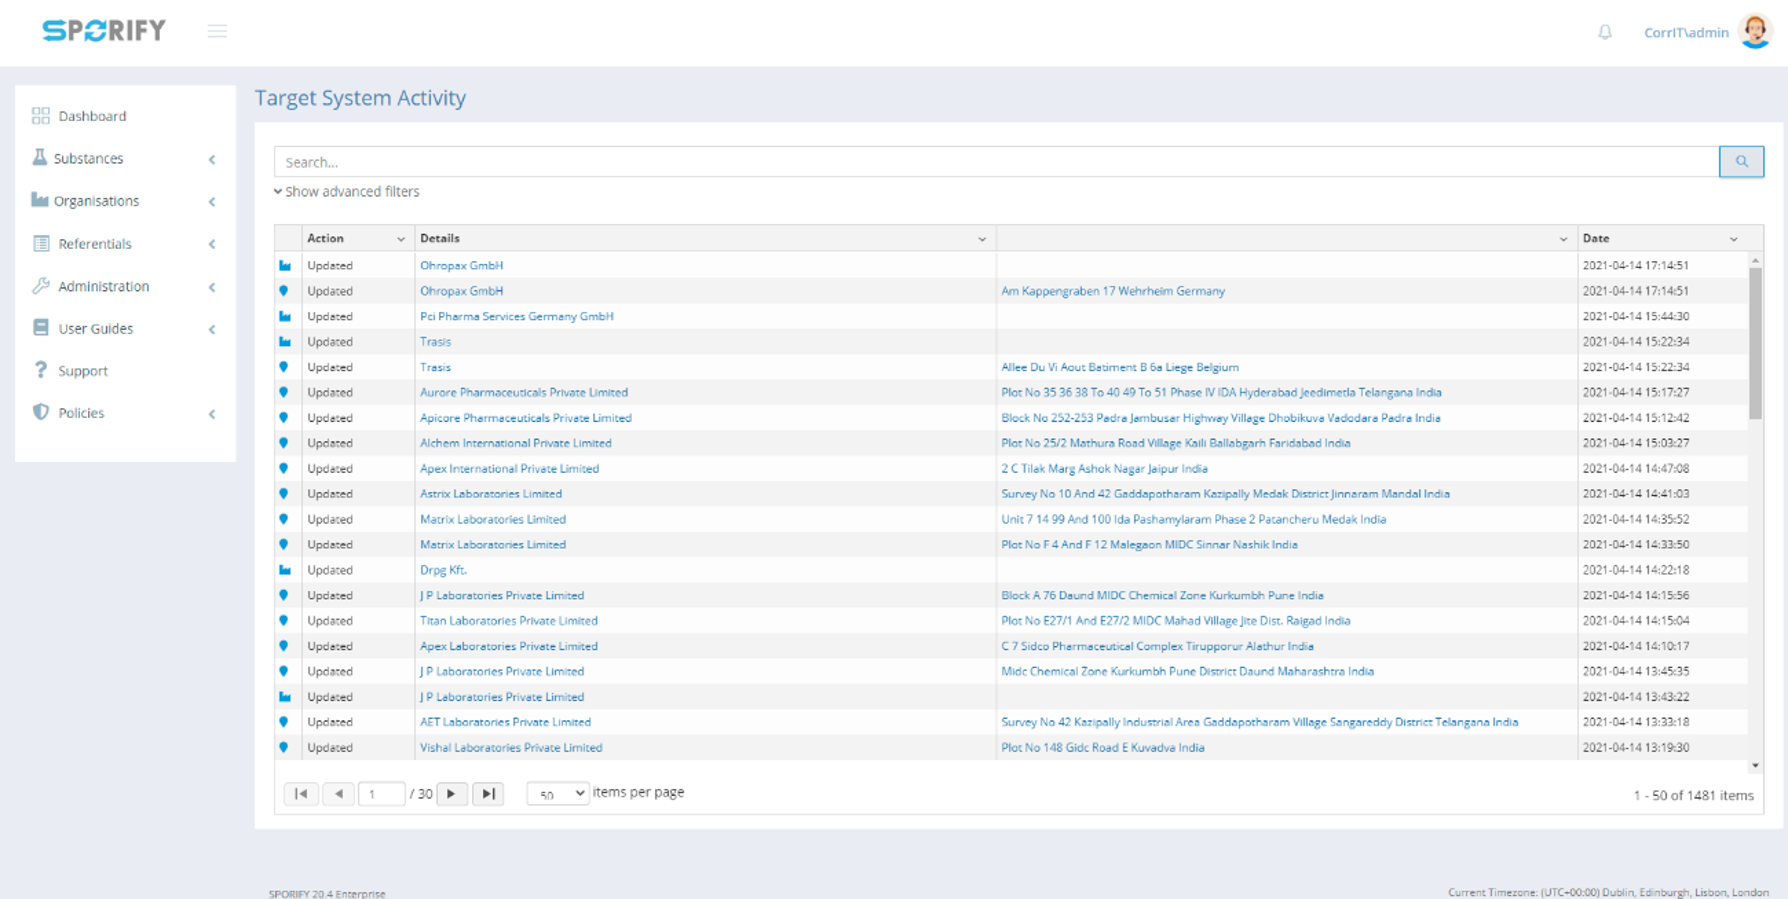
Target System Activity
|
Target System Activity Explained
Search based on the following criteria:
-
Term Name
-
Organistation Name
-
Substance Name
Filter based on the following options:
-
Date Range
-
System
-
SPOR RMS (Lists, Terms)
-
SPOR OMS (Organisations, Locations)
-
SPOR SMS (Human Substances, Vet Substances)
-
G-SRS (Substances)
-
EUTCT (Human Substances, Vet Substances)
-
XEVMPD (Substances)
-
-
Favourites
-
Favourites Only (show only activity on your followed items)
-
-
Action
-
Created
-
Updated
-
Referentials
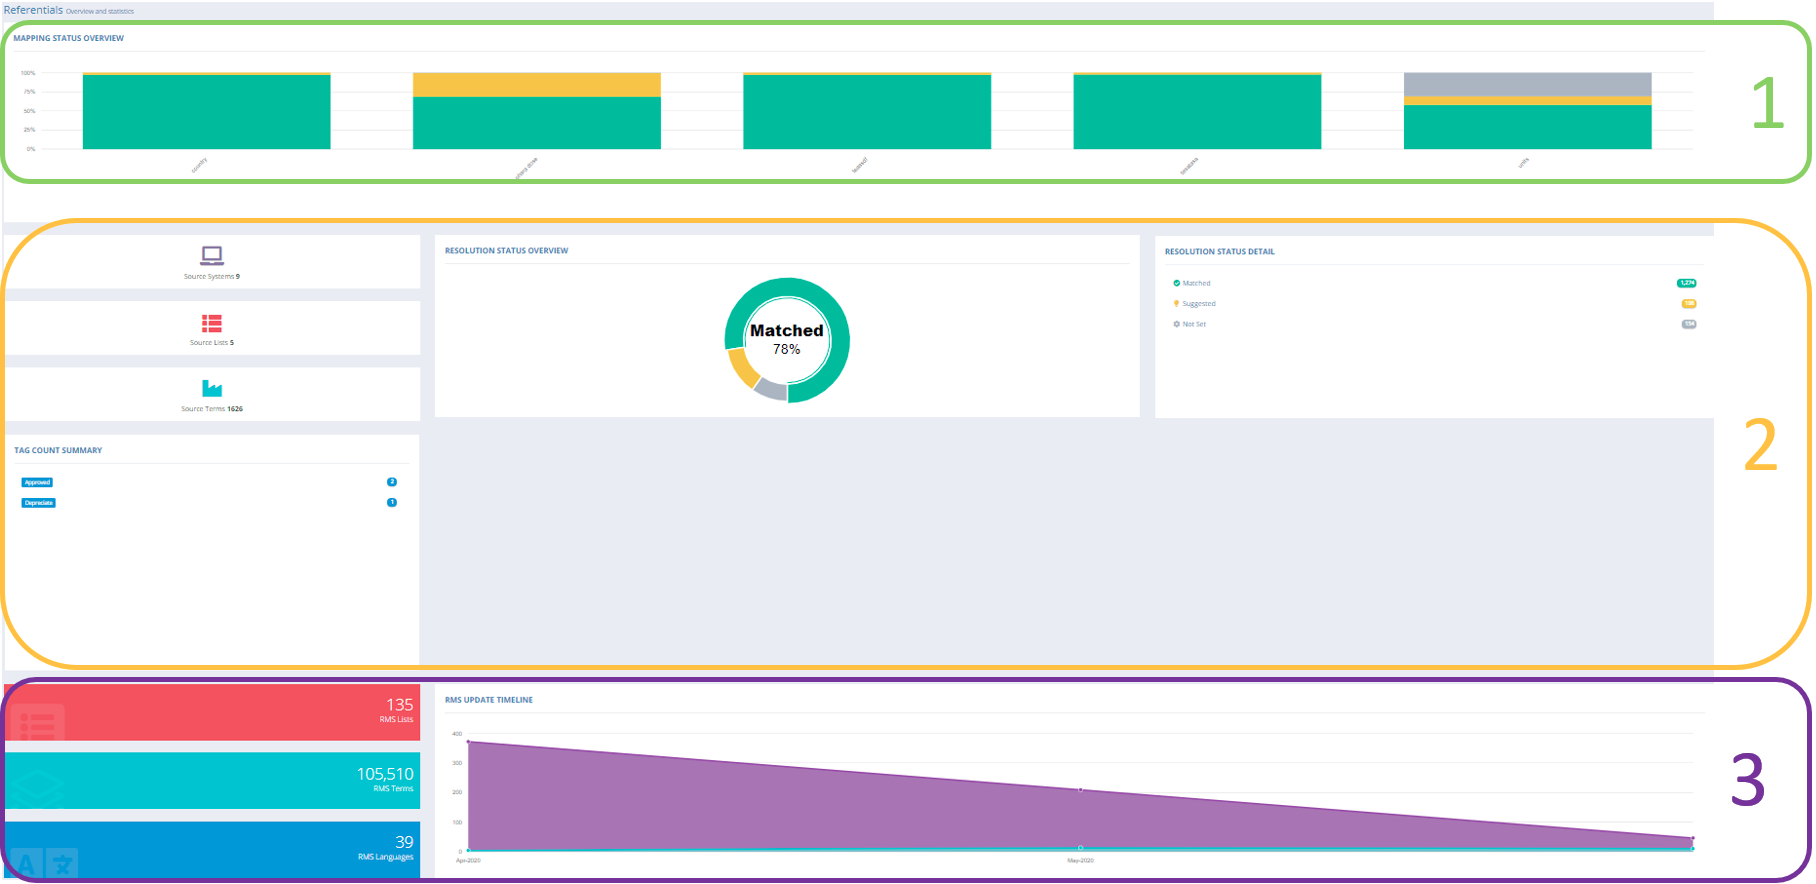
Overview
|
Overview Explained:
Panel 1:
-
Bar chart outlining the data’s current Mapping Status for each list
Panel 2:
-
Count Overview: Source Systems, Source Lists, Source Terms
-
Summed total overview of Source List Status
-
Resolution Status overview by Source Term
-
Tag Count Summary
Panel 3:
-
SPOR Detail: Available Lists, Terms and Languages in EMA SPOR Master Systems
-
Timeline of EMA SPOR RMS Master Data activity:
-
List by modified date
-
Terms by modified date
-
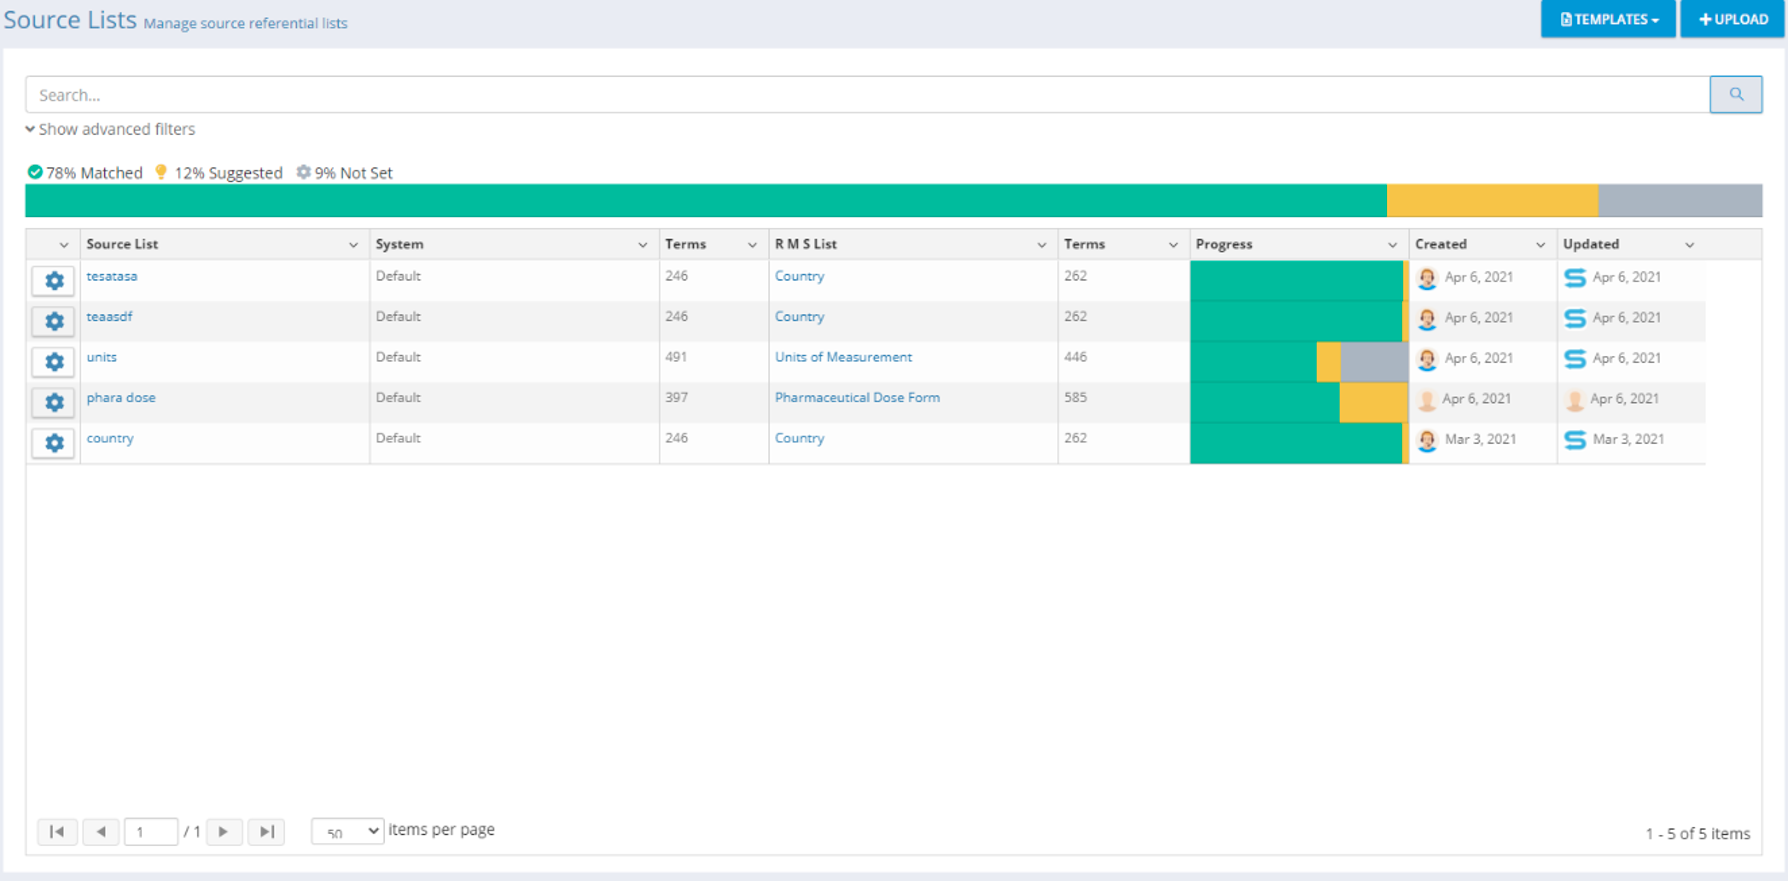
Source Lists (Mapping)
|
Template: Formatting Source Data:
-
How to Format Your Source Data:
-
Download the Standard Referential Excel or CSV Template by clicking on the Templates Action Button. This template can be used for all of your Source RMS lists.
-
Data Format Required: SPORIFY requires two mandatory* and three optional pieces of information to carry out Referential Data Mapping:
-
Term ID* (Unique identifier)
-
Term Name* (Full term name)
-
Term Short Name (Short name of term)
-
Term Other Name (Alternative name of term)
-
Term Description (Term detail description)
-
-
Using Excel: If your workbook has multiple worksheets you must select the required worksheet to import from.
-
Using CSV: Each column of data should be delimited with a comma.
-
If your column text contains the delimiter character, the text should be wrapped in quotation marks. For example, Capsule, Soft is formatted as “Capsule, Soft” to correctly import the delimiter character.
-
CSV files should be saved with UTF-8 encoding to preserve special characters.
-

|
Sample Populated Template Excel file. Data Format: “Local Term ID, Local Term Detail”

|
Sample Populated Template CSV file. Data Format: “Local Term ID, Local Term Detail”
-
How to Format Your Source Data, including existing Term mappings:
-
Download the Advanced Referential Excel or CSV Template by clicking on the Templates Action Button. This template can be used for all of your Source RMS lists.
-
Data Format Required: SPORIFY requires two mandatory* and three optional pieces of information to carry out Referential Data Mapping:
-
Term ID* (Unique identifier)
-
RMS Term Id
-
Term Name* (Full term name)
-
Term Short Name (Short name of term)
-
Term Other Name (Alternative name of term)
-
Term Description (Term detail description)
-
-
Using Excel: If your workbook has multiple worksheets you must select the required worksheet to import from.
-
Using CSV: Each column of data should be delimited with a comma.
-
If your column text contains the delimiter character, the text should be wrapped in quotation marks. For example, Capsule, Soft is formatted as “Capsule, Soft” to correctly import the delimiter character.
-
CSV files should be saved with UTF-8 encoding to preserve special characters.
-

|
Sample Populated Template Excel file. Data Format: “Term Id, RMS Term Id ,Term Name, Term Short Name, Term Other Name, Term Description”

|
Sample Populated Template CSV file. Data Format: “Term Id, RMS Term Id, Term Name, Term Short Name, Term Other Name, Term Description”
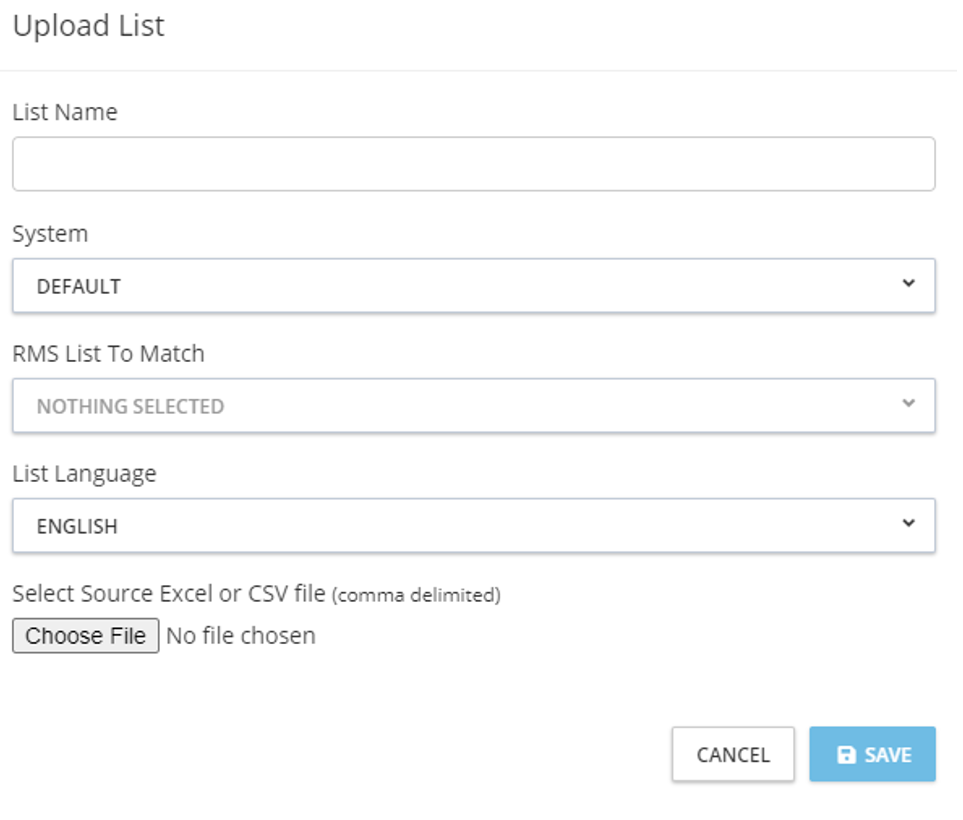
Upload: Importing Data
|
Fields Explained:
-
List Name: Local list name/friendly name which you will recognise for your internal list.
-
System: Name of the Local System that your list is from. Custom System Names is subject to subscription level. If only one system is available, the name is always “Default”.
-
RMS List To Match: Select the list you wish to match your local list against from all available list names.
-
List Language: This drop-down menu is populated based on the Referential list selected in the previous field. Every Language available in the Referential list will be displayed for selection. SPORIFY uses a matching algorithm to look across all available languages for matches, but you can select your primary language here.
-
Select Source Excel or CSV File: Browse your computer network and select the source file to upload. By default, the system expects CSV files to be delimited with a comma.
-
Set Custom Delimiter: If your CSV file is delimited with a character other than a comma you can set your custom delimiter here. A custom delimiter can be up to 3 characters in length.
-
Number of Header Rows in My Source File: If your file contains header information you can enter the number of rows you wish SPORIFY to skip when importing your data.
-
Click Save to import your data and run the SPORIFY Matching Algorithms.
-
Click Cancel to clear all fields and return to previous screen.
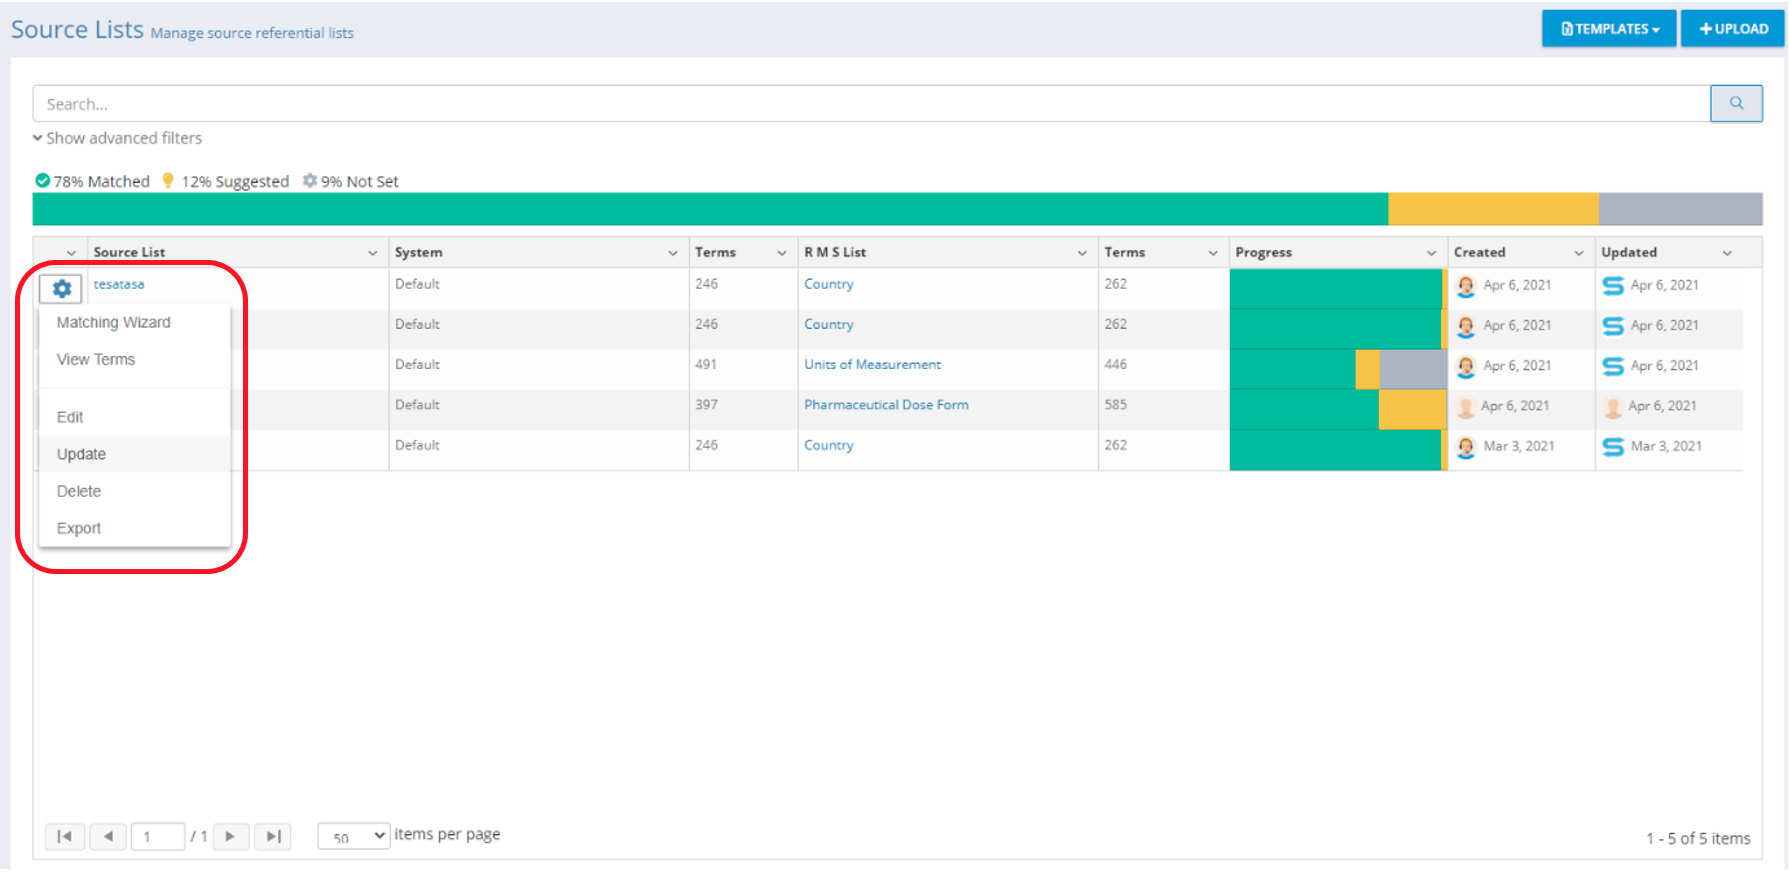
Actions Available on List
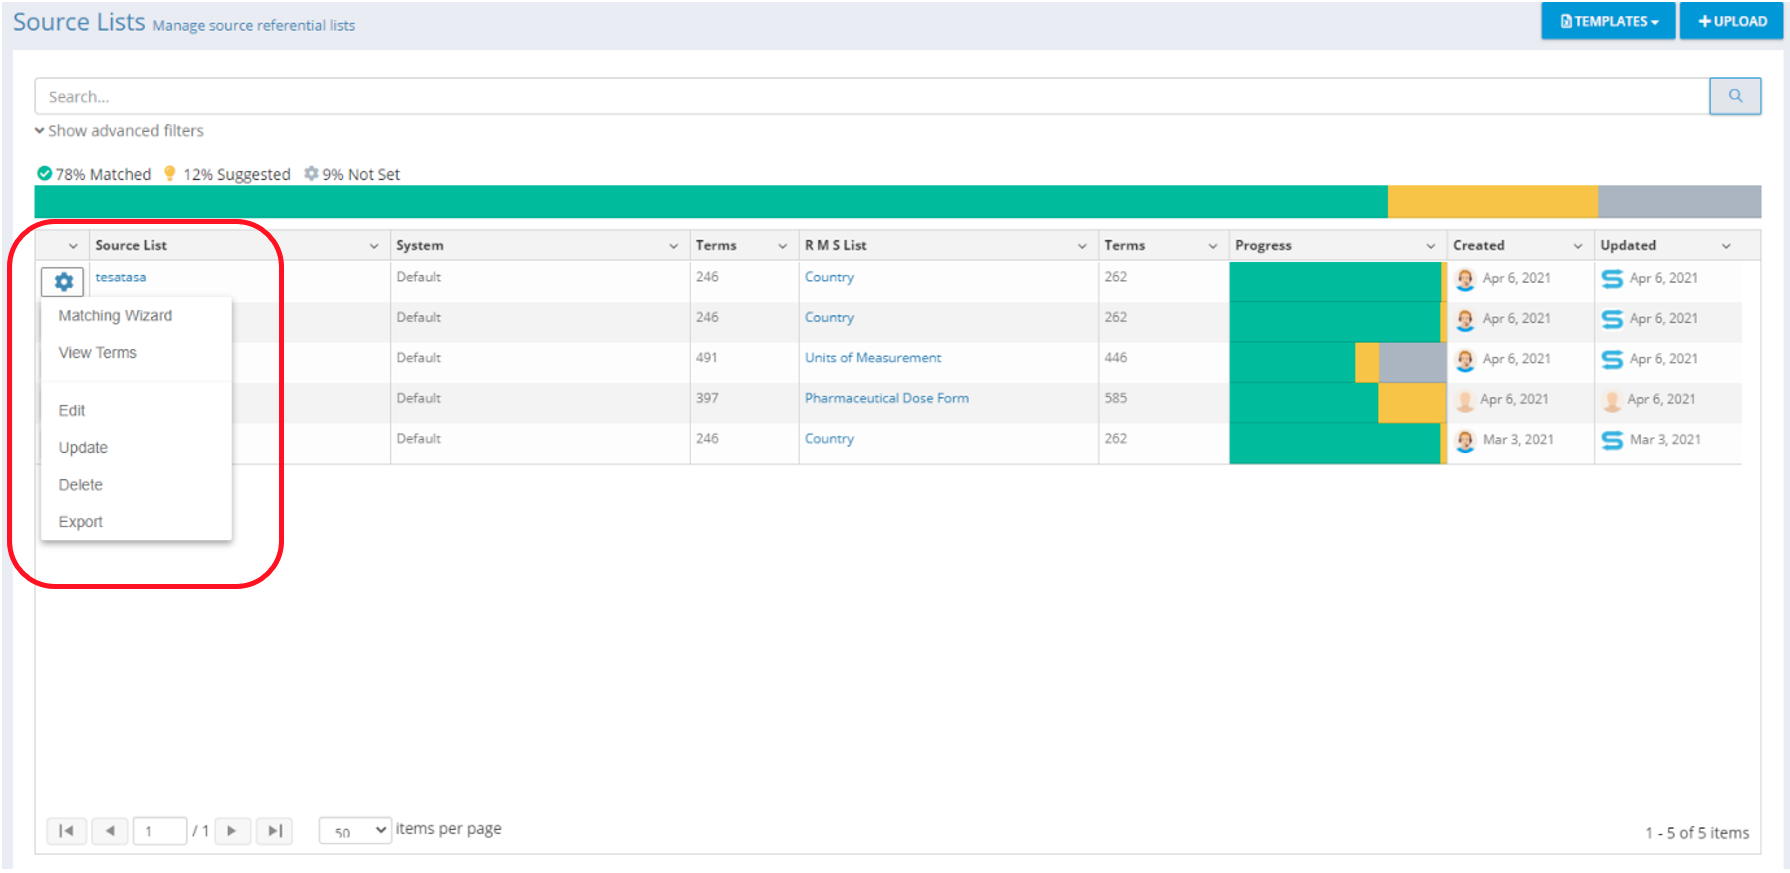
|
View Terms
Click View Terms to gain access to the list of terms. Here you can view all Source Terms and their associated mappings.
|
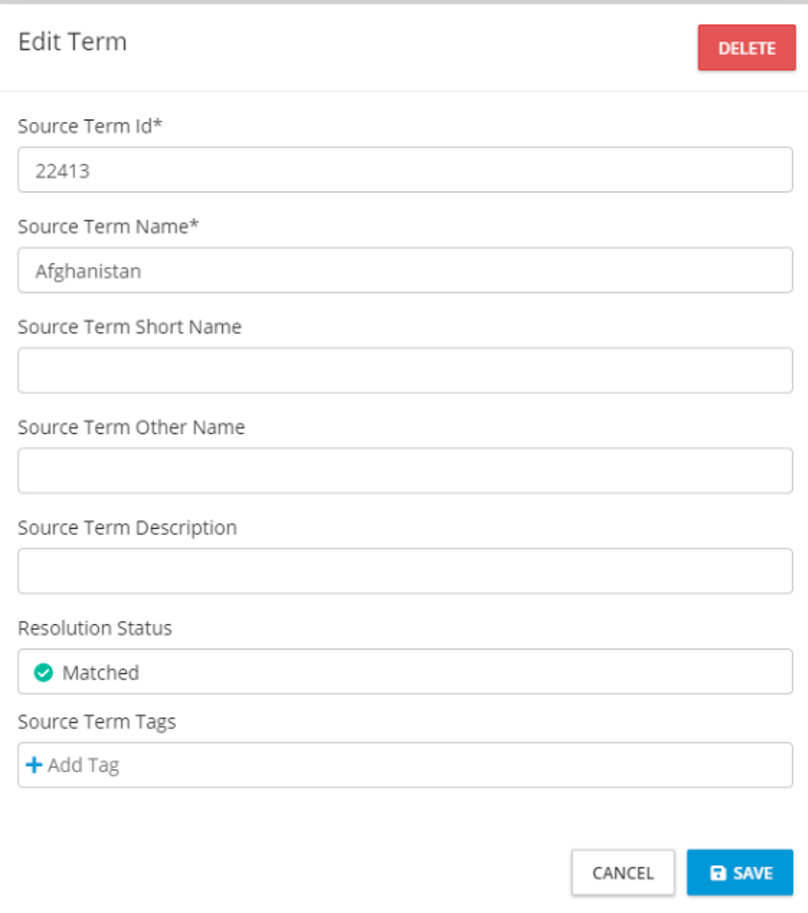
Edit
Click Edit to gain access to list information. Here you can edit the list name and associated system.

|
Edit Explained:
-
Edit List Name
-
Edit associated system

|
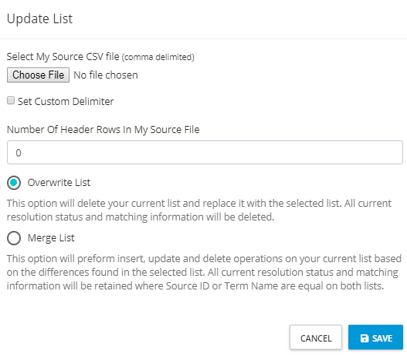
Update
Click Update to gain access to options related to updating your list content. Here you can select to overwrite the list or merge a new list to your existing list.
|
Update Explained:
-
Overwrite List:
-
This option will delete your current list and replace it with the selected list. All current Resolution Status, Source Tags and matching information will be deleted.
-
-
Merge List:
-
This option will perform insert, update and delete operations on your current list based on the differences found in the selected list. All current Resolution Status, Source Tags and matching information will be retained where Source ID or Term Name are equal on both lists.
-
|
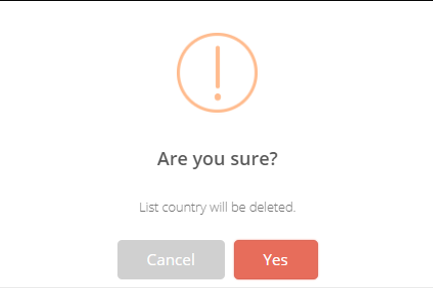
Delete
This option will delete your current list from SPORIFY. You will be prompted to confirm deletion. This operation is not reversible.
|
Export
The list will be exported to Excel. Exports will contain your original data and also the matched data and any associated Resolution Status, Tags or Data Insight.
Mapping
SPORIFY Mapping Explained
-
By default, SPORIFY will analyse your uploaded data and apply a Resolution Status to every term you have uploaded.
-
System Based Resolution Status:
-
Matched: SPORIFY has located an exact match for your term on the Target Referential list.
-
Multiple Choice: SPORIFY has located multiple exact matches for your term on the Target Referential list. Note: When matching to Hierarchical lists, multiple choice will be allocated where identical term names with different term IDs are related to different parent terms.
-
Suggested: SPORIFY found Target Referential Terms that are closely related to your local term.
-
Not Set: SPORIFY could not locate any term similar to your local term.
-
-
SPORIFY provides mapping functionality to both Hierarchical and Non- Hierarchical lists. When matching to a Hierarchical list the corresponding matched terms will display the term parent in sub text under the matched term. When reviewing suggestions, users can view parent term information by hovering their mouse over the relevant term name text in the list of returned suggestions.
-
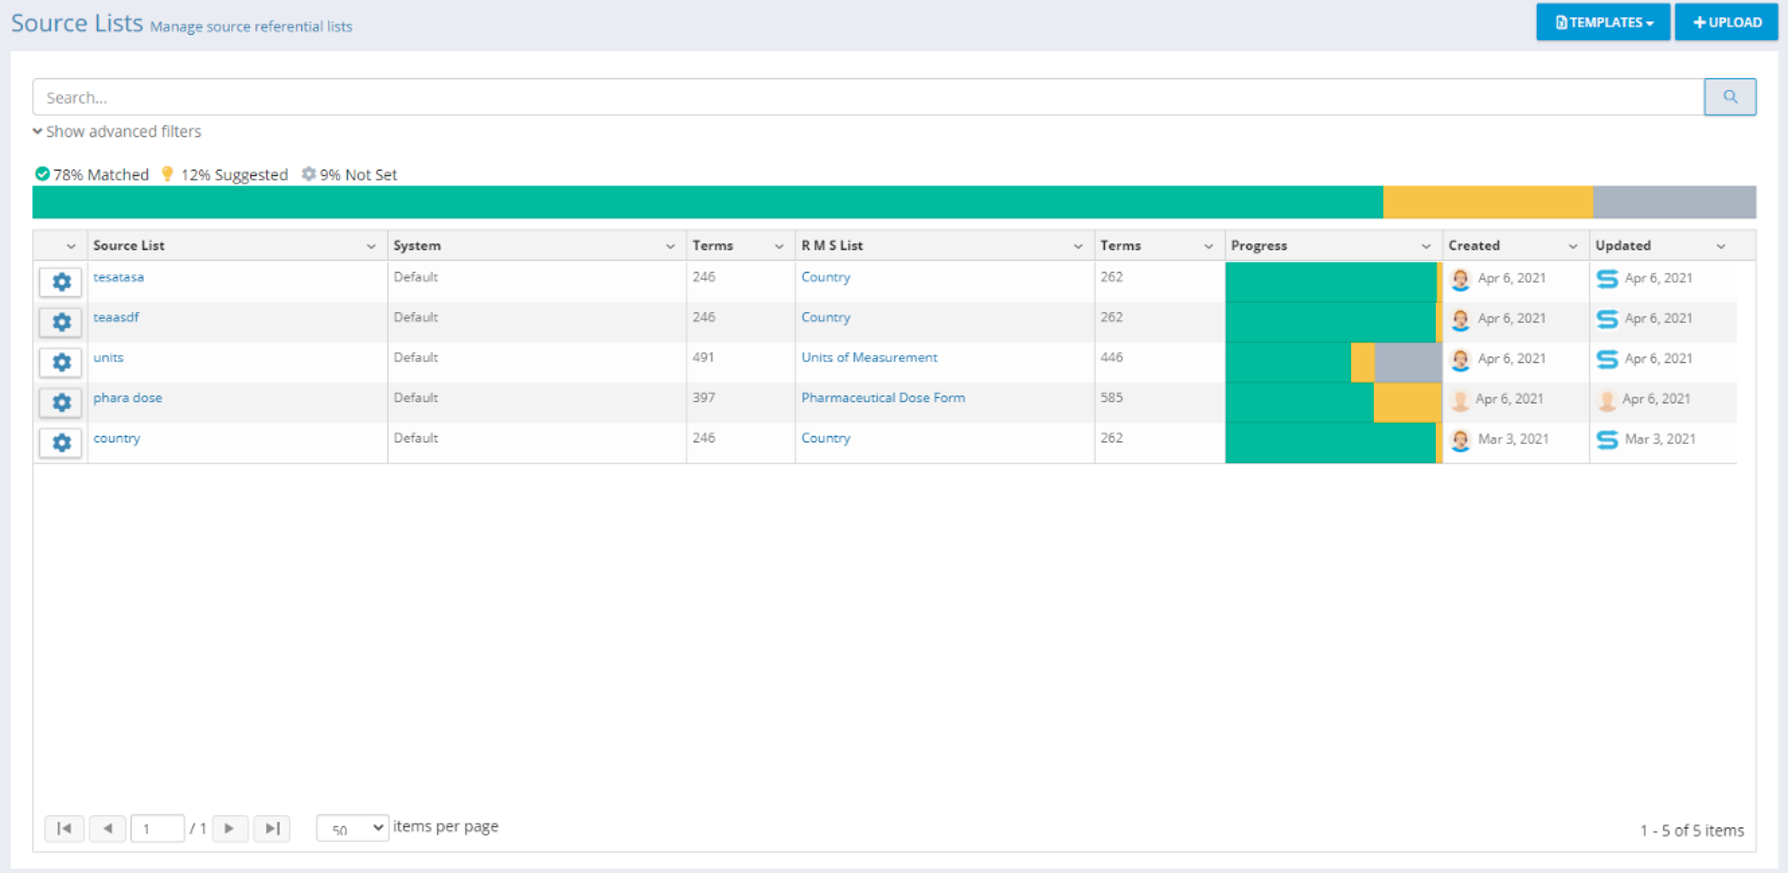
Once your lists are uploaded, each list will have a progress bar showing Resolution Status percentage for the given list.
-
Above all lists, an overall progress bar will show your Resolution Status percentage across all lists.
|
|
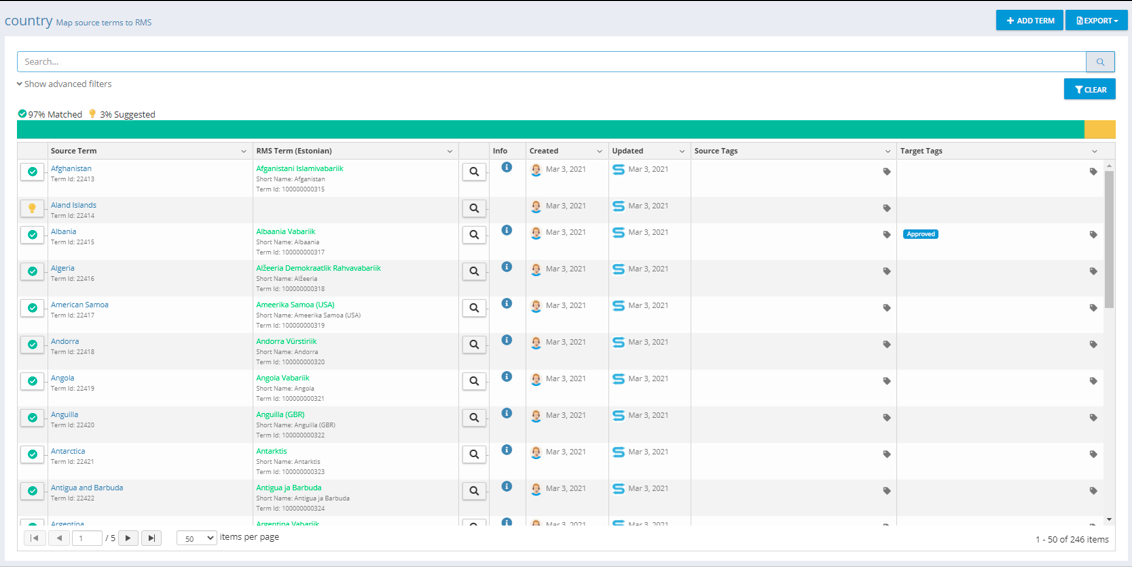
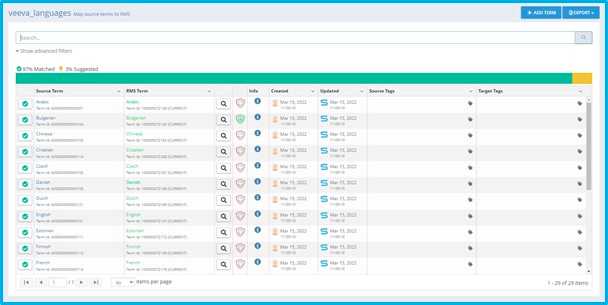
Manually Matching Terms
-
Click on Source List Name to move to the manual matching grid.
-
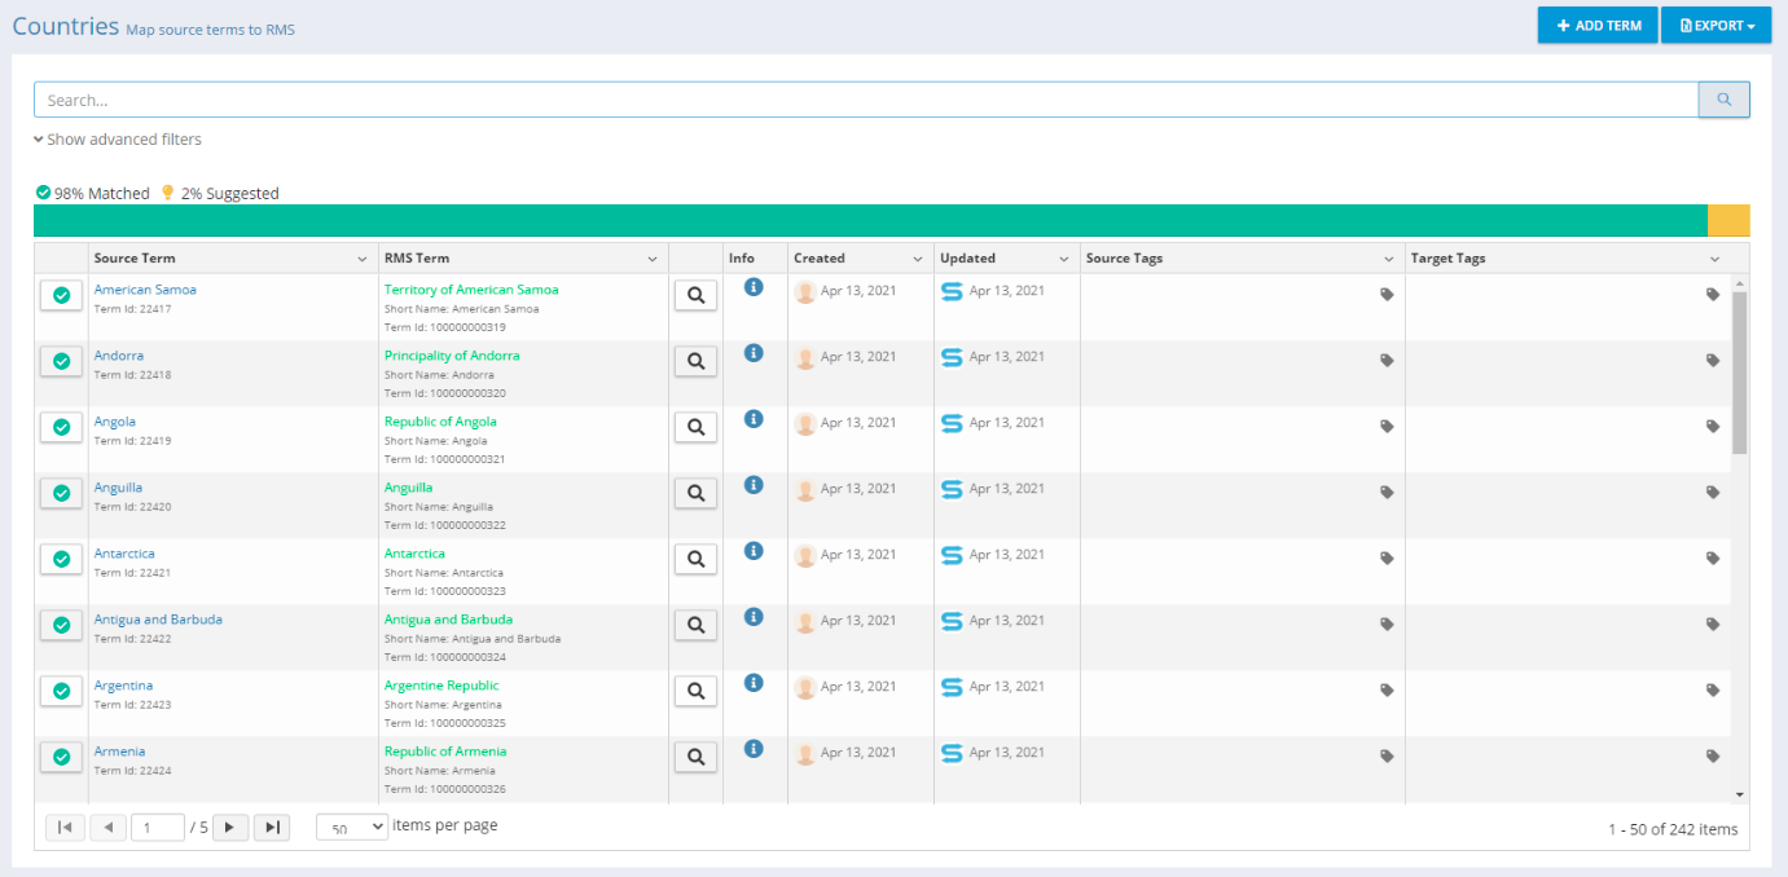
Matching Grid Explained
-
Resolution Status
-
Source Term
-
Subtext (where available)
-
Source ID
-
-
-
RMS Term
-
Subtext (where available)
-
Term ID
-
Short name
-
Symbol
-
Parent Term (Hierarchical lists)
-
-
-
Info: This column displays Match Type information e.g. exact or fuzzy match
-
Created: Who created this record and when
-
Updated: Who last updated this record and when
-
Source Tags: Tags associated to your local data
-
Target Tags: Tags associated to the Target Term Data
-
Assigning Data Tags to Source Data and Target Term Data
-
Assign Source Tags:
-
Method #1
-
Select the Source Term on the grid.
-
Click Add Tag and select one or more Tags as required.
-
Click Save.
-
|
-
Method #2
-
Select the tag icon under the Source Tags column on the data grid.
-
Add or remove tags as required from the Tags control.
-
Click Save.
-

|
-
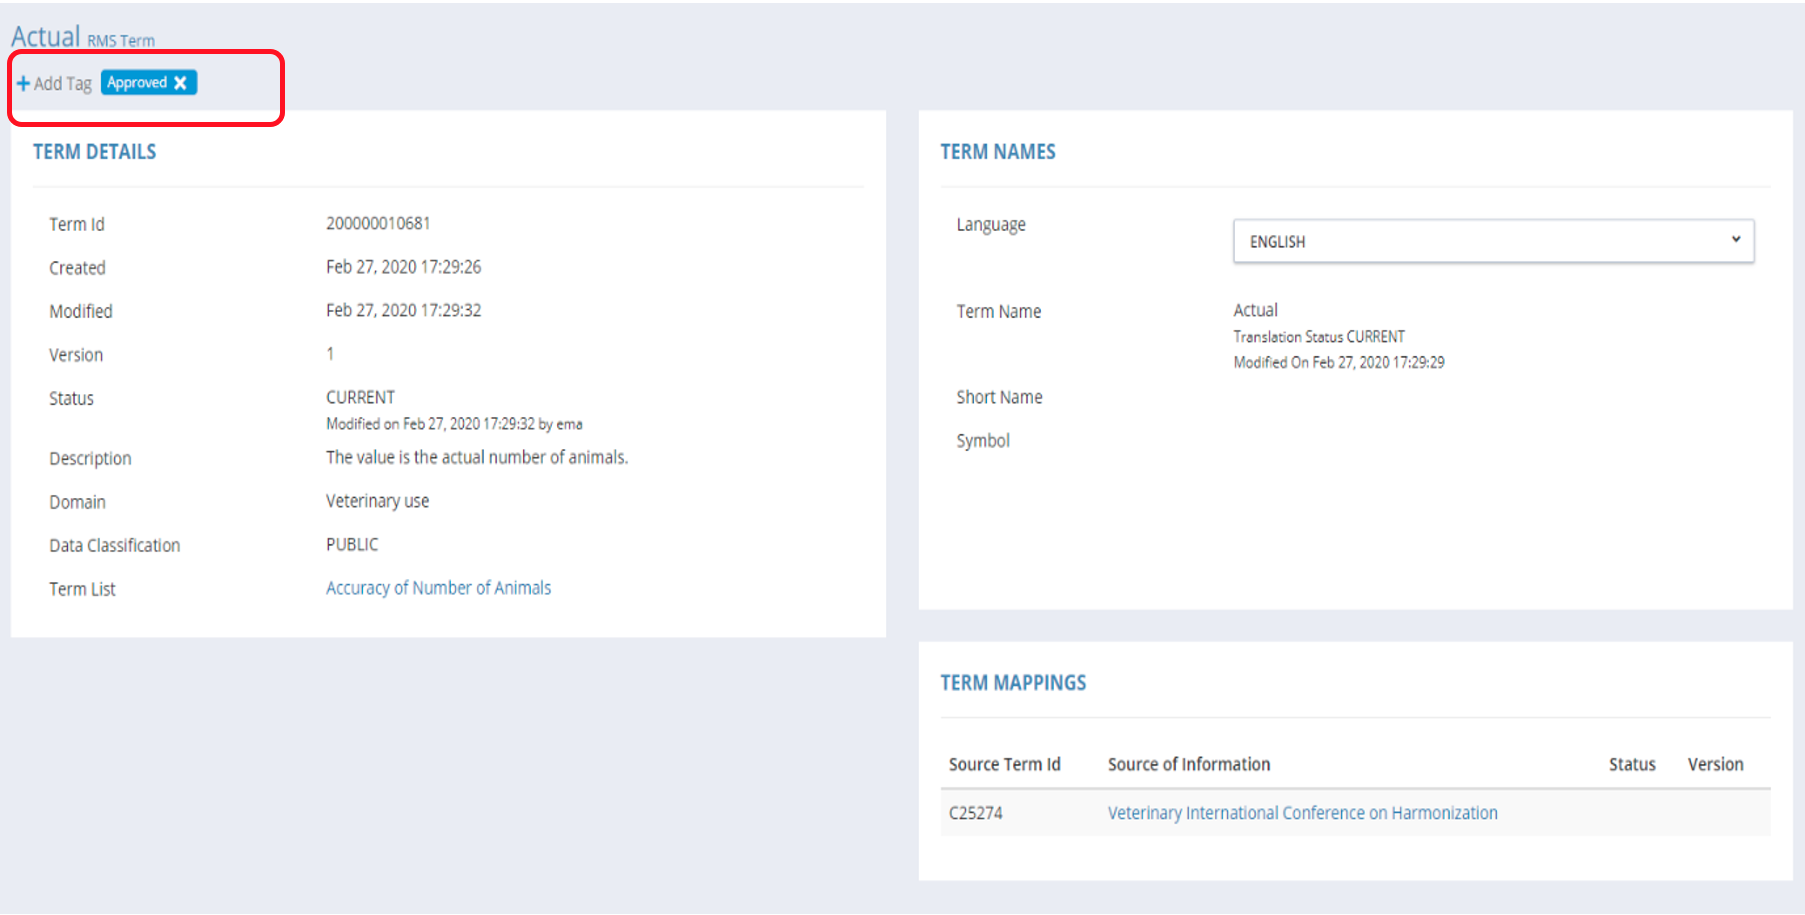
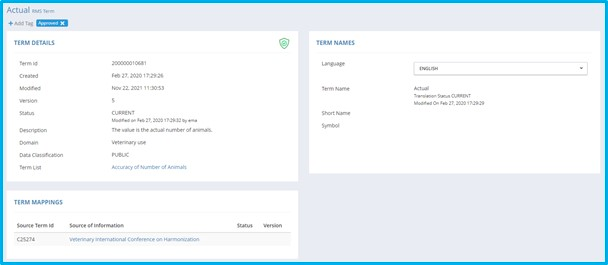
Assign Target Term Tags:
-
Method #1
-
Select the Target RMS Term on the grid.
-
You will be redirected to the Term Detail page for the selected term.
-
Add Tags by using the Add Tags input box under the Term Name heading.
-
Tags are automatically saved when assigned to Target Data.
-
|
-
Method #2
-
Select the tag icon under the Target Tags column on the data grid.
-
Add or remove Tags as required from the Tags control.
-
Click Save.
-

|
Searching and Advanced Filters
-
Search across the data in the data grid using the following fields:
-
Source Term
-
RMS Term
-
-
Advanced filters allow data to be filtered by the following fields:
-
Status
-
Match Type (dependent on status selected)
-
Language
-
Tag
-
-
Refresh: Refresh the data grid with the results of the selected filters.
-
Clear: Reset all filters to default.
Export
Export is where you access your Mapped Data. Exports will contain your original data and also the matching RMS data and any associated Resolution Status, Tag or Data Insight. Remaining RMS items are also provided on the exported file. This informs you of the items you are missing from your Source Data.
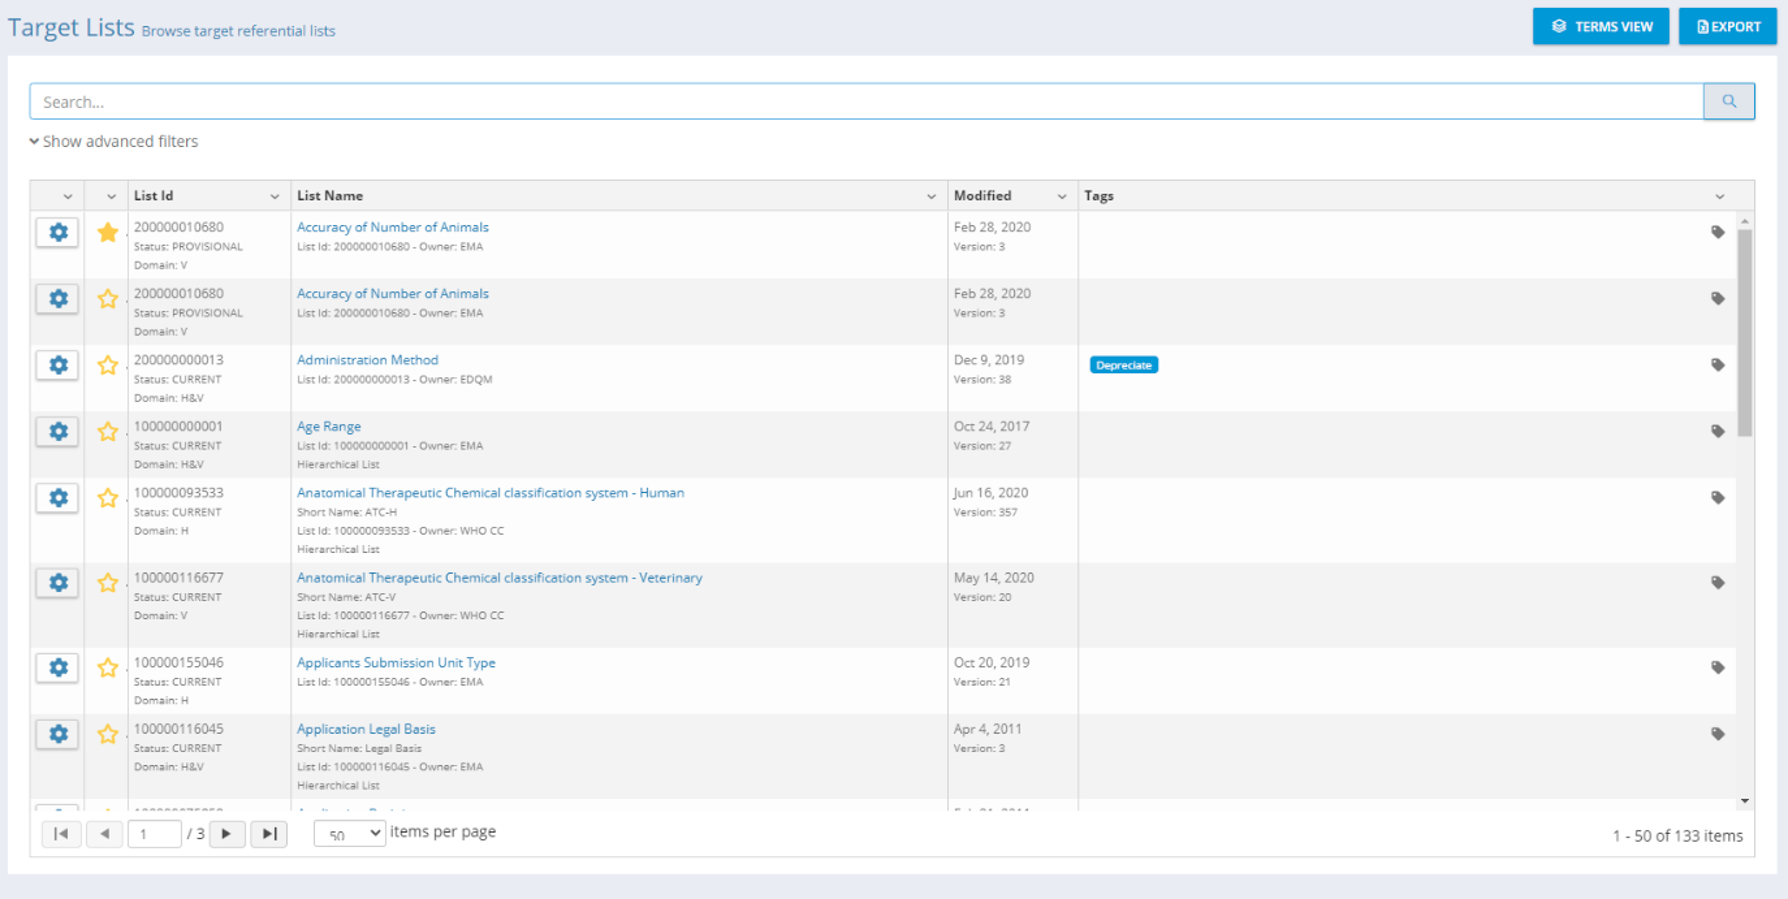
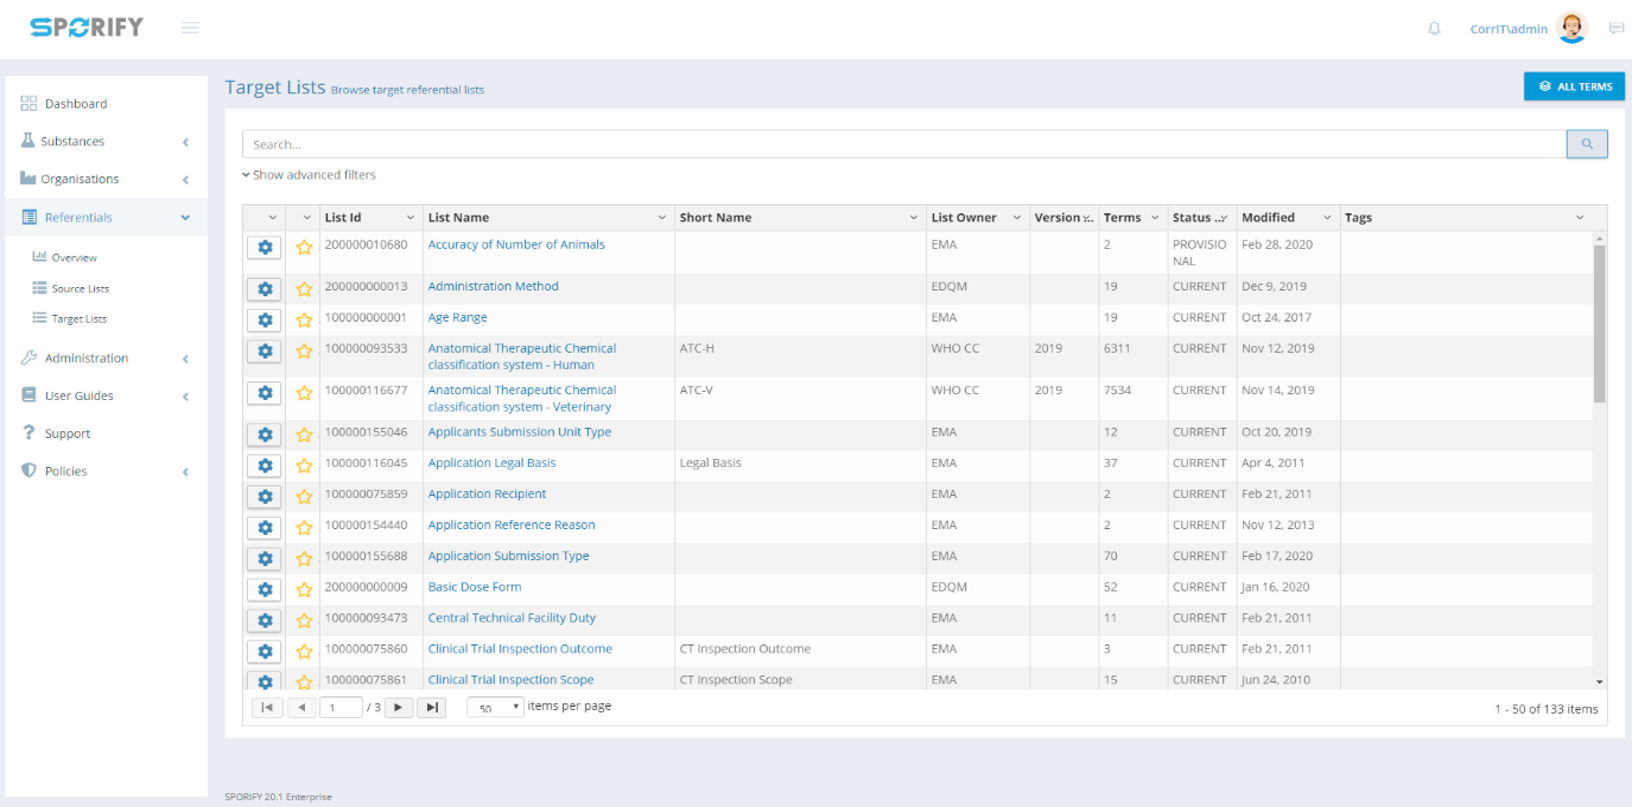
Target Lists (Term View)
|
Target Lists
List View
-
Search: List Name across all available lists.
-
Filters:
-
Favourites: Limit your search to lists marked as a favourite.
-
Domain: Limit your search to the selected domain.
-
List Status: Limit your search to the selected status.
-
List Owner: Limit your search to the selected owner.
-
Tags: Limit your search based on Tags you have applied to the Target Data.
-
-
Refresh: Clicking the Refresh button will update the dataset based on the selected search and filters applied.
-
Clear: When filters are present, a Clear button will appear which you can click to clear all filters at once.
List View Grid
The Target List grid is designed to provide as much information about a given list as possible while remaining user friendly. Hyperlinks are provided inside the grid on the List Name column to navigate to pages with more detail regarding the selected item.
-
List ID:
-
Subtext (where available)
-
Status
-
Domain
-
-
-
List Name:
-
Subtext (where available)
-
List ID
-
Owner
-
Hierarchical List (Hierarchical lists only)
-
-
-
Modified:
-
Modified date of the Term and the associated Term Version number in subtext.
-
|
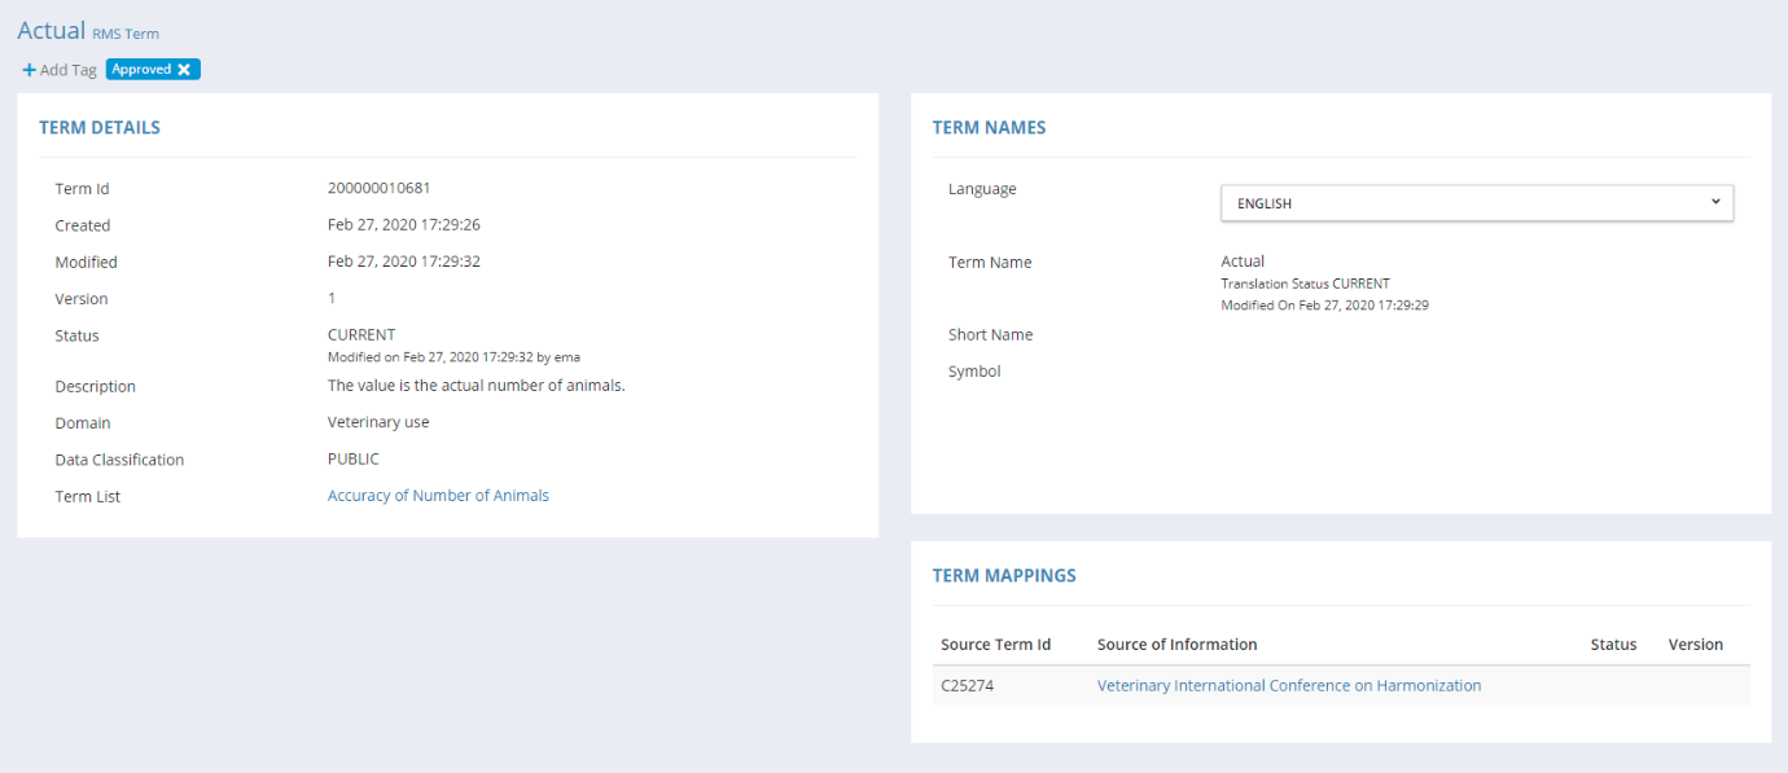
Term View
-
Search: Term Name across all available lists.
-
Filters:
-
RMS List: Limit your search to the selected list.
-
SPOR Languages: Display the Term Name in the selected SPOR language where available.
-
Domain: Limit your search to the selected domain.
-
Term Status: Limit your search to the selected status.
-
Translation Status: Limit your search to the selected translation status.
-
Tags: Limit your search based on Tags you have applied to the Target Data.
-
-
Refresh: Clicking the Refresh button will update the dataset based on the selected search and filters applied.
-
Clear: When filters are present, a clear button will appear which you can click to clear all filters at once.
-
Follow Lists: Clicking the Follow Lists button will navigate you to a page listing all available lists. You can follow any list by clicking the star icon to the left of the list.
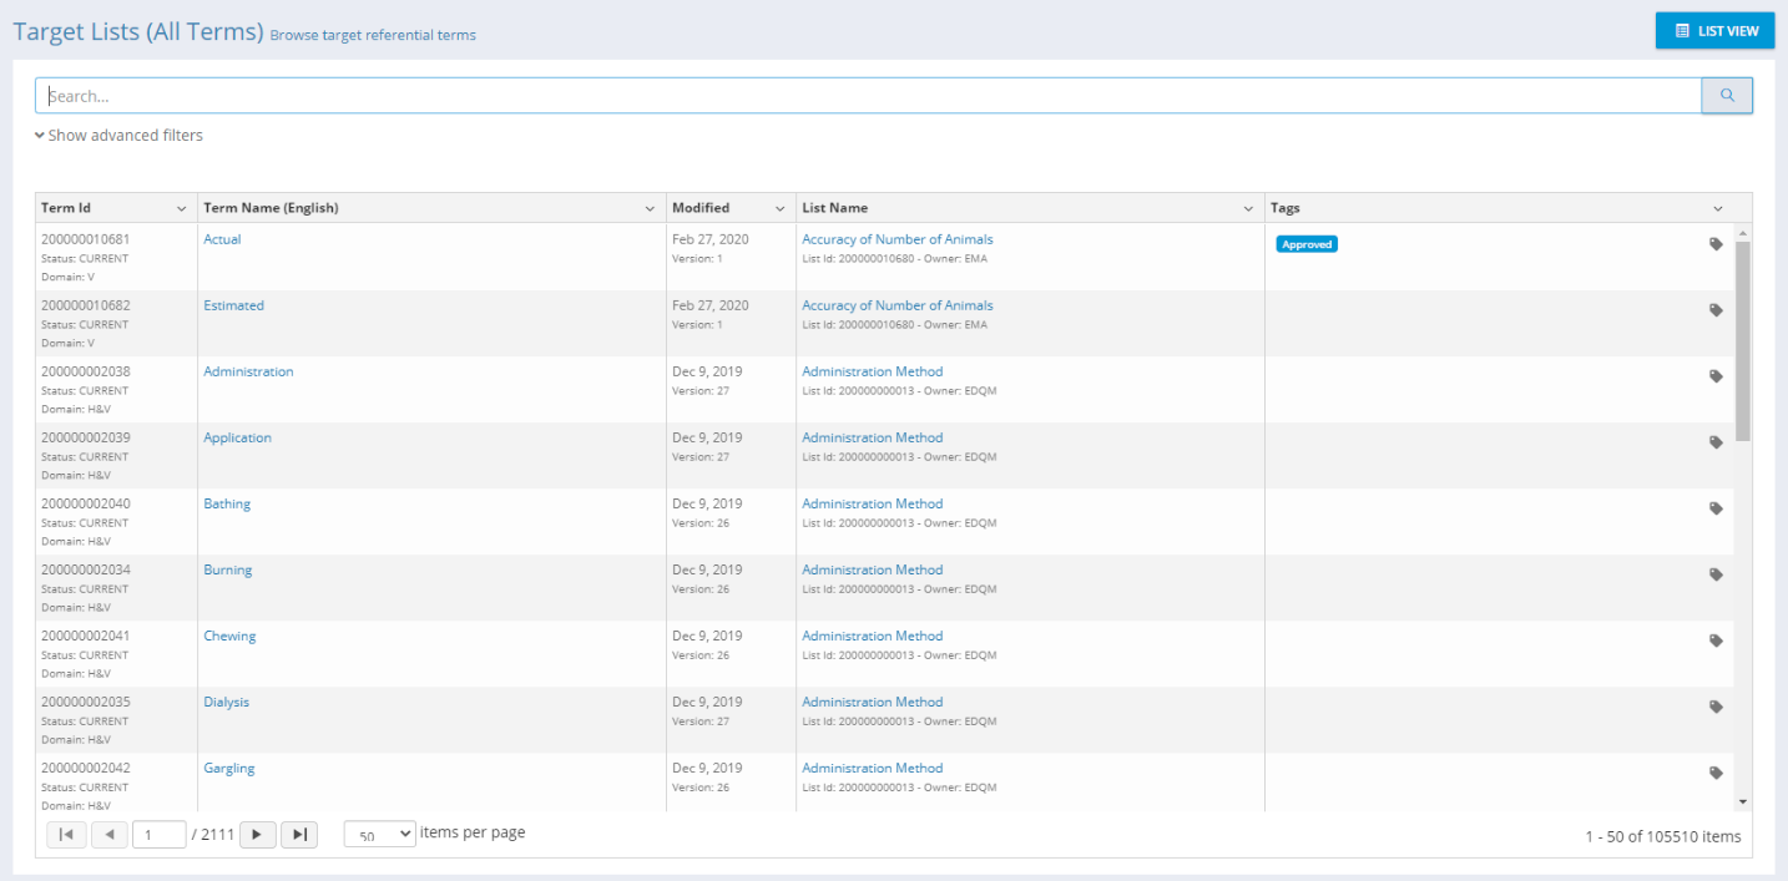
Target List (All Terms) Grid
The Term View All Terms grid is designed to provide as much information about a given term and its current status as possible while remaining user friendly. Hyperlinks are provided inside the grid on the Term Name, List Name and List ID to navigate to pages with more detail regarding the selected item.
-
Term ID:
-
Subtext (where available)
-
Term Status
-
Domain
-
-
-
Term Name (language): Term Name in displayed language and associated translation status.
-
Subtext (where available)
-
Term ID
-
Short name
-
Symbol
-
Parent Term (Hierarchical Lists)
-
-
Clicking the Term Name will navigate to the Term Detail page.
-
Clicking the Parent Term Name will navigate to the Parent Term Detail page.
-
-
Modified: Modified date of the Term and the associated Term Version number in subtext.
-
List Name: Name of the list on which the Term can be found. Clicking the name will navigate to the List Term page. Clicking the List Name will navigate to the List Term Page.
-
Subtext (where available)
-
List ID
-
Clicking the List ID will navigate to the List Detail page.
-
-
List Owner
-
-
Tags

|
Follow Favourites
To follow all changes to a given list, select the star to the left of the list ID on the grid.
|
|
|
Note: Selecting a Term Language on this page will take you to the All Terms page for the selected list prefiltered to the clicked language.
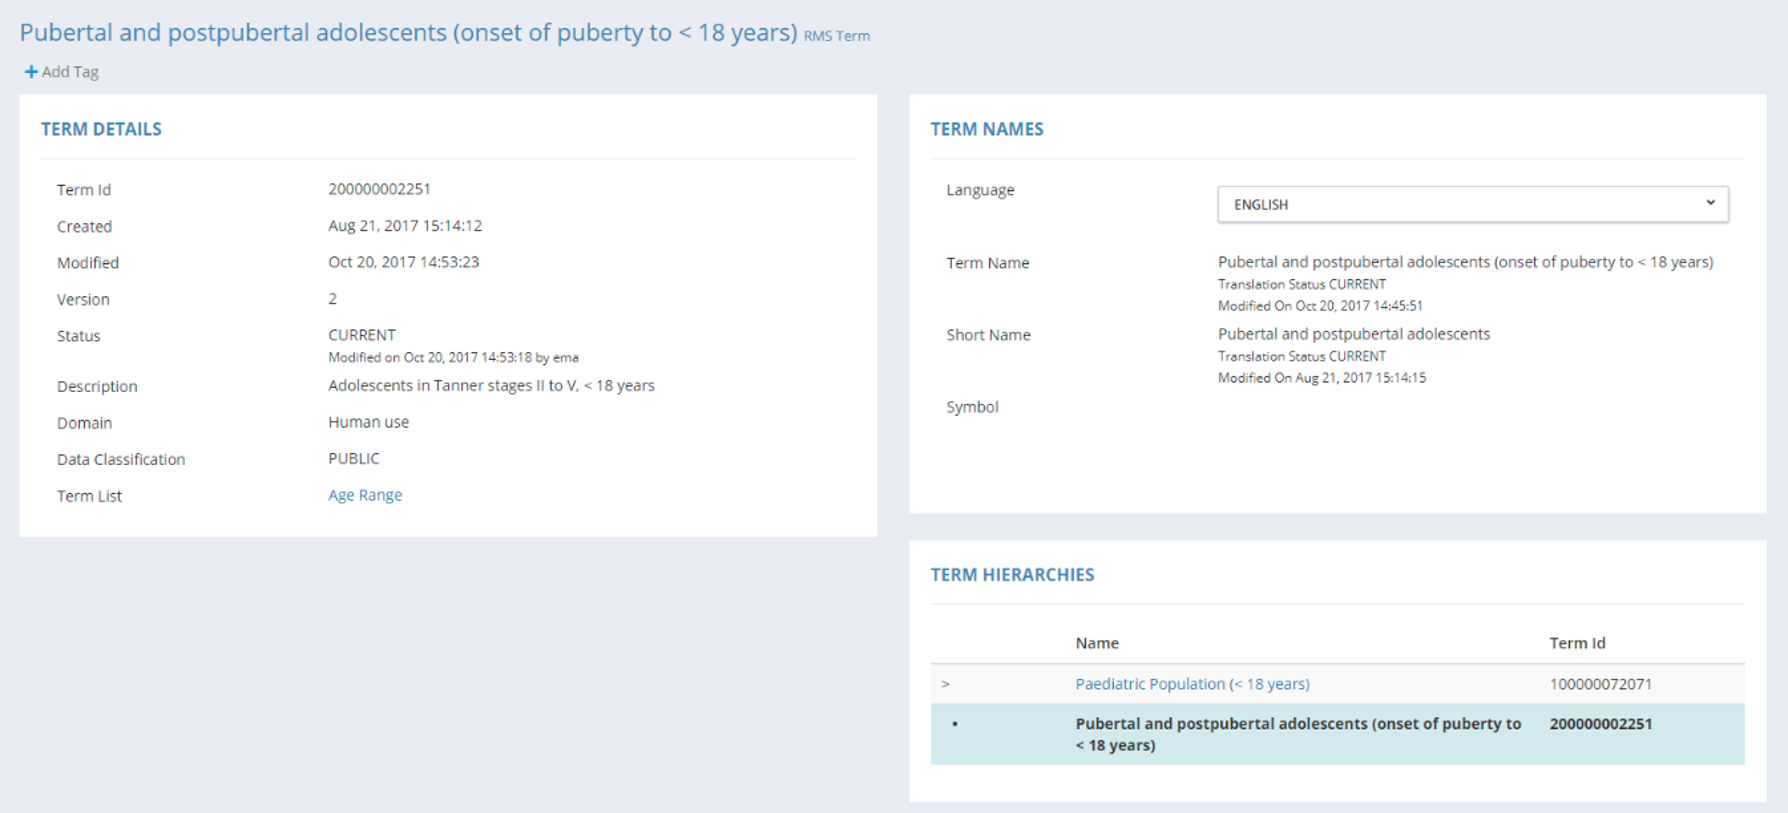
Hierarchical Lists
Hierarchical Lists are lists with terms that can be related to each other. A Hierarchical Term may have one or more Parent Terms associated with it.
Hierarchical Lists are denoted as Hierarchical in SPORIFY under the given List Name on the List Data grid and also under the List Name heading on the List Detail page.
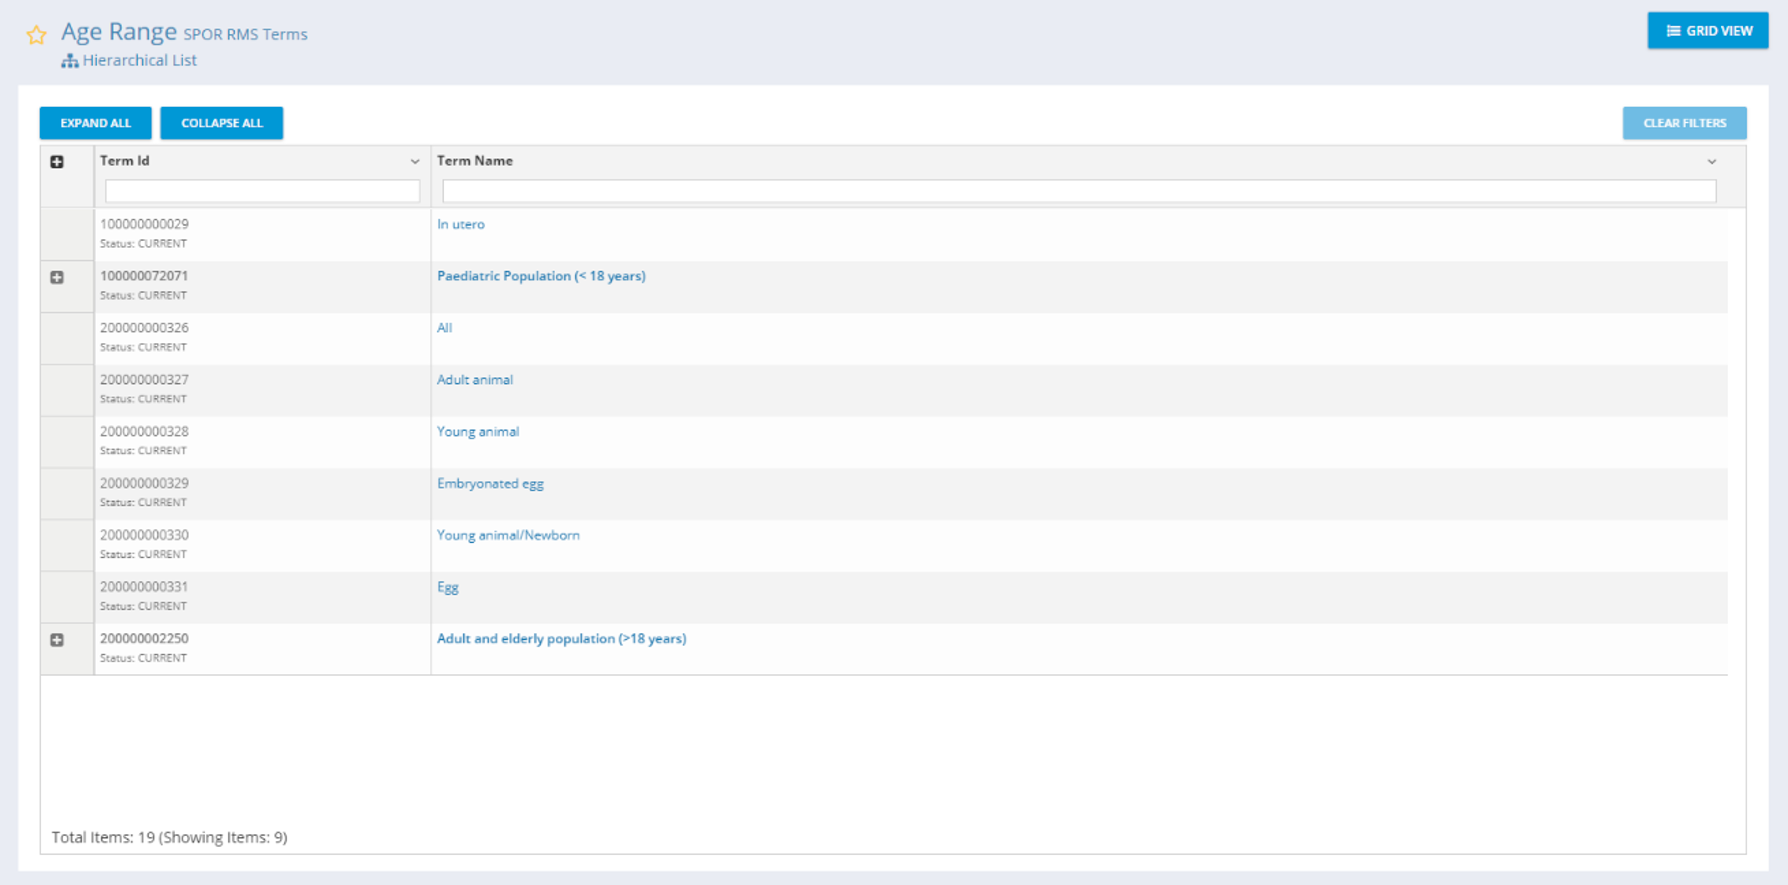
Hierarchical lists have an additional view option known as Hierarchy View.
While in Hierarchy View, terms are displayed in a tree view structure. Parent Terms are displayed with a + button on the left side of the grid, which can be expanded to show related Child Terms. Hierarchies can be multiple layers deep and the + button can be used to expand or collapse the Hierarchy as required.
Term ID: Term ID
-
Subtext (where available)
-
Term Status
-
Term Name: Clicking the Term Name will navigate to the Term Detail page
|
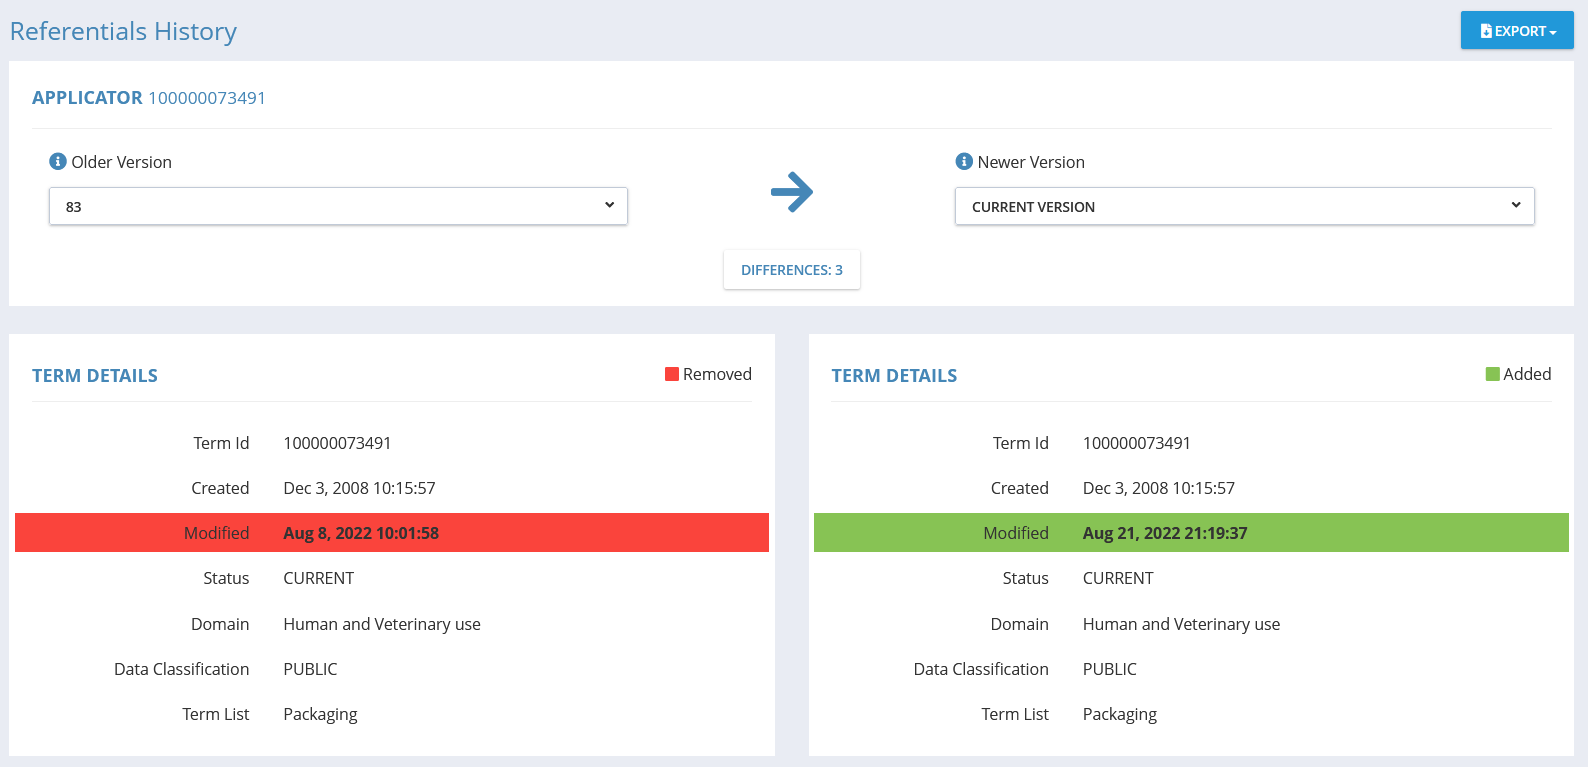
History Comparison
|
SPORIFY is monitoring changes on RMS Terms and provides a history comparison feature to compare the two versions of a term and highlight the changes. Every changed value is highlighted with a color:
-
Green represents a value that was added
-
Red represents a value that was modified or removed.
The change are captured for Term Details, Term Names, Description and Term Mappings. The total number of differences between two selected versions is displayed in the center of the screen.
Available Actions:
-
Older Version
-
Newer Version
-
Export
Note: Full data history is not available from SPOR. SPORIFY will archive all available versions while synchronising for comparison purposes.
Data Governance
When Data Governance is switched on for this domain, target data records can be governed via Referentials Source Lists, Referentials Target Lists and Referentials Term Details screens. Referentials target data records will be governed at term level.
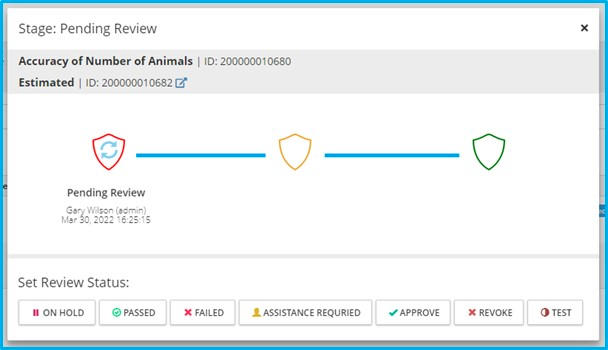
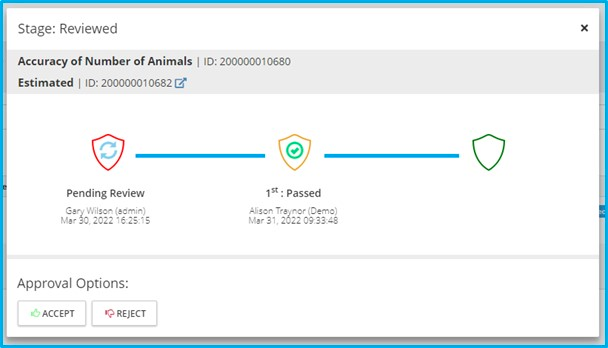
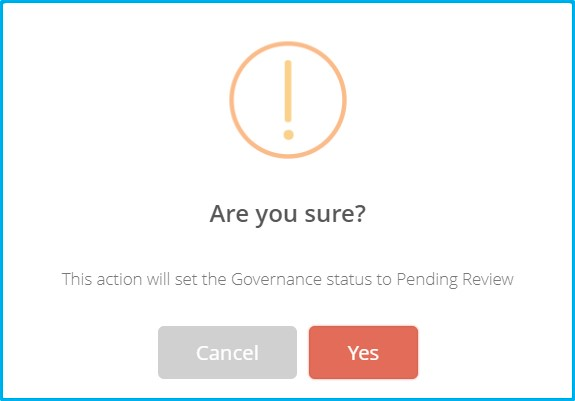
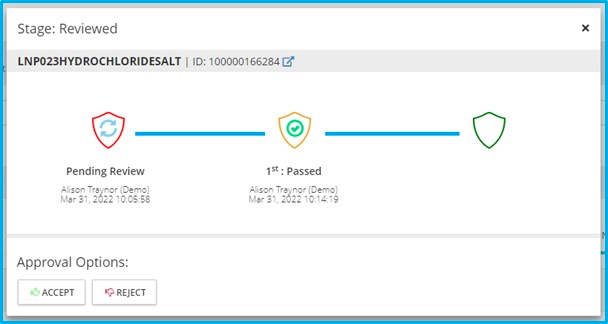
A record’s data governance status is initially set to Pending Review. The reviewer can then set a custom status and add an optional comment and the approver can thus accept or reject this status. Comments will be visible by hovering over the comment icon. If the approver rejects the status, then the record is set back to Pending Review. Any approver can also reject an item after it has already been approved to restart the process.
If the 4 eye principle is switched on, the reviewer and approver cannot be the same user.
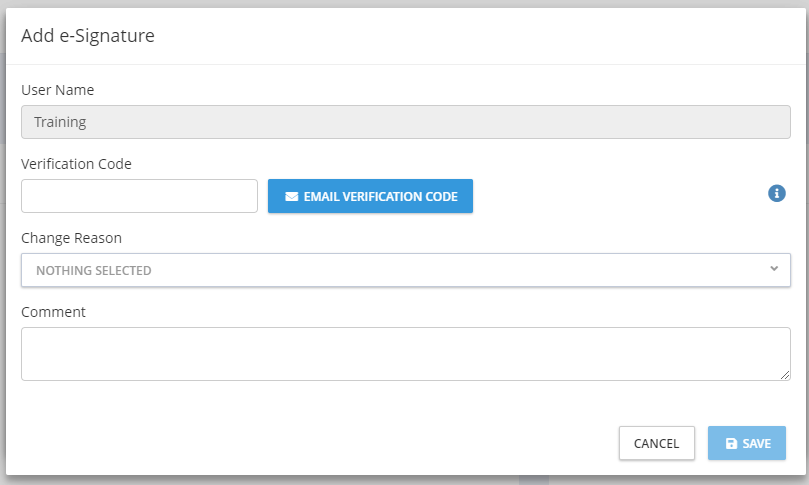
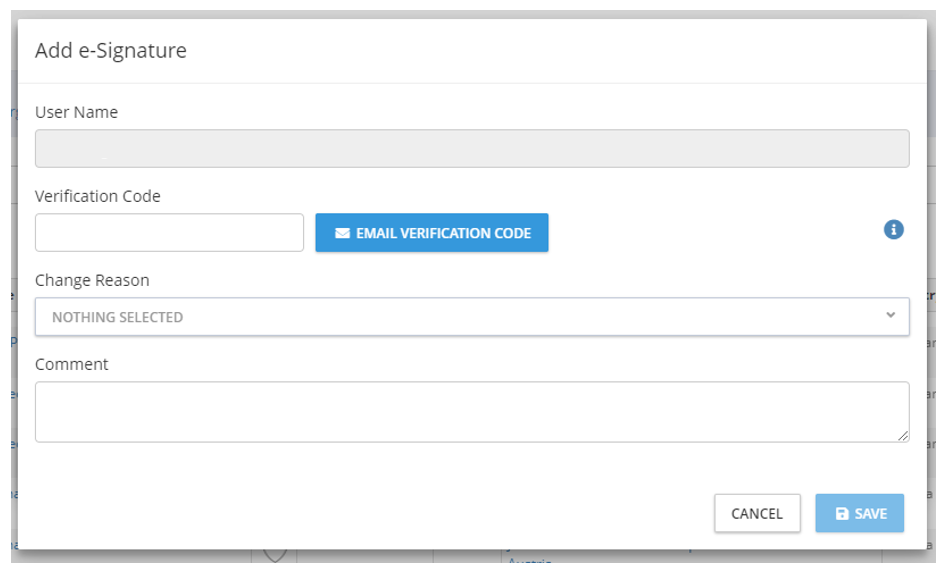
If e-signature is switched on, the user must apply an e-signature to approve the record.
|

|
|
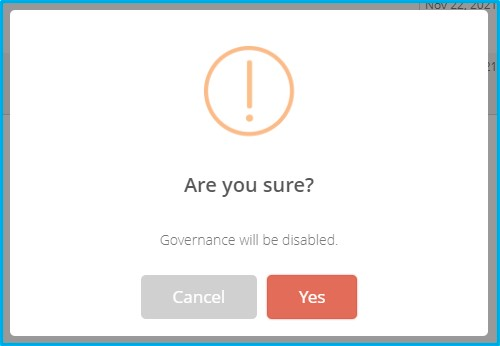
Available Actions:
-
Enable
-
Disable
|
-
Govern (Stage: Pending Review)
-
Set Review Status
-
Add Comment
-
-
|

|
-
Govern (Stage: Reviewed)
-
Accept
-
Username
-
Verification Code
-
Change Reason
-
Comment
-
-
Reject
-
|
|
|
Change Requests
SPORIFY provides an Referentials Change Request module to view and manage updates regarding lists and terms to SPOR RMS within SPORIFY.
|
-
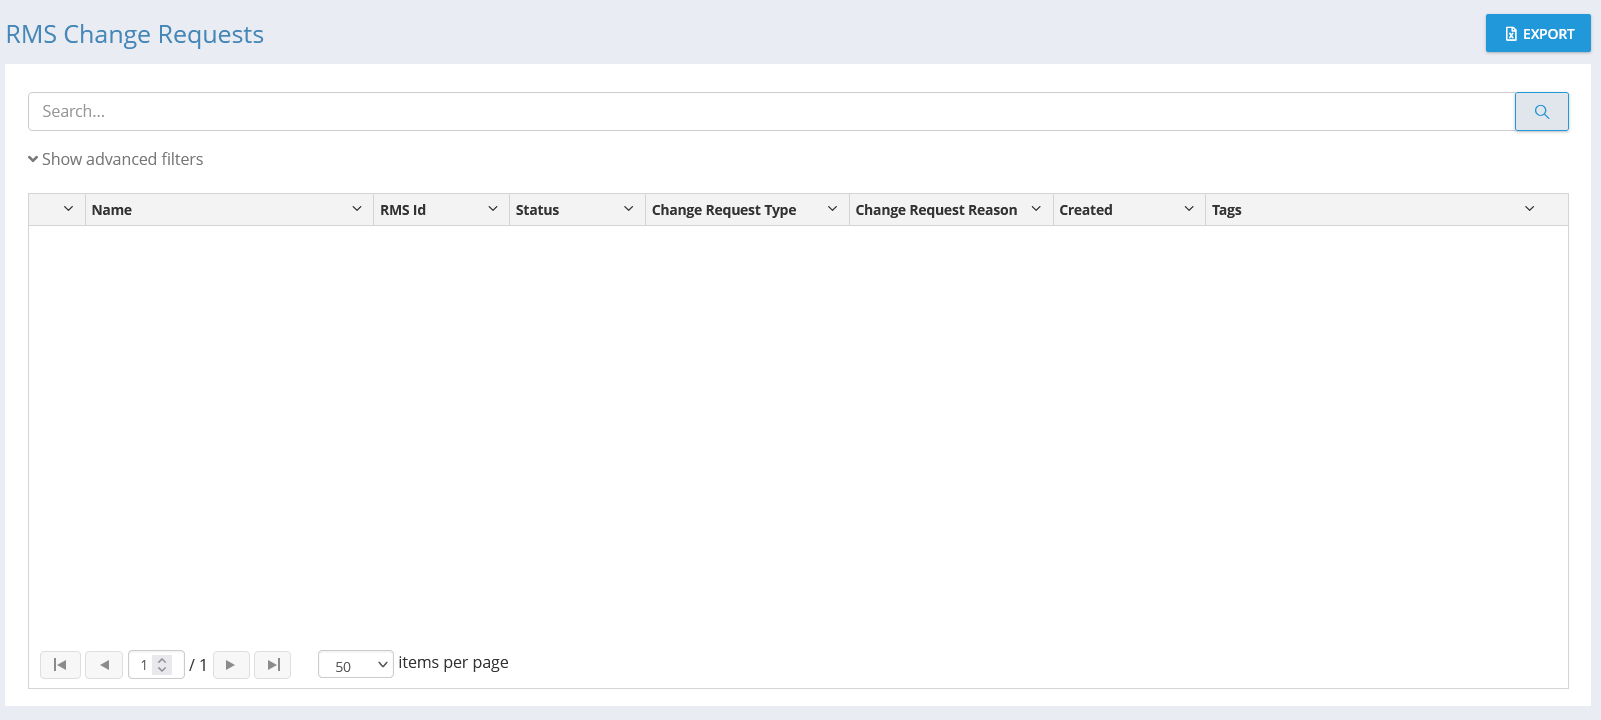
Change Requests lists can be accessed by selecting Referentials on the navigation menu, then Change Requests. Here, it lists the change requests that SPORIFY has synchronised from SPOR. Clicking on a name link brings up the associated details page.
-
The link in the Details column of any given change request shows further information, including information relating to Change Request Details, Location Details, Status Changes, Referentials Details, and Supporting Documents.
-
Any comments associated with a change request can be viewed by hovering over the speech bubble icon beside the record’s name in the Name column.
-
Change requests can be exported using the Export button.
-
Submitted change requests are available to view on the Target System Activity area of the dashboard using the SPOR RMS tab. They also appear in Notifications. Clicking these areas will bring you to the Target System Activity screen where you can view more details.
-
The System advanced filter’s RMS Change Requests option used in conjunction with the Refresh button brings up a list of all RMS change requests.
-
SPORIFY’s Change Requests feature synchronises with SPOR everyday.
Organisations
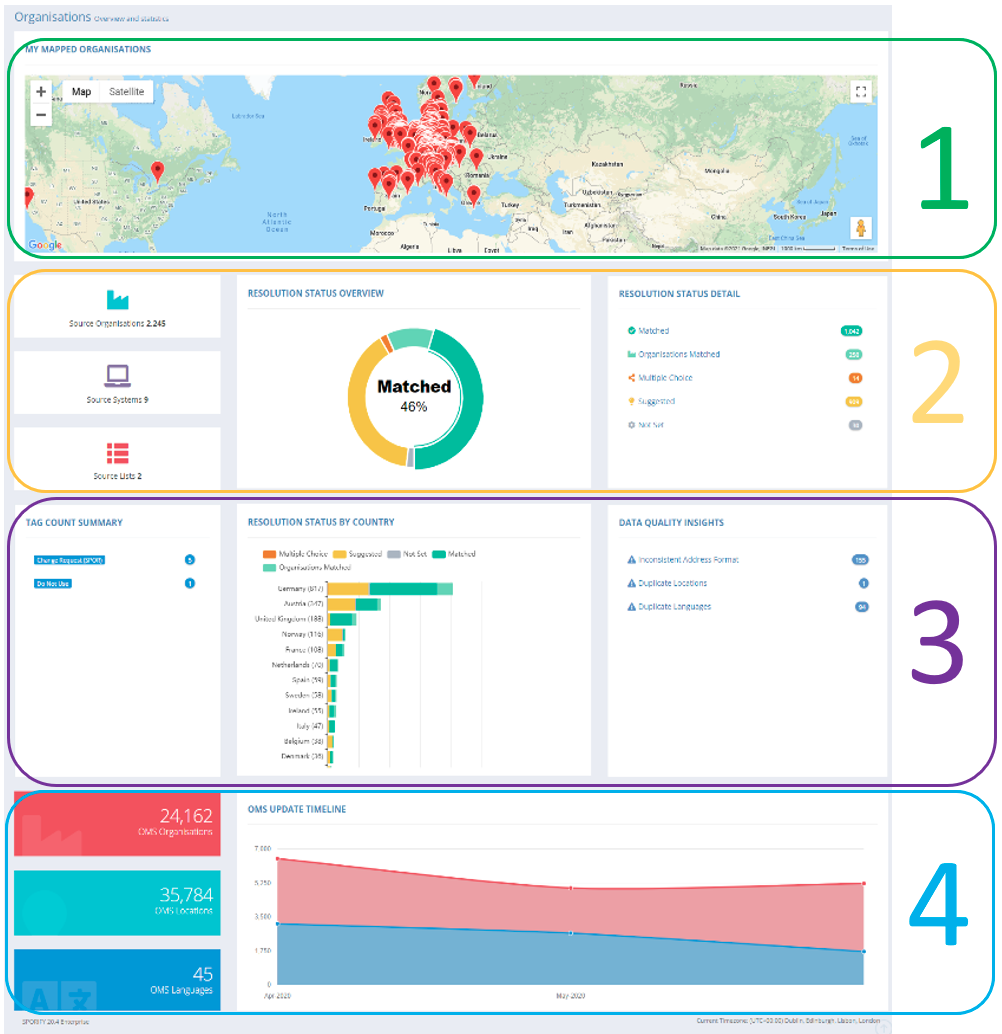
Overview
|
Overview Explained:
Panel 1:
-
My Mapped Organisations: Pinned locations that you have matched
Panel 2:
-
Overview of your data:
-
Count of your local data by Systems, Lists and Organisations
-
Chart showing your data by Resolution Status
-
Resolution Status details
-
Panel 3:
-
Tag Count Summary
-
Overview of Resolution Status by source country
-
Data Quality Insights Summary
Panel 4:
-
OMS Locations, Organisations and Languages
-
OMS Update timeline
Source Lists (Mapping)
|
Template: Formatting Source Data
-
How to format your Source Data:
-
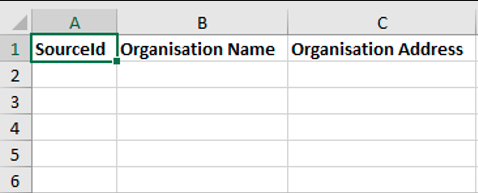
Download the Standard Organisations Excel or CSV Template by clicking on the Templates action button. This template can be used for all of your Source Organisation lists.
-
Data Format Required: SPORIFY requires three mandatory pieces of information to carry out Organisation & Location Mapping:
-
Source ID (Unique Local Database ID)
-
Organisation Name
-
Organisation Address
-
Note: Your address can be spread over multiple columns. SPORIFY will take every column after column three and include it as the source address.
-
-
Using Excel: If your workbook has multiple worksheets, you must select the required worksheet to import from.
-
By default, the system expects CSV files to be delimited with a comma.
-
Set Custom Delimiter: If your CSV file is delimited with a character other than a comma, you can set your custom delimiter here. A custom delimiter can be up to three characters in length.
-
If your column text contains the delimiter character, the text should be wrapped in quotation marks. For example, Street1, Street2, City, State, Country, Postcode should be formatted as “Street1, Street2, City, State, Country, Postcode” to correctly import the delimiter character.
-
CSV files should be saved with UTF-8 encoding to preserve special characters.
-
|
Sample Populated Template Excel file. Data Format: “Source ID, Organisation Name, Organisation Address”

|
Sample Populated Template CSV file. Data Format: “Local ID, Organisation Name, Organisation Address”
-
How to format your Source Data, including existing Organisation or Location mappings:
-
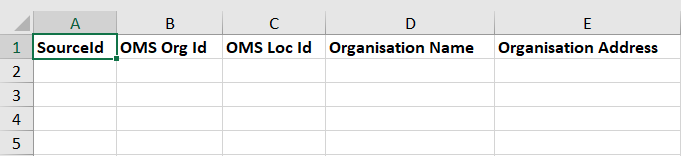
Download the Advanced Organisations Excel or CSV Template by clicking on the Templates action button. This template can be used for all of your Source Organisation lists, which already has explicit mappings to OMS ORG-ID or LOC-ID.
-
Data Format Required: SPORIFY requires three mandatory pieces of information to carry out Organisation & Location Mapping:
-
Source ID (Unique Local Database ID)
-
OMS Org Id
-
OMS Loc Id
-
Organisation Name
-
Organisation Address
-
-
Note: Your address can be spread over multiple columns. SPORIFY will take every column after column three and include it as the source address.
-
Using Excel: If your workbook has multiple worksheets, you must select the required worksheet to import from.
-
By default, the system expects CSV files to be delimited with a comma.
-
Set Custom Delimiter: If your CSV file is delimited with a character other than a comma, you can set your custom delimiter here. A custom delimiter can be up to three characters in length.
-
If your column text contains the delimiter character, the text should be wrapped in quotation marks. For example, Street1, Street2, City, State, Country, Postcode should be formatted as “Street1, Street2, City, State, Country, Postcode” to correctly import the delimiter character.
-
CSV files should be saved with UTF-8 encoding to preserve special characters.
-
|
Sample Populated Template Excel file. Data Format: “Source ID, OMS Org Id, OMS Loc Id, Organisation Name, Organisation Address”

|
Sample Populated Template CSV file. Data Format: “SourceId,OMS Org Id,OMS Loc Id,Organisation Name,Organisation Address”.
Upload: Importing Data

|
Fields Explained:
-
List Name: Local list name/friendly name which you will recognise for your internal list.
-
System: Name of the local System that your list is from. Custom System Names is subject to subscription level. If only one system is available, the name is always “Default”.
-
Select My Source Excel or CSV File: Browse your computer network and select the source file to upload. The system expects CSV files to be delimited with a comma.
-
Set Custom Delimiter: If your CSV file is delimited with a character other than a comma you can set your custom delimiter here. A custom delimiter can be up to three characters in length.
-
Number of Header Rows in My Source File: If your file contains header information you can enter the number of rows you wish SPORIFY to skip when importing your data.
-
Click Save to import your data and run the SPORIFY matching algorithms.
-
Click Cancel to clear all fields and return to previous screen.
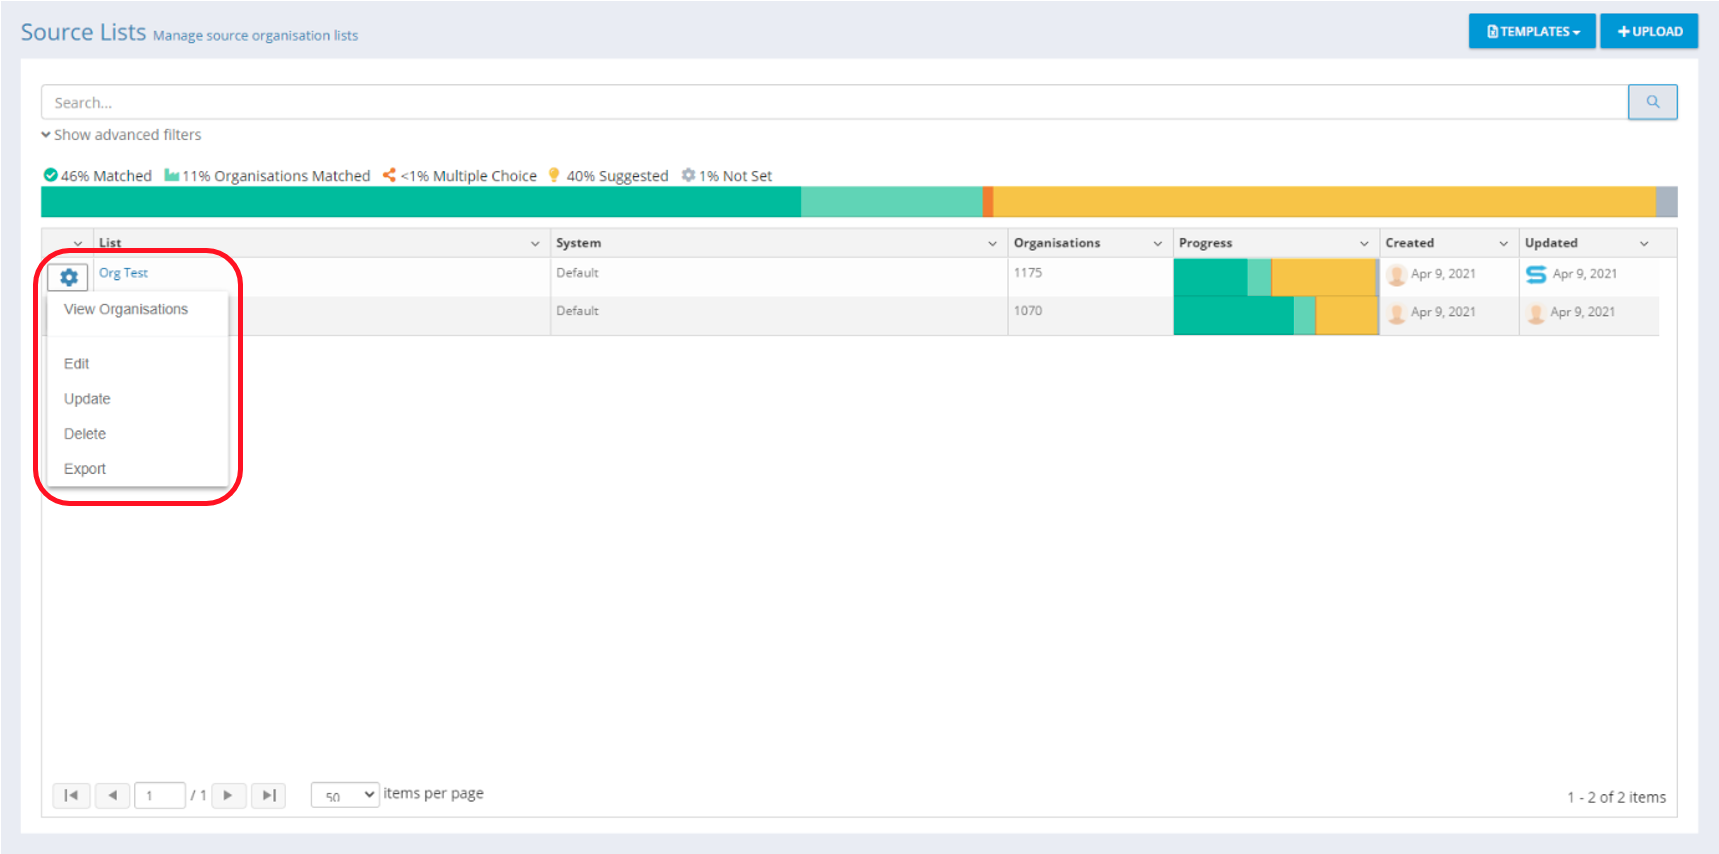
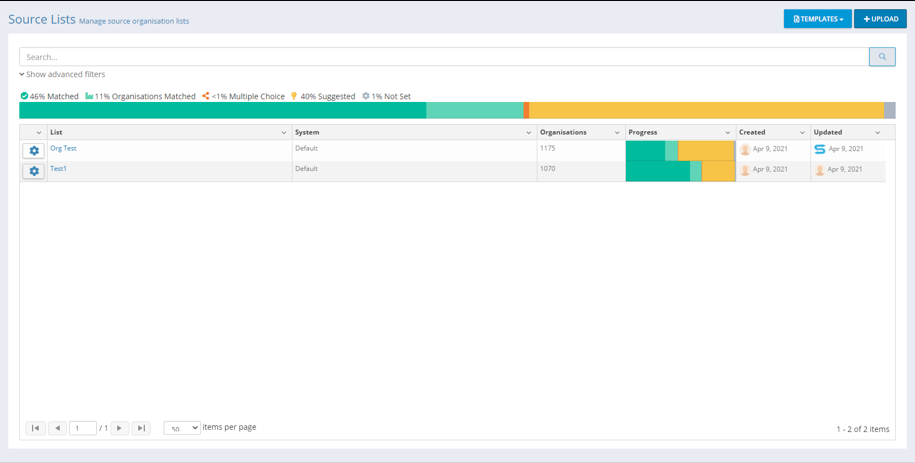
Actions Available on List
|
View Organistations
Click View Organisations to gain access to your list of Source Organisations. Here you can view all Source Organisations on your Source Organisations list and associated mappings.

|
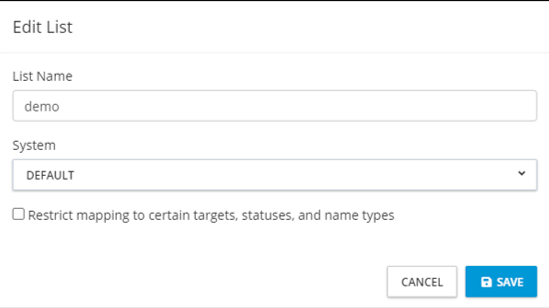
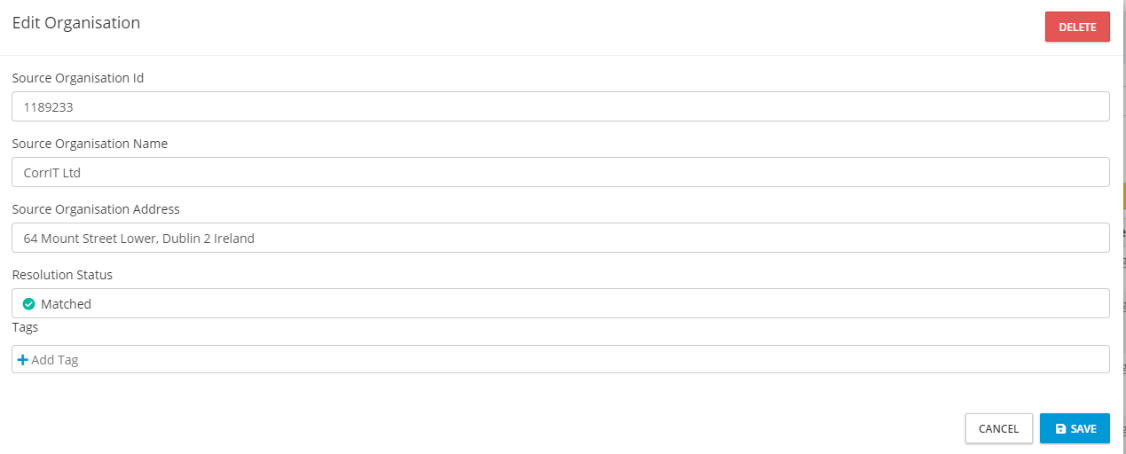
Edit
Click Edit to gain access to list information. Here you can edit the list name and associated system.
Edit Explained:
-
Edit List Name
-
Edit assigned system
|
Update
Click Update to gain access to options related to updating your list content. Here you can select to overwrite the list or merge a new list to your existing list.
Update Explained:
-
Overwrite List:
-
This option will delete your current list and replace it with the selected list. All current Resolution Status, Source Tags and matching information will be deleted.
-
-
Merge List:
-
This option will perform insert, update and delete operations on your current list based on the differences found in the selected list. All current Resolution Status, Source Tags and matching information will be retained where Source ID or Organisation Name are equal on both lists.
-

|
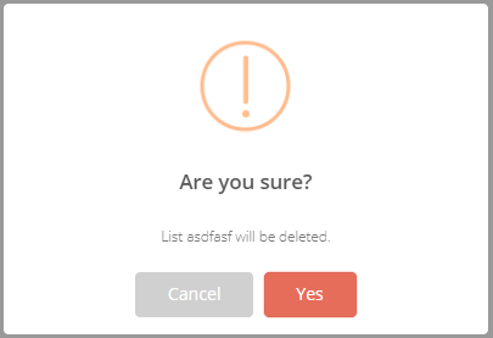
Delete
This option will delete your current list from SPORIFY. You will be prompted to confirm deletion. This operation is not reversible.
|
Export
This list will be exported to Excel. Exports will contain your original data and also the matched data and any associated Resolution Status, Tags or Data Insight.
Mapping
SPORIFY Mapping Explained
-
By default, SPORIFY will analyse your uploaded data and apply a Resolution Status to every term you have uploaded.
-
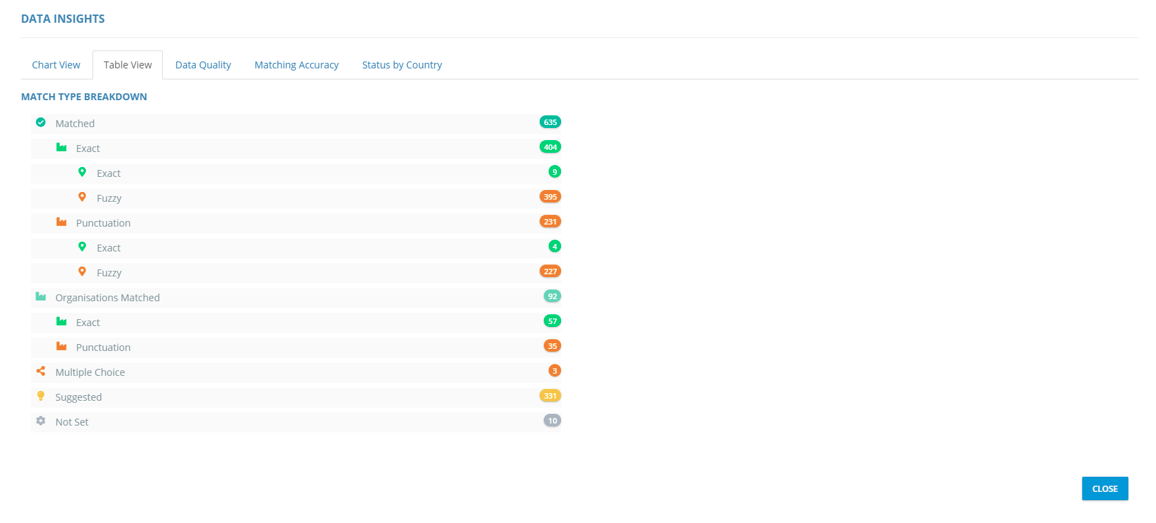
System-based Resolution Status:
-
Matched: SPORIFY has located an Exact Match for your data on the Target Organisation list.
-
Organisation Matched: Organisation mapped, location not mapped.
-
Multiple Choice: SPORIFY has located multiple exact matching Organisation Names for your data on the Organisation list.
-
Suggested: SPORIFY found Organisation Names that are closely related to your data.
-
Not Set: SPORIFY could not locate any Organisation similar to your data.
-
-
Match Settings are available to SPORIFY company administrators; they fine tune how SPORIFY matching works. Mapping results will be impacted by the Match Settings applied by your SPORIFY administrator.
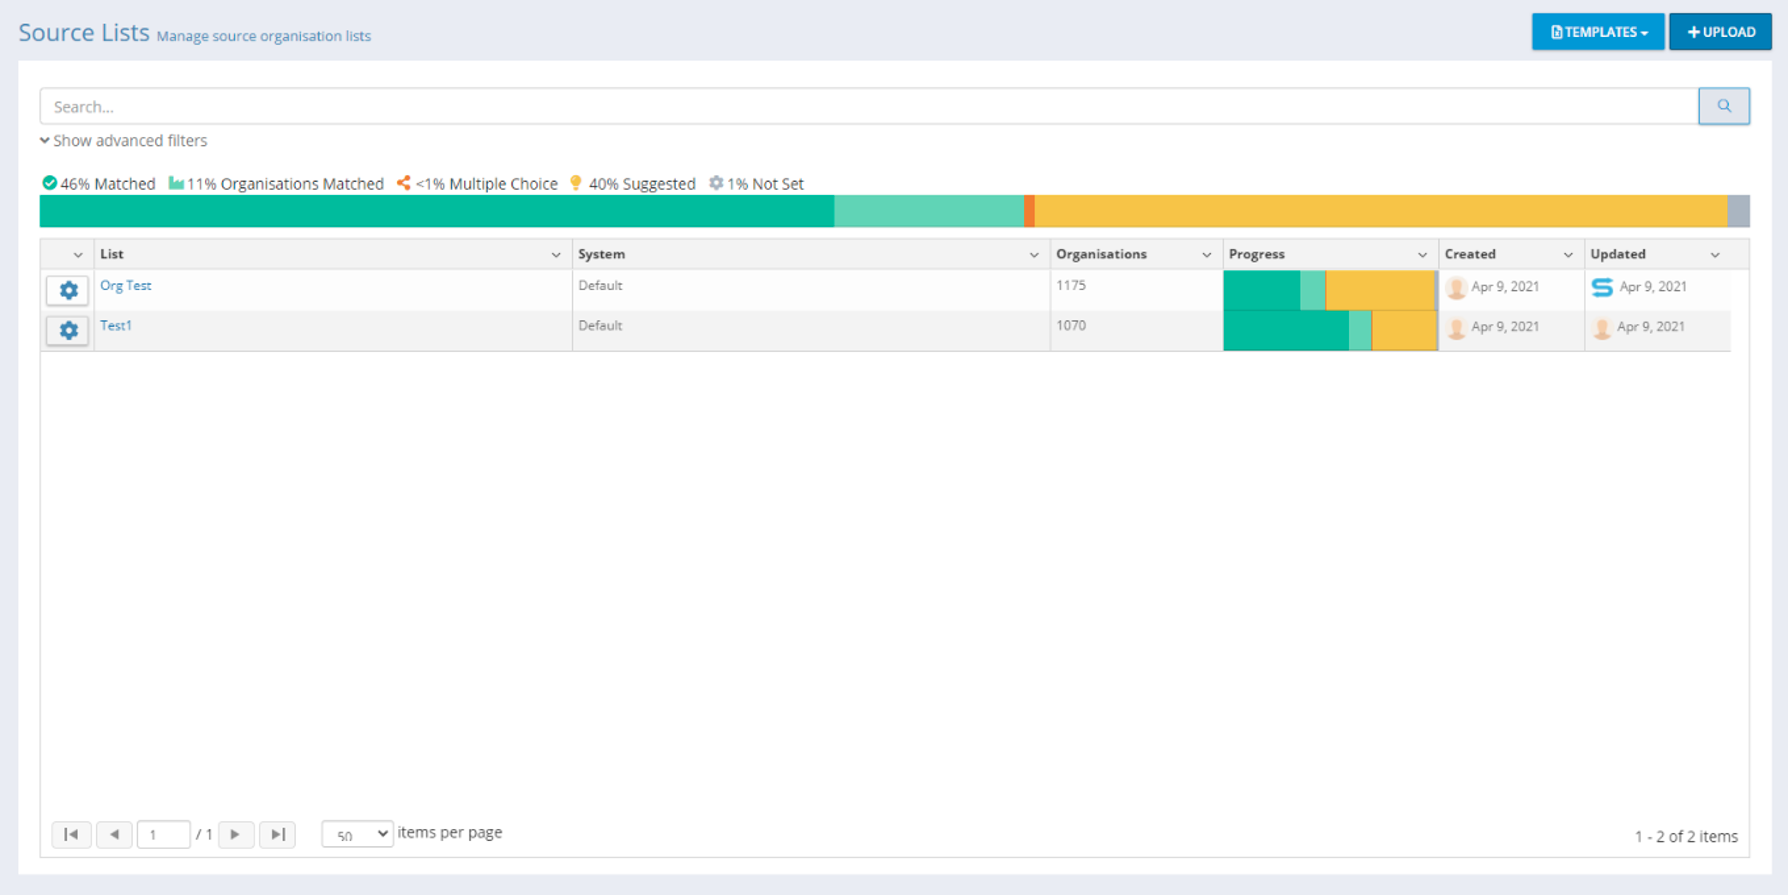
-
Once your lists are uploaded, each list will have a progress bar showing the Resolution Status percentage for the given list.
-
Above all lists, an overall progress bar will show your Resolution Status percentage across all lists.
|
|
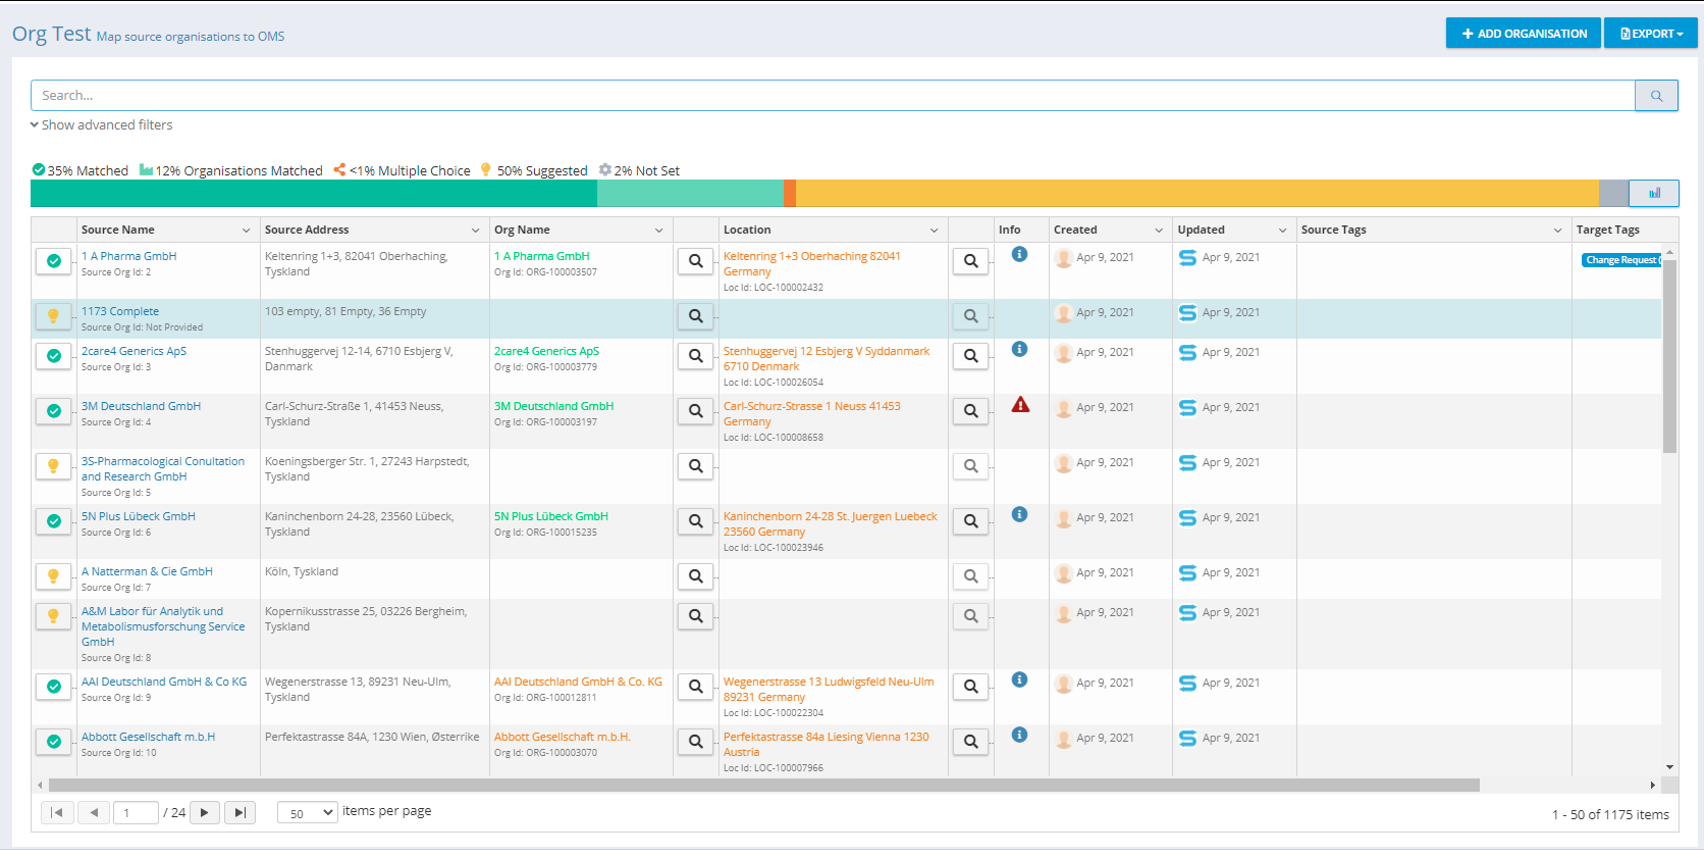
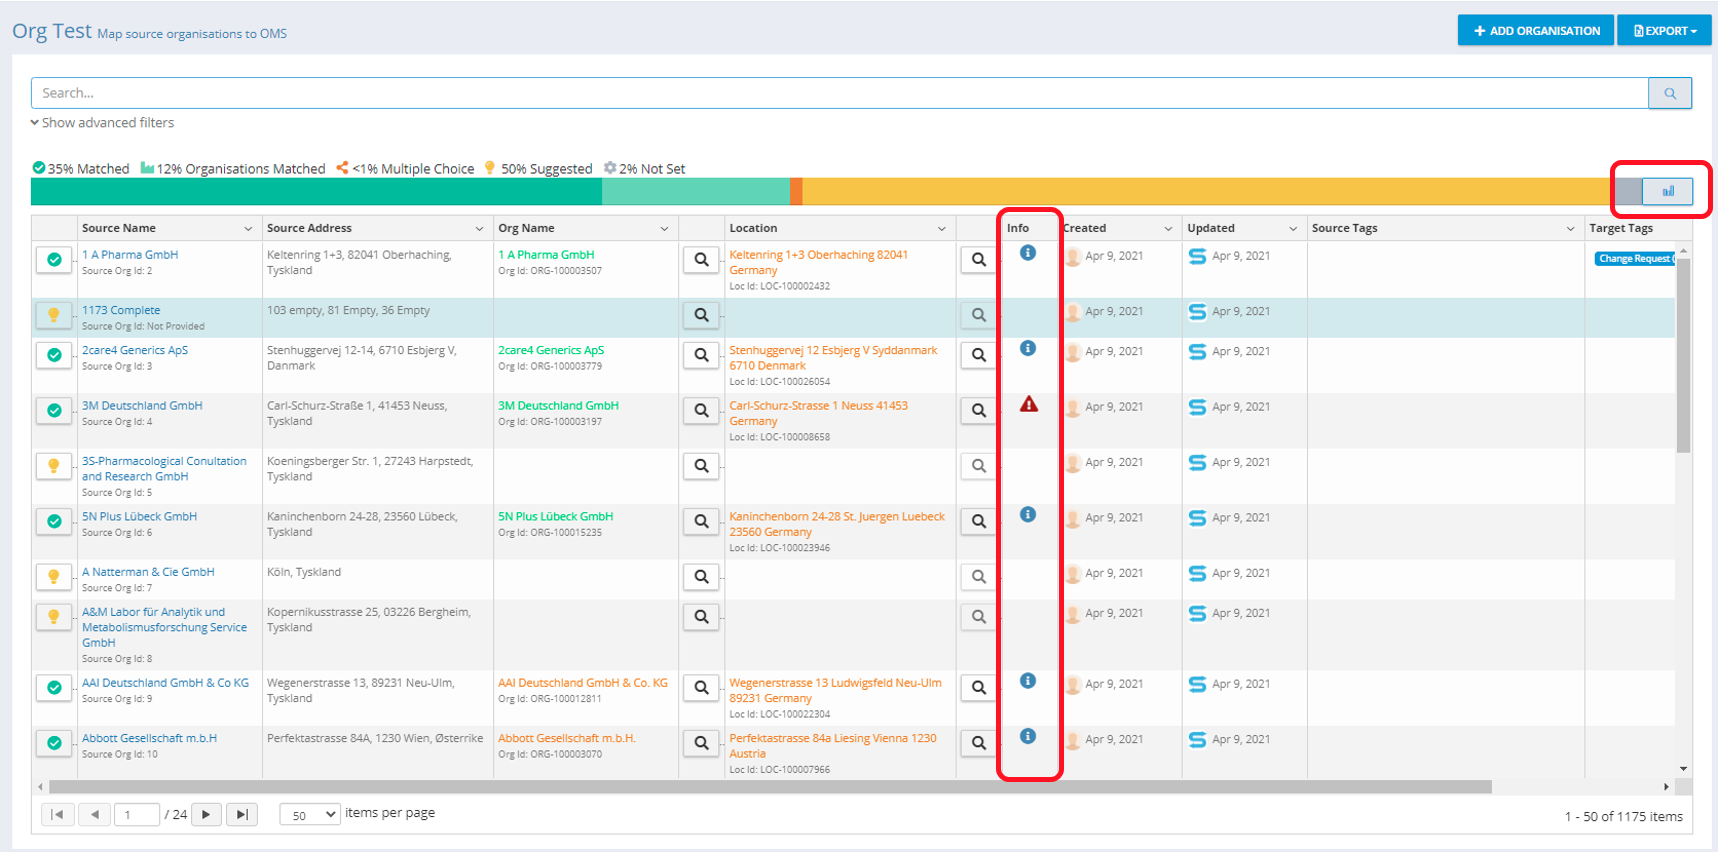
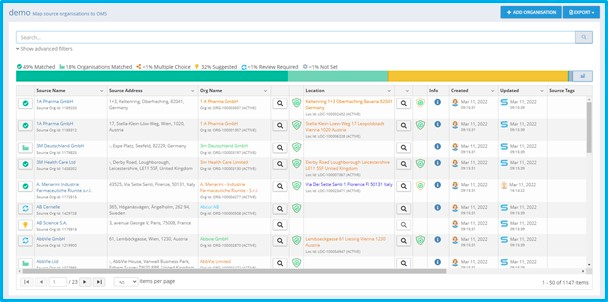
Manually Matching Organisations and Locations
-
Organisation matching is slightly different to Referential and Substance matching.
-
Organisations require two layers of matching: (1) Organisations and (2) Locations.
-
Automatic matching is applied at Organisation level and Location level where possible.
-
Matching Grid Explained:
-
Resolution Status: Status applied to the uploaded data
-
Source Name: Organisation Name from your uploaded data
-
Subtext (where available)
-
Source ID
-
-
-
Source Address: Organisation Address from your uploaded data
-
Org Name: Organisation Name from Target Organisation List
-
Subtext (where available)
-
ORG ID
-
-
-
Location: Location information from Target Organisation List
-
Subtext (where available)
-
LOC ID
-
-
-
Info: Match Type information and Data Insight information
-
Search Icon to display suggestions or search within the Target Data
-
Match Type Information
-
Created: Created timestamp
-
Updated: Last updated timestamp
-
Source Tags: Tags applied to your source record
-
Target Tags: Tags applied to the target location record
-
Assigning Data Tags to Source Data and Target Location Data
-
Assign Source Tags:
-
Method #1
-
Select the Source Name on the grid.
-
Click Add Tag and select one or more Tags as required.
-
Click Save.
-
|
-
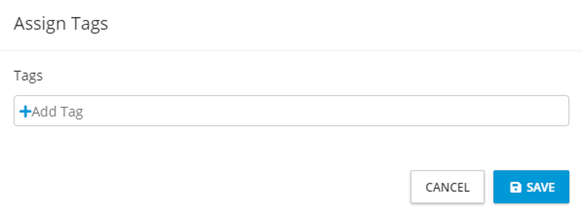
Method #2
-
Select the tag icon under the Source Tags column on the data grid.
-
Add or Remove Tags as required from the Tags control.
-
Click Save.
-
|
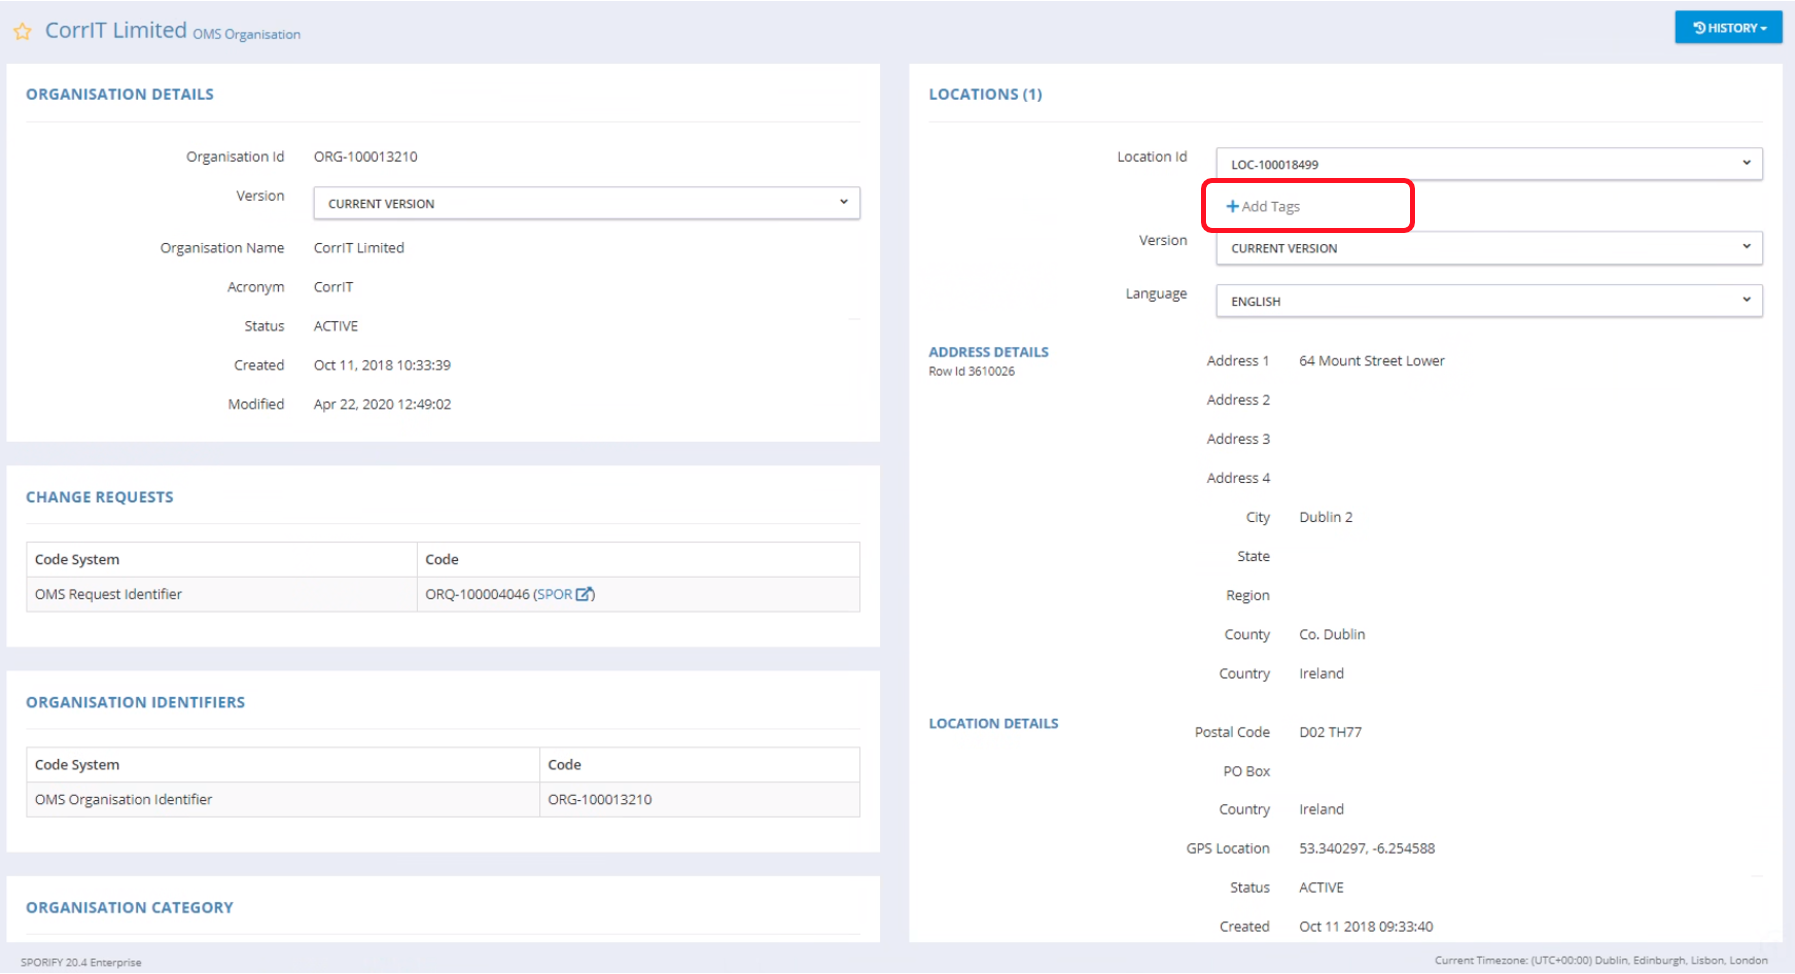
Assign Target Location Tags:
-
Method #1
-
Select the target location on the grid.
-
You will be redirected to the Organisation Detail page for the selected location displayed.
-
In the Locations panel, you can add Tags by using the Add Tags input box.
-
Tags are automatically saved when assigned to Target Data.
-
|
-
Method #2
-
Select the tag icon under the Target Tags column on the data grid.
-
Add or Remove Tags as required from the Tags control.
-
Click Save.
-

|
Searching and Advanced Filters
-
Search across the data in the data grid using the following fields:
-
Source Name
-
Source Address
-
-
Advanced filters allow data to be filtered by the following fields:
-
Status
-
Match Type (dependent on status selected)
-
Data Insights
-
Language
-
Tag
-
-
Refresh: Refresh the data grid with the results of the selected filters
-
Clear: Reset all filters to default
Match Type Explained
-
Organisations
|
Icon |
Name |
Description |
|---|
-
Exact (SPORIFY found an exact match)
-
Suggested (Manual match from a SPORIFY suggestion)
-
User Selected (Manual match selected by user without suggestion)
-
Punctuation/Abbreviation (Administrator setting)
-
System to System (Automatically matched from other Source System Data)
-
Locations
|
Icon |
Name |
Description |
|---|
-
Exact Text Match (String match)
-
Fuzzy Text Match (Non-exact match)
-
User Selected (Manual match)
Note: Target Organistaion Name and Location will be colour coded based on the Match Type applied.
Data Insight Explained
-
-
SPORIFY detected Data Insights which may highlight potential issues with the Target Data.
-
How to see Data Insights:
-
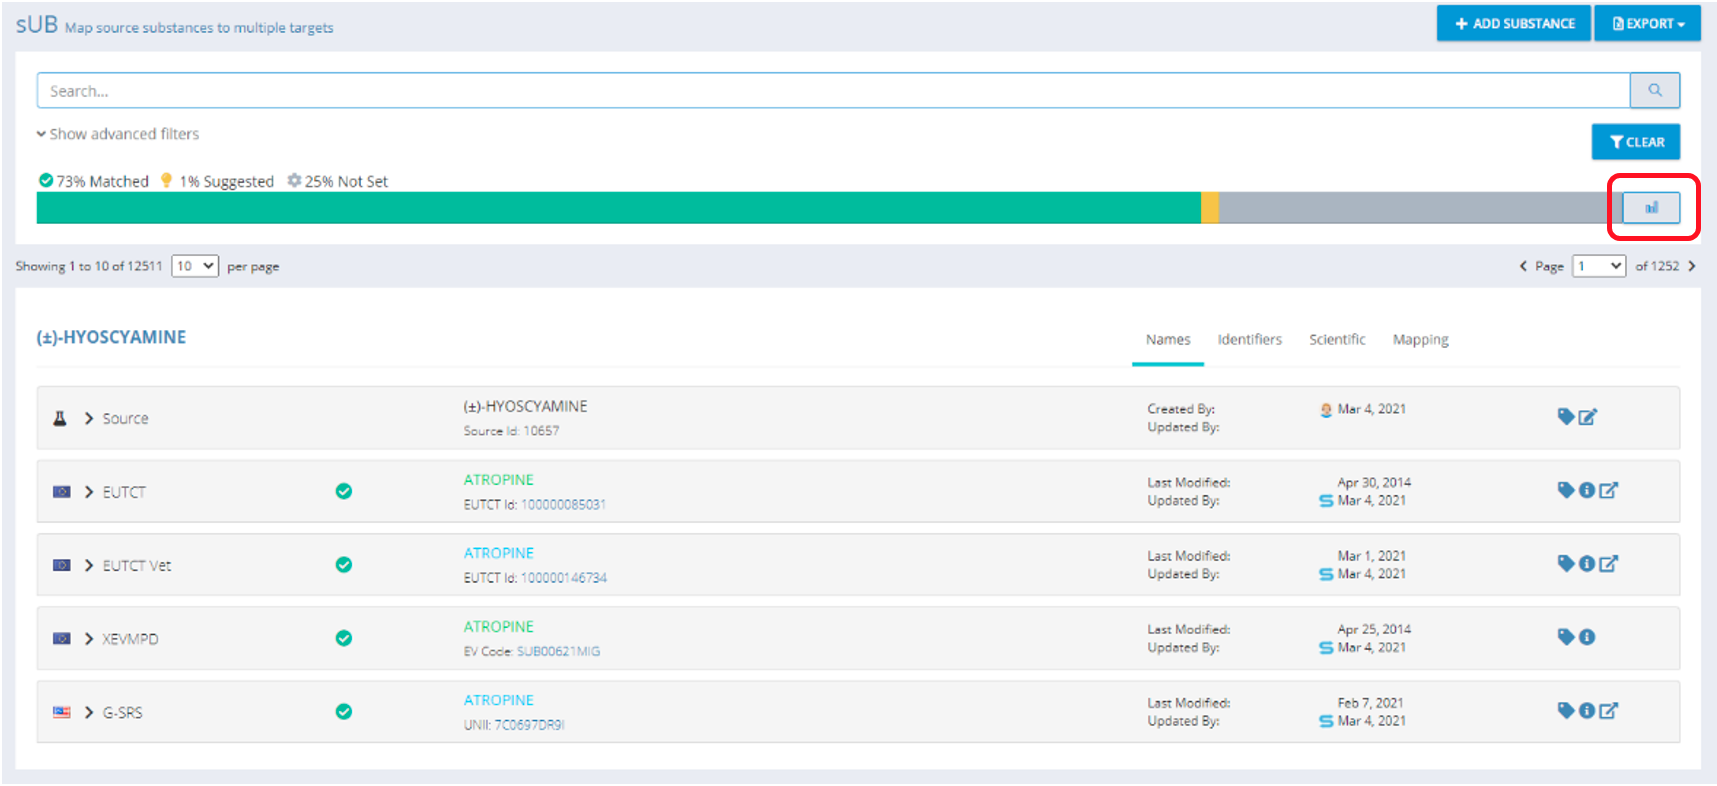
Chart View: Available by clicking the Data Insight button to the right side of the SPORIFY Progress Bar.
-
Grid View: Data Insights show in the Info column on the grid.
-
-
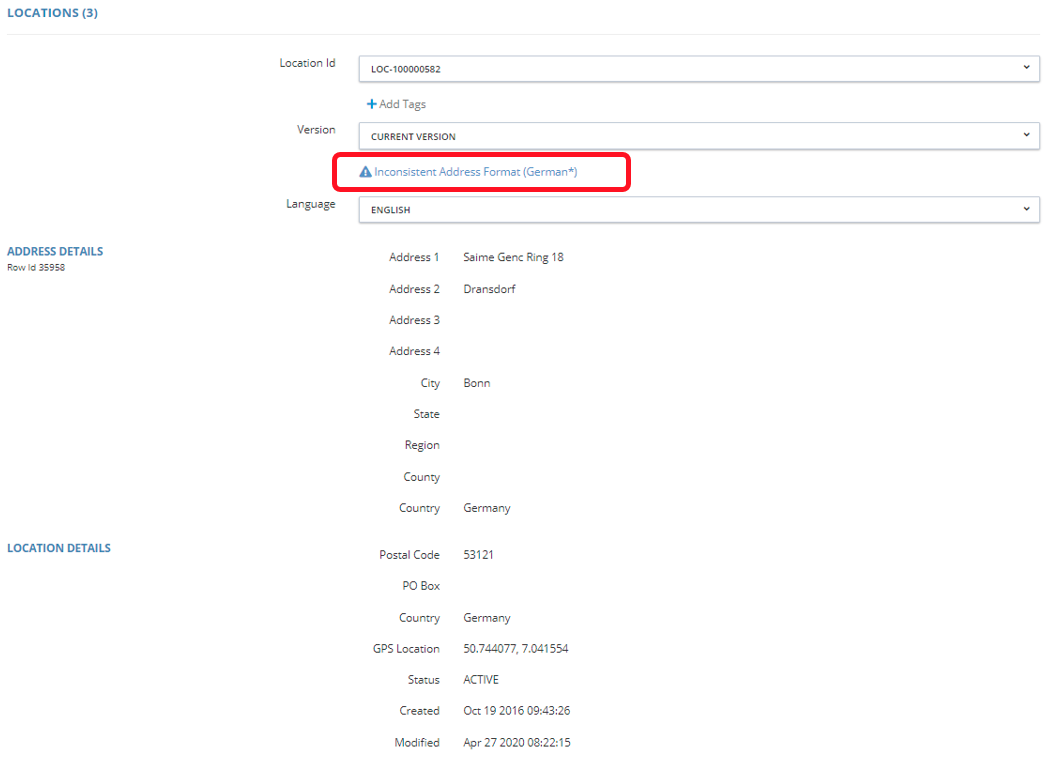
Detailed View: Each data insight will be displayed in more detail on the Location Detail page. To view this information simply click the location address and hover over the Data Insights icon shown on the detail page to explain what the insight is.
-
|
|
Note: Each chart has a toolbar available on the right-hand side with specific options available for each specific chart. A popular feature is to use the Save icon in the tool bar to save charts locally as image files to be included in local documents and reports.
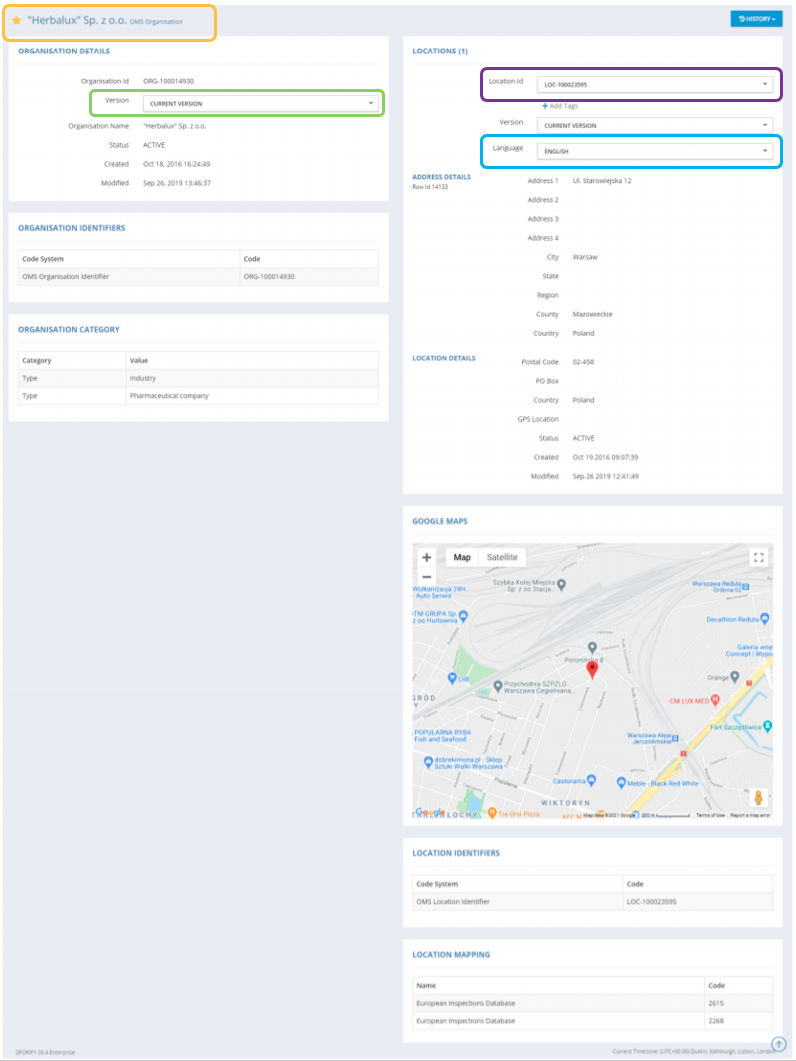
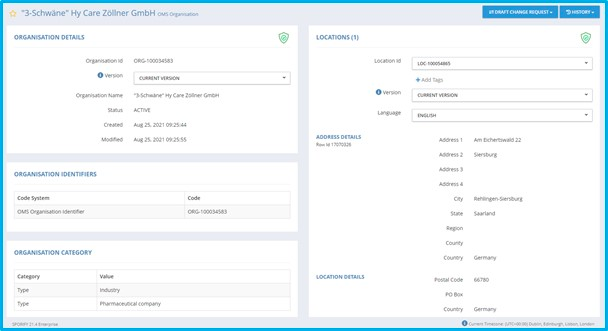
Location Detail Page
|
Note: In the above example the language dropdown will highlight the inconsistent translation records. In an effort to uniquely identify each translation record, we have included the SPOR Internal Row ID for the specific language records under the Address detail label for the associated language.
Add Organisation

|
Export
Export is where you access your Mapped Data. Exports will contain your original data and also the matched data from the Target System along with any Resolution Status or Tags you have supplied, as well as any Data Insights the system has detected.
The are multiple options to Export Mapped Data:
-
Export English
-
contains the Mapped records in English Language only
-
-
Export all Languages
-
contains the Mapped records and all Languages available in SPOR OMS
-
-
Export SPOR CSV
-
contains the Mapped records, combined with the full SPOR CSV data. Note: to successfully export the SPOR CSV, sufficient EMA credentials must be configured first. Please contact your Administrator or configure your EMA credentials in ‘My Settings’ option in your ‘Account Profile’.
-
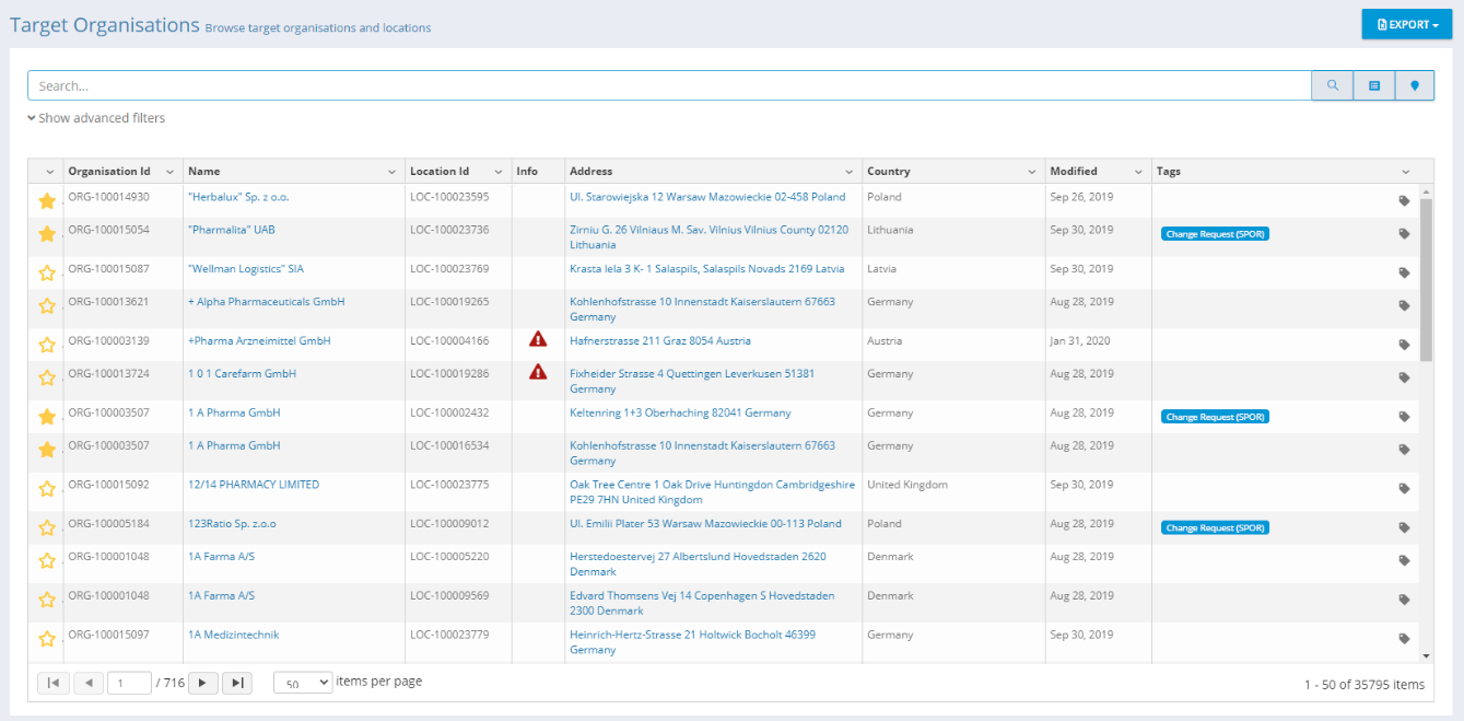
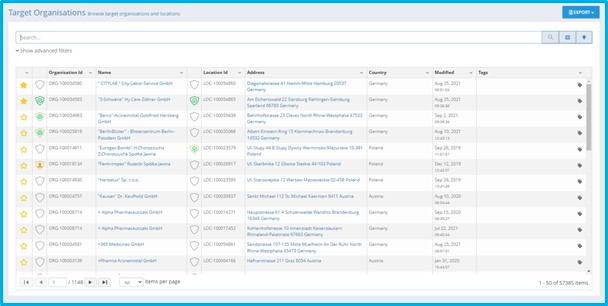
Target Organisations (Browse Target Organisations and Locations)
|
|
-
Follow Favourites:
Click the Star and SPORIFY will monitor your Favourites for any changes and alert you on the main dashboard.
-
Versions:
Select all previous versions of our Organisation from Version Start Date to End Date.
-
All Locations:
Easily select different locations for the selected Organisation.
-
Language:
View all available languages for the OMS entry. All available data will translate onscreen to the OMS language data.
History
SPOR provides history on Organisation and Location information. This history record is recorded with a timestamp showing the date range during which the selected record was active.
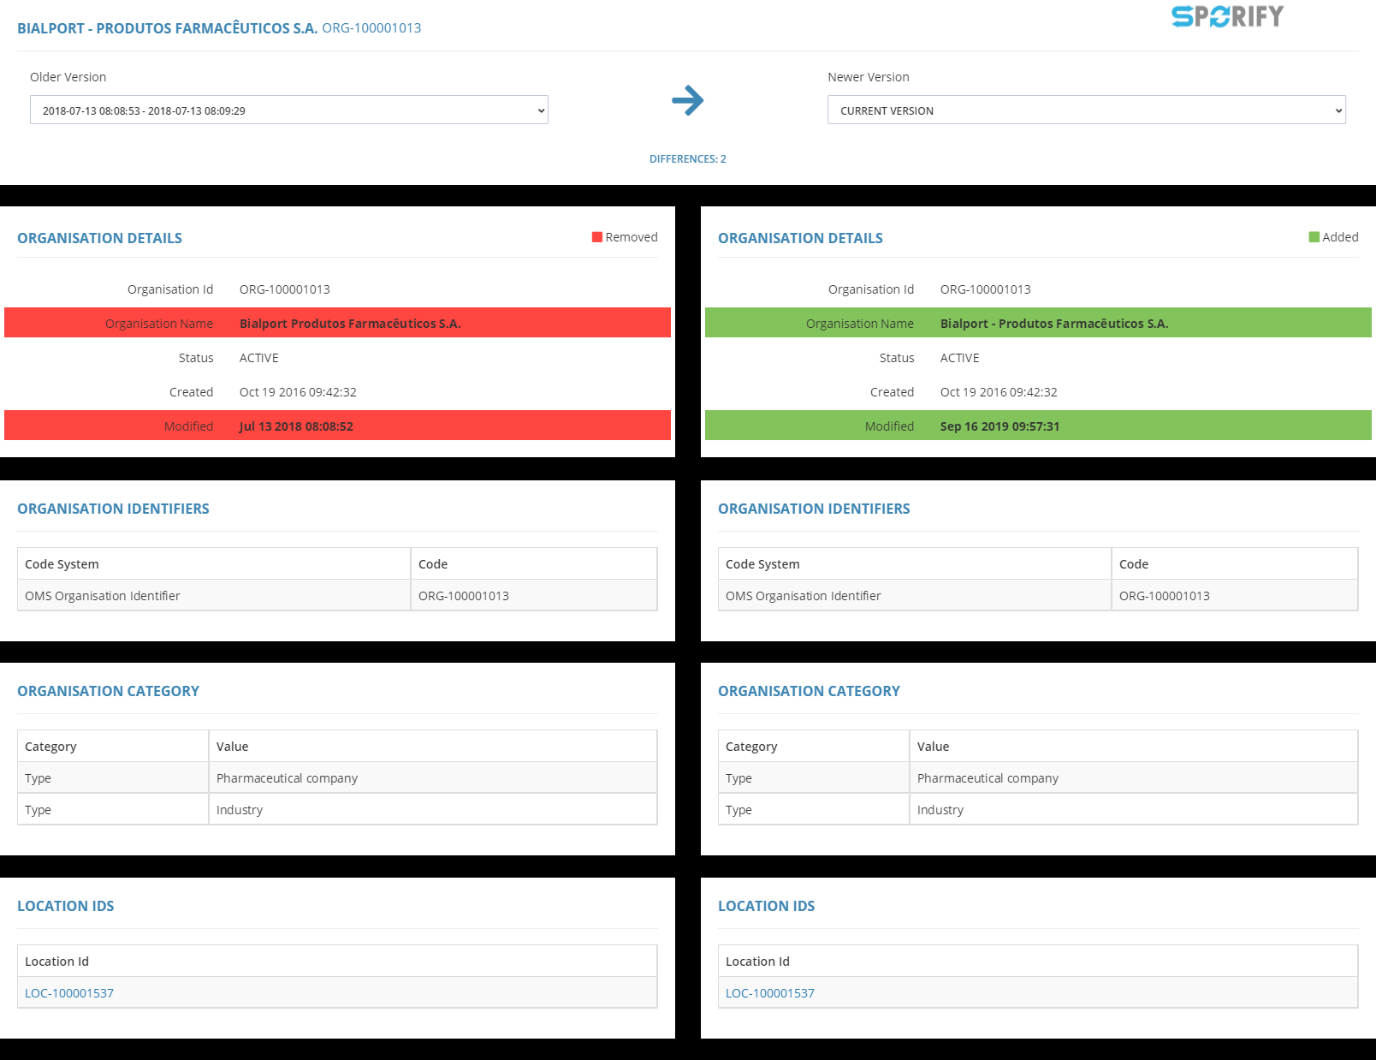
History Record Comparison
SPORIFY provides a History module to easily compare changes between Organisation or Location versions to highlight differences.
|
Comparison Screen Explained
-
Version Selection: Select the versions to compare via Older Version and Newer Version dropdown boxes.
Note: The resulting comparison screen is divided into two panels (left and right) with a difference summary available if you hover under the arrow in the version selection panel.
-
Left Panel:
-
Older record (Red highlighted items have been removed compared to the newer version)
-
-
Right Panel:
-
Newer record (Green highlighted items have been added compared to the older record)
-
-
Export: Save a screenshot of the comparison record to a PNG image file.
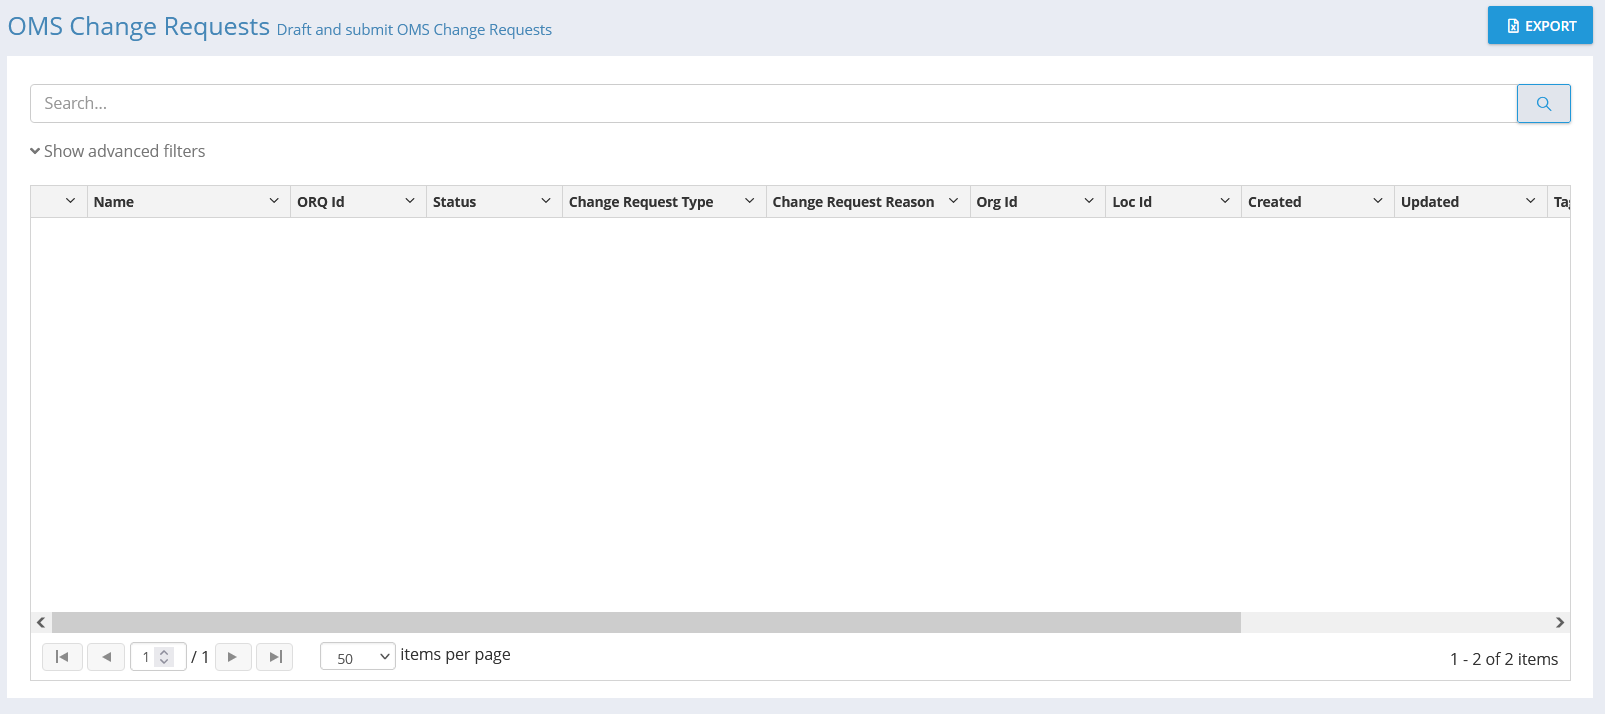
Change Requests
SPORIFY provides an Organisation Change Request module to view and manage updates regarding organisations and locations to SPOR OMS within SPORIFY.
|
-
Change Requests lists can be accessed by selecting Organisations on the navigation menu, then Change Requests. Here, it lists the change requests that SPORIFY has synchronised from SPOR, as well as any drafts that have been made. Clicking on a name link brings up the associated details page.
-
The link in the Details column of any given change request shows further information, including information relating to Change Request Details, Location Details, Status Changes, Organisation Details, and Supporting Documents.
-
Any comments associated with a change request can be viewed by hovering over the speech bubble icon beside the record’s name in the Name column.
-
Change requests can be exported using the Export button.
-
Submitted change requests are available to view on the Target System Activity area of the dashboard using the SPOR OMS tab. They also appear in Notifications. Clicking these areas will bring you to the Target System Activity screen where you can view more details.
-
The System advanced filter’s OMS Change Requests option used in conjunction with the Refresh button brings up a list of all OMS change requests.
-
SPORIFY’s Change Requests feature synchronises with SPOR everyday.
Data Governance
When Data Governance is switched on for this domain, target data records can be governed via Organisations Source Lists, Organisations Target Lists and Organisations Details screens. Organisations records will be governed at both organisation and location levels.
A record’s data governance status is initially set to Pending Review. The reviewer can then set a custom status and add an optional comment and the approver can thus accept or reject this status. Comments will be visible by hovering over the comment icon. If the approver rejects the status, then the record is set back to Pending Review. Any approver can also reject an item after it has already been approved to restart the process.
If the 4 eye principle is switched on, the reviewer and approver cannot be the same user.
If e-signature is switched on, the user must apply an e-signature to approve the record.
|
|
|
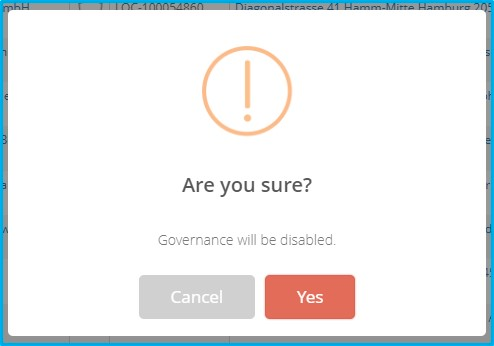
Available Actions:
-
Enable
-
Disable
Navigate To: Organisations Record - Data Governance Icon - Disable
|
-
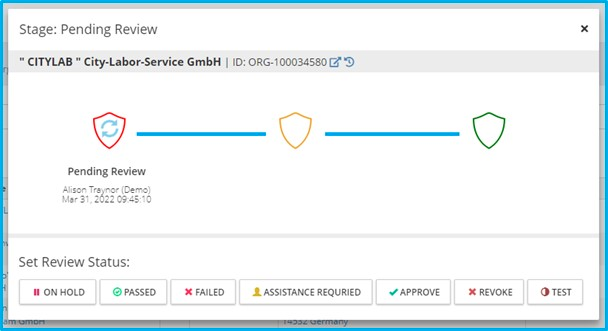
Govern (Stage: Pending Review)
-
Set Review Status
-
Add Comment
-
-
|

|
-
Govern (Stage: Reviewed)
-
Accept
-
Username
-
Password
-
Reason
-
Comment
-
-
Reject
-

|
|

|
Substances
Overview
|
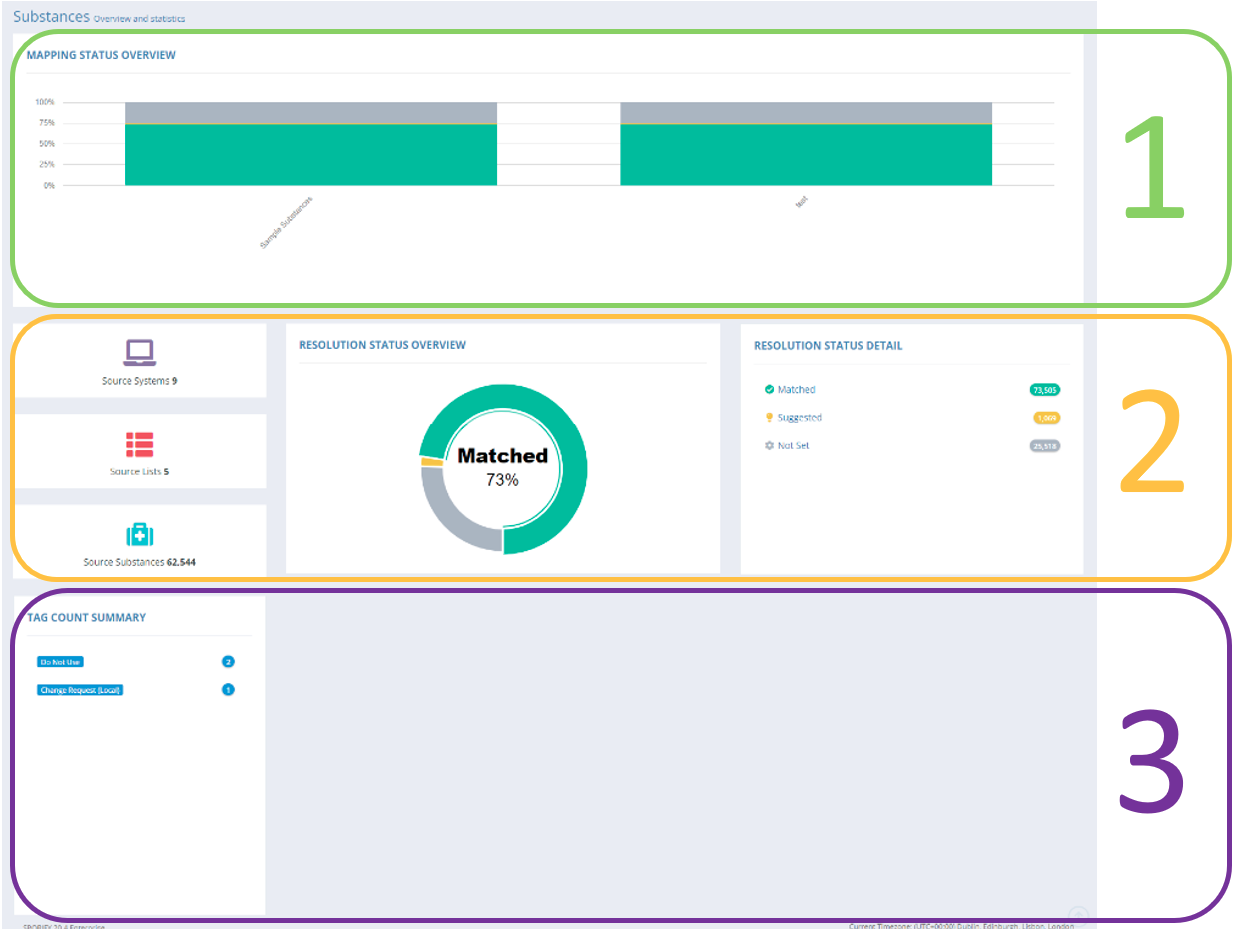
Overview Explained:
Panel 1:
-
Overview of Mapping Status by list
Panel 2:
-
Summed total overview of Source Systems, Source Lists and Source Substances
-
Chart outlining overall Resolution Status
-
Key detailing Resolution Status
Panel 3:
-
Tag Count Summary
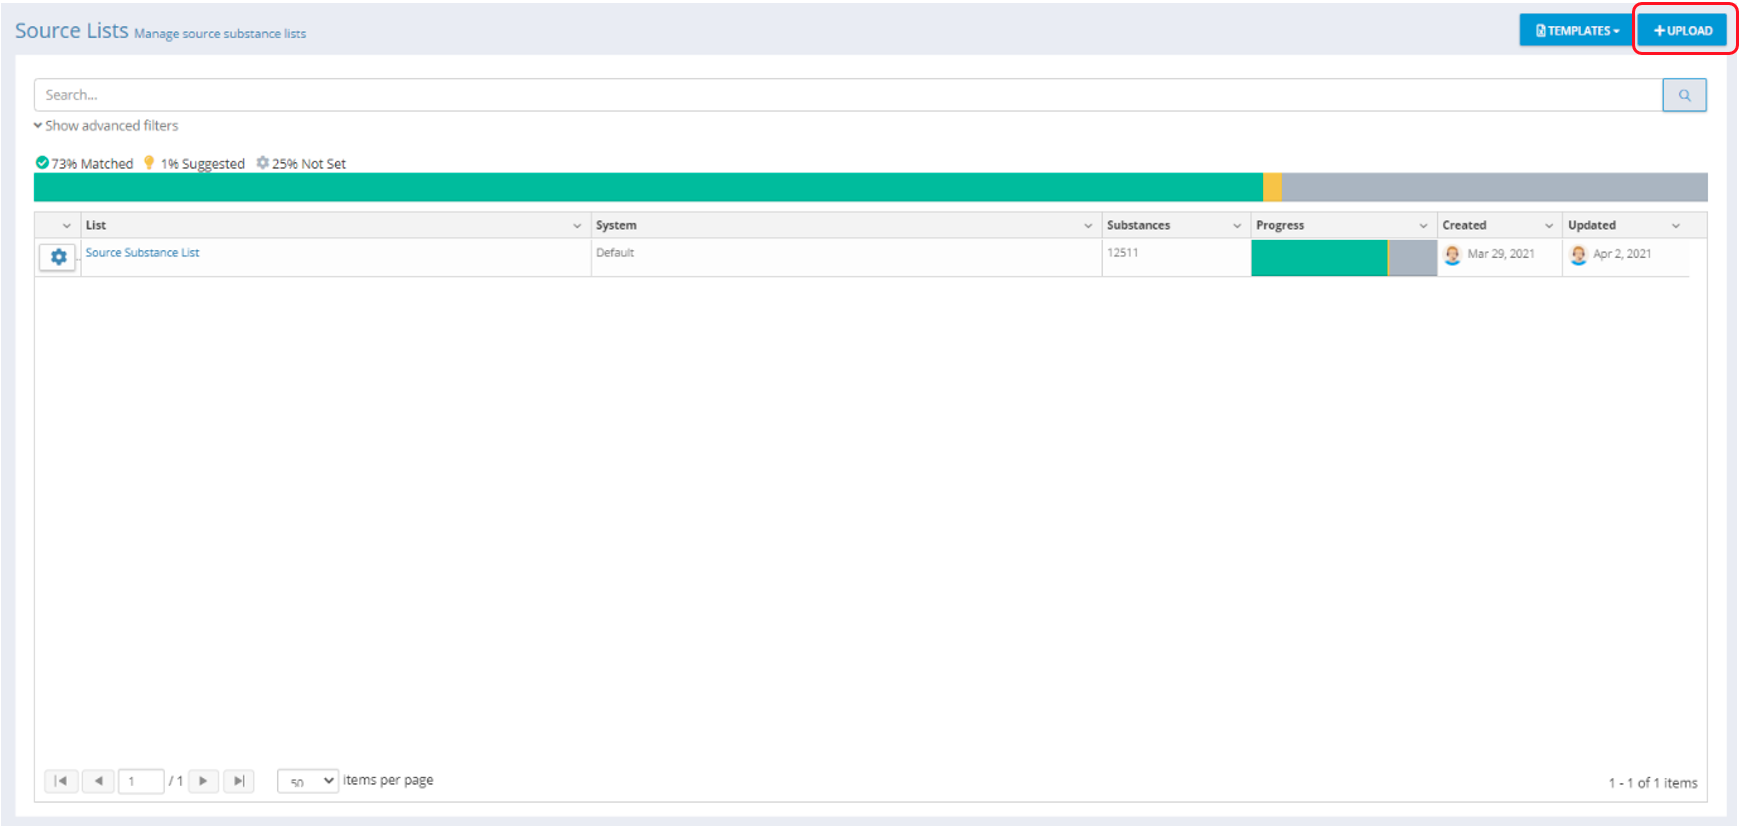
Source Lists (Mapping)
|
Template: Formatting Source Data
-
How to format your Source Data:
-
Download the Substance Excel or CSV Template by clicking on the Template action button. This template can be used for all Source Substance Lists.
-
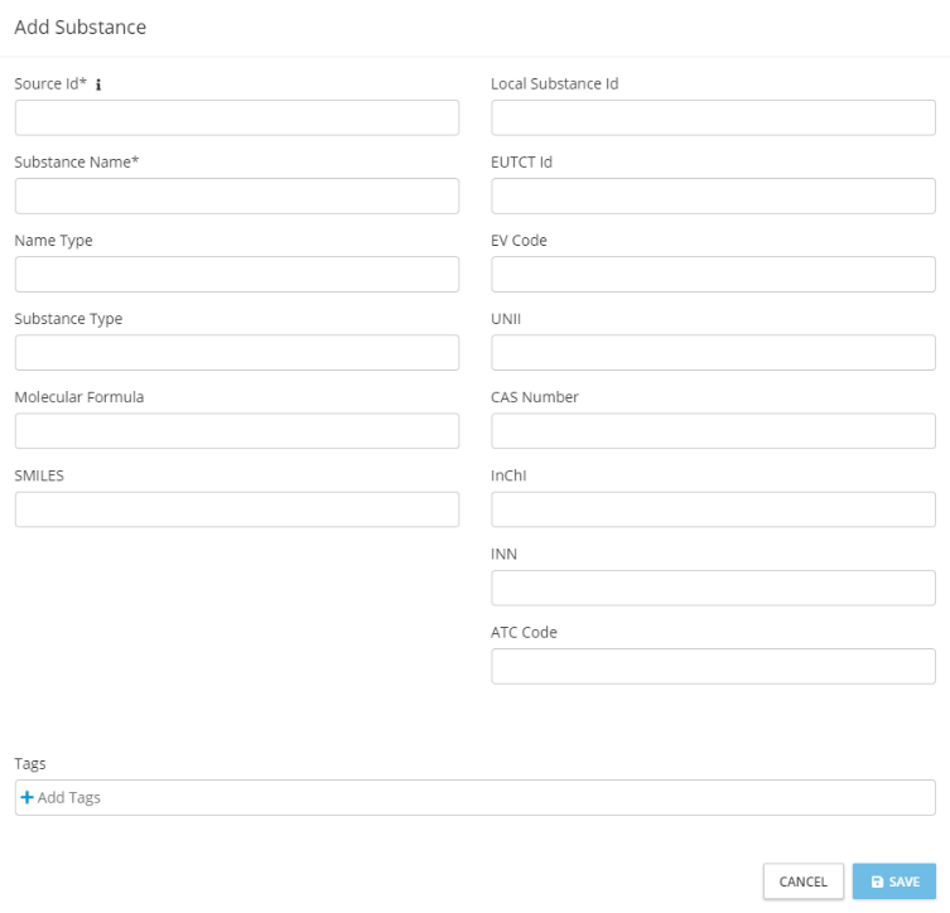
SPORIFY requires two pieces of mandatory* information to carry out Substance Mapping and provides optional fields for enhanced matching:
-
Source ID* (Local Database Unique ID is a required field, must be unique for every record)
-
Substance Name* (Source Substance Name is a required field)
-
Local Substance ID (This is not required to be unique e.g. an alias may share this ID with its common name. This ID is also used during our matching process to provide System to System match type.)
-
SMS/EUTCT
-
EV Code
-
UNII
-
CAS
-
INCHI
-
INN
-
ATC Code
-
Molecular Formula
-
SMILES
-
Name Type
-
Substance Type
-
-
Using Excel: If your workbook has multiple worksheets, you should select the required worksheet to import from.
-
By default, the system expects CSV files to be delimited with a comma.
-
Set Custom Delimiter: If your CSV file is delimited with a character other than a comma, you can set your Custom Delimiter here. A Custom Delimiter can be up to three characters in length.
-
If your column text contains the delimiter character, the text should be wrapped in quotation marks. For example, 1,2,3-TRIAZOLINE is formatted as “1,2,3-TRIAZOLINE” to correctly import the delimiter character.
-
CSV files should be saved with UTF-8 encoding to preserve special characters.
-
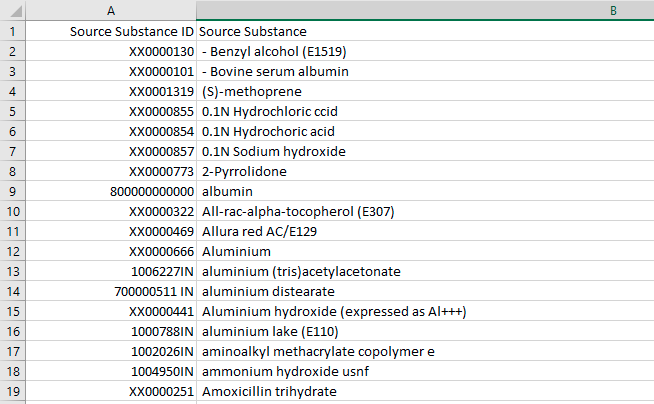
|
Sample Populated Template Excel file. Data Format: “Source Substance ID, Source Substance”
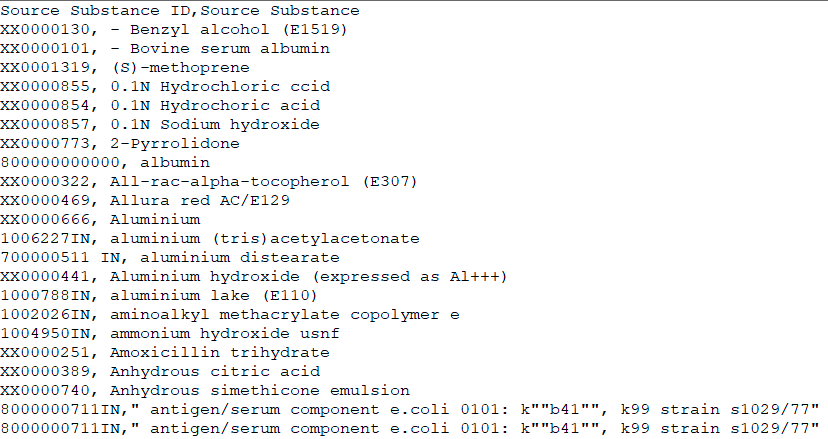
|
Sample Populated Template CSV file. Data Format: “Source Substance ID, Source Substance”
Upload: Importing Data
|
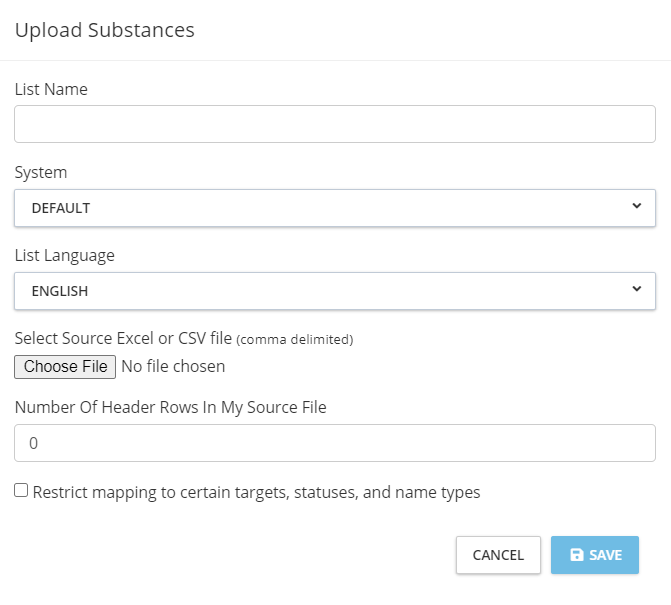
Fields Explained:
-
List Name: Recognisable local list name/friendly name for your internal list.
-
System: Name of the local system that your list is from. Custom System Names is subject to subscription level. If only one system is available, the name is always "Default".
-
List Language: This drop-down menu is populated with the language list from SPOR SMS list. Every language available in SMS will be displayed for selection. SPORIFY uses a matching algorithm to look across all available languages for matches. The system default is English but you can select your primary language here.
-
Select Source Excel or CSV File: Browse your computer network and select the source file to upload. If using CSV, the system expects files to be delimited with a comma by default.
-
Select Source Excel Worksheet: If we detect your Excel file has multiple worksheets, select the worksheet you wish to import.
-
Set Custom Delimiter: If your CSV file is delimited with a character other than a comma, you can set your Custom Delimiter here. A Custom Delimiter can be up to three characters in length.
-
Number Of Header Rows in My Source File: If your file contains header information, you can enter the number of rows you wish SPORIFY to skip when importing your data.
-
Click Save to import your data and run the SPORIFY matching algorithms.
-
Click Cancel to clear all fields and return to the previous screen.
-
Restrict mapping to certain targets, statuses, and name types: * Option to restrict mapping to chosen targets * Option to restrict mapping to specific statuses for each Target Substance System * Option to restrict mapping to specific substance name types for each Target Substance System
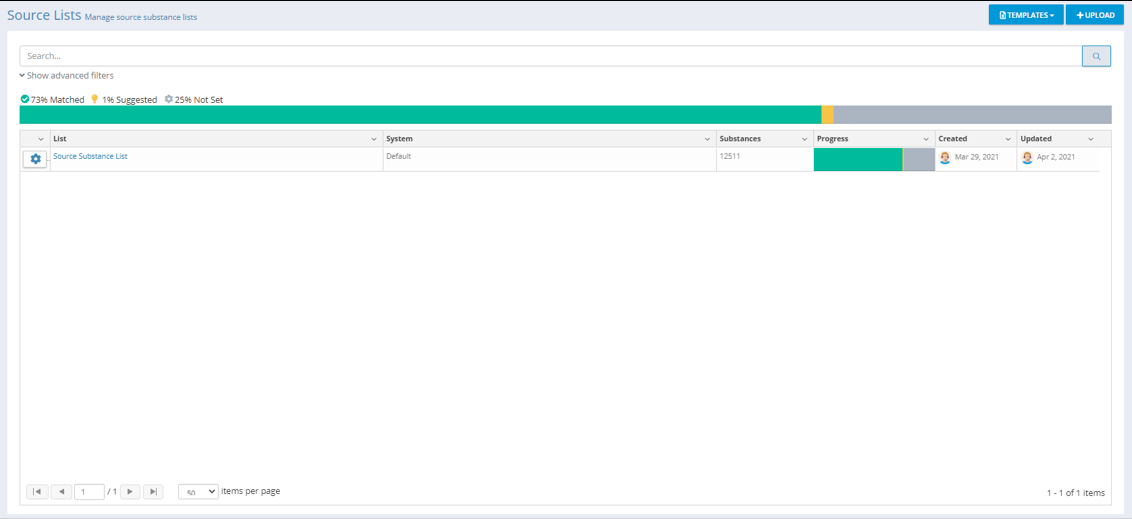
Actions Available on List
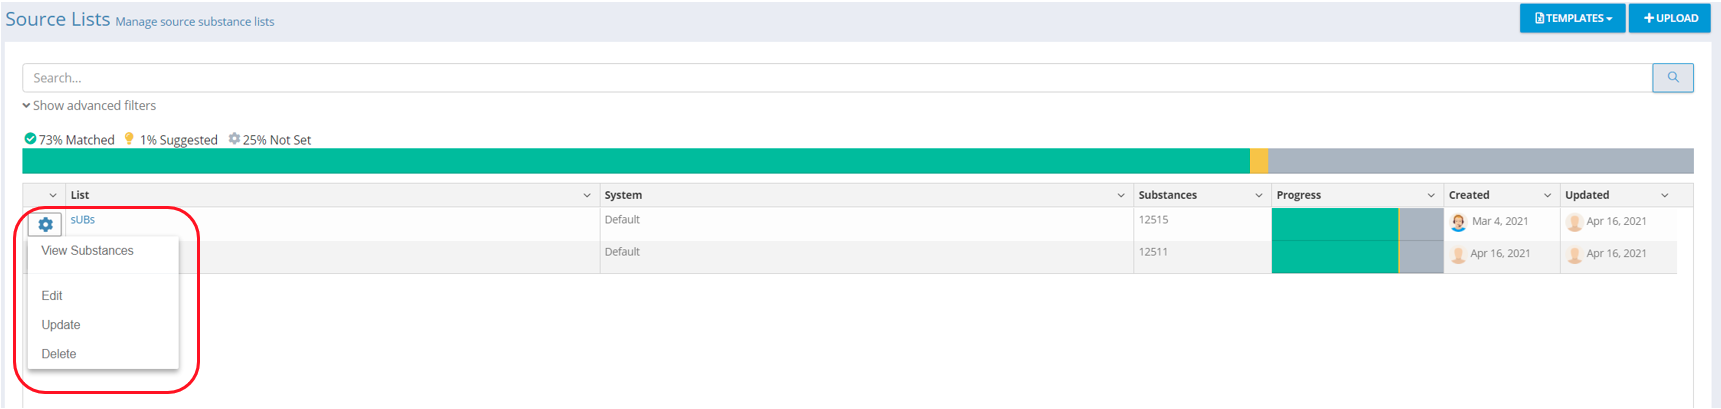
View Substances
|
Click View Substances to gain access to your list of Source Substances. Here you can view all Source Substances on your Source Substances list and associated mappings.
|
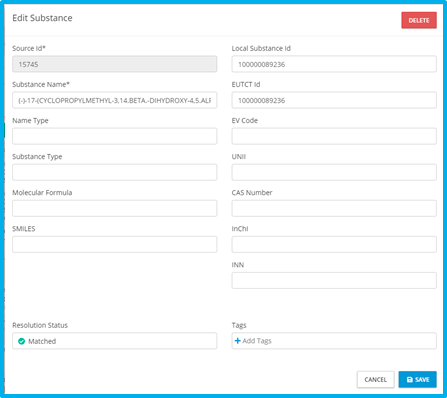
Edit
Edit Explained
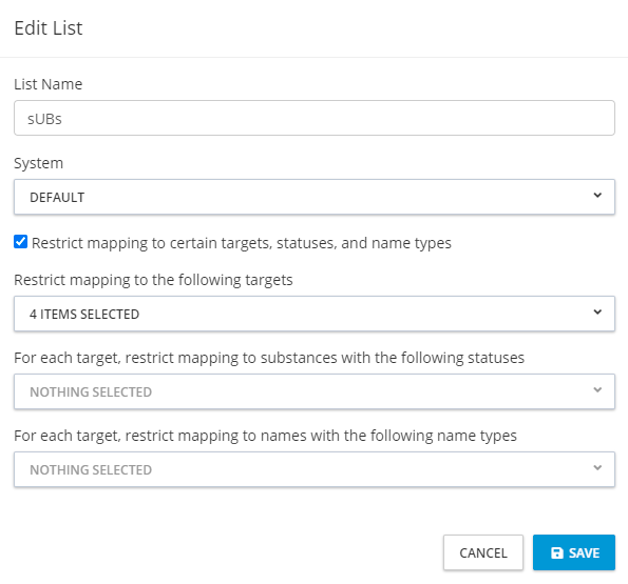
Click Edit to gain access to list information. Here you can edit the List Name, associated system and mapping restrictions to certain Target Substances and name types:
-
Edit List Name
-
Edit assigned system
-
Restrict mapping to certain targets, status and name types:
-
Option to restrict mapping to chosen targets
-
Option to restrict mapping to specific statuses for each target substance system
-
Option to restrict mapping to specific substance name types for each Target Substance System
-
|
Update
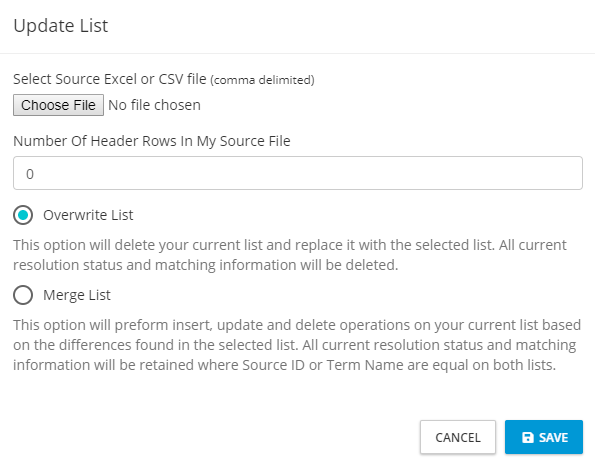
Click Update to gain access to options related to updating your list content. Here you can select to overwrite the list or merge a new list to your existing list.
Update Explained:
-
Overwrite List:
-
This option will delete your current list and replace it with the selected list. All current Resolution Status, Source Tags and matching information will be deleted.
-
-
Merge List:
-
This option will perform insert, update and delete operations on your current list based on the differences found in the selected list. All current Resolution Status, Source Tags and matching information will be retained where Source ID or Substance Name are equal on both lists.
-
|
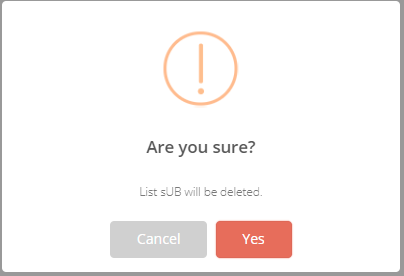
Delete
This option will delete your current list from SPORIFY. You will be prompted to confirm deletion. This operation is not reversible.
|
Export
The list will be exported to Excel. Exports will contain your original data and also the matched data and any associated Resolution Status, Tags or Data Insight.
Mapping
SPORIFY Mapping Explained
-
By default, SPORIFY will analyse your uploaded data and apply a Resolution Status to every term you have uploaded.
-
System-based Resolution Status:
-
Matched: SPORIFY has located an Exact Match for your term on the Target Data.
-
Multiple Choice: SPORIFY has located multiple exact matches for your term on the Target Data.
-
Suggested: SPORIFY found Target Data terms that are closely related to your local term.
-
Not Set: SPORIFY could not locate any terms similar to your local term.
-
-
Once your lists are uploaded, each list will have a progress bar showing a Resolution Status percentage for the given list.
-
Above all lists, an overall progress bar will show your Resolution Status percentage across all lists.
|
|
Manually Matching Terms
-
Click on the Source List's name to move to the substance matching screen.
-
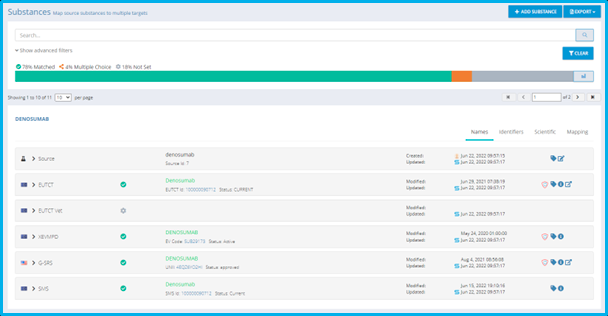
Substance matching screen explained:
-
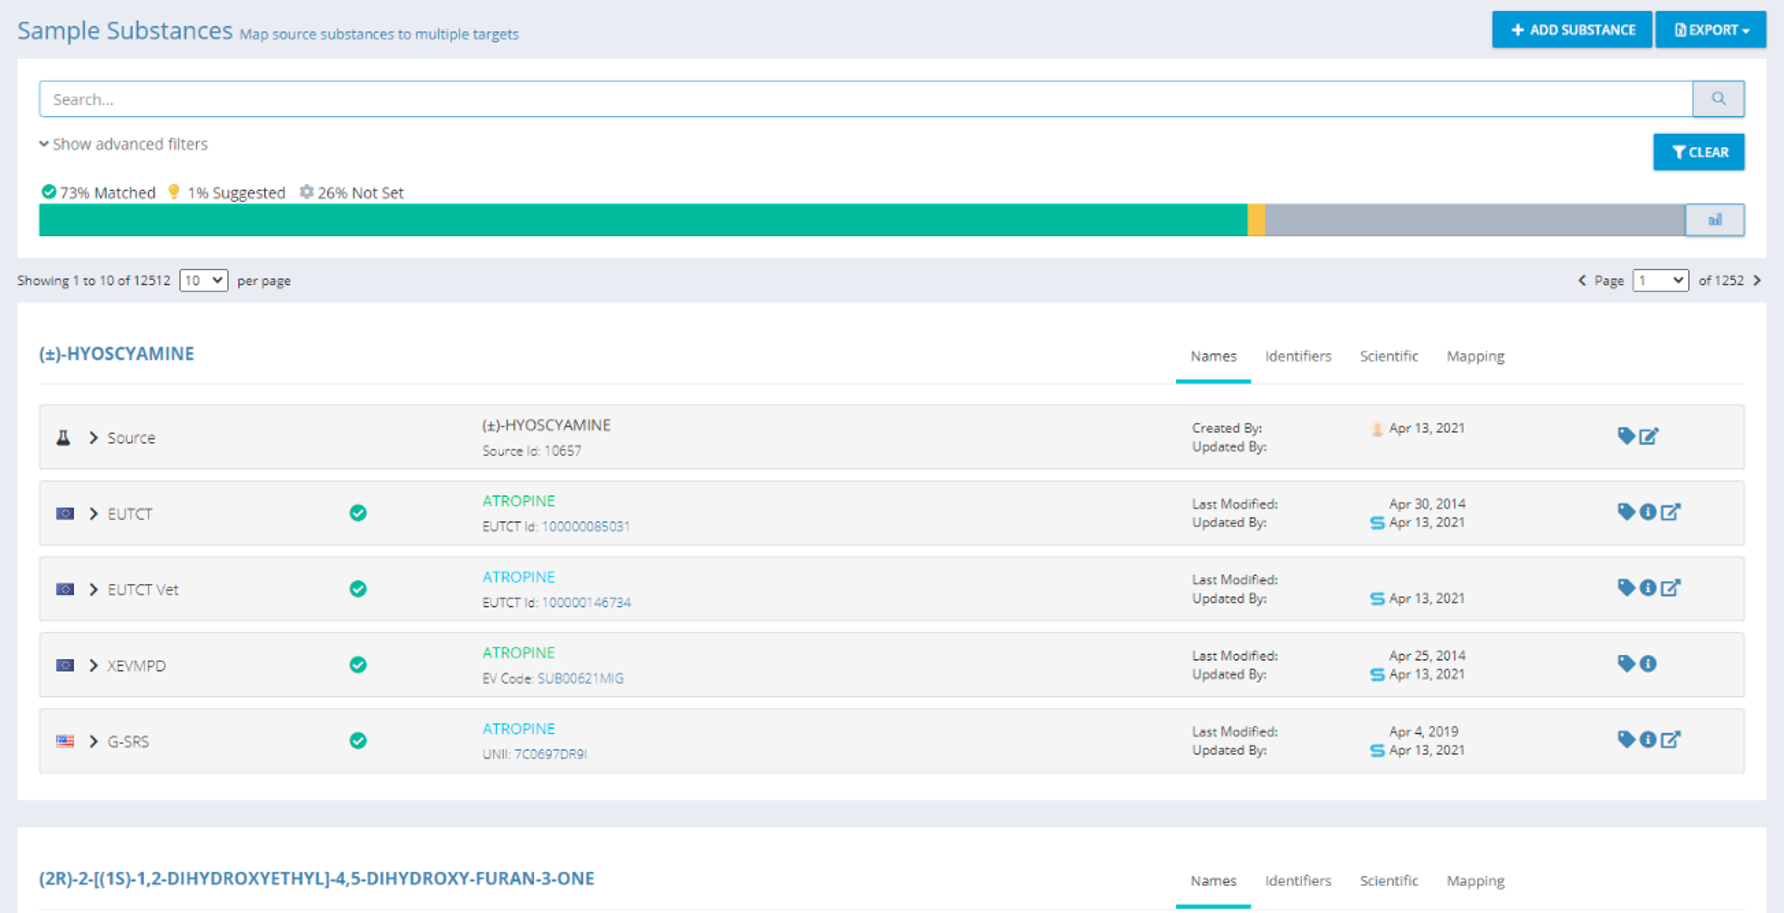
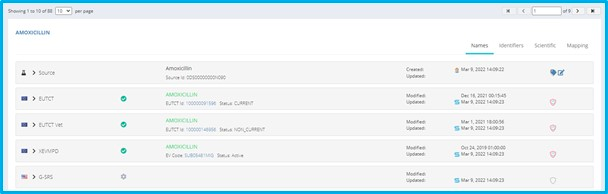
The substance matching screen is similar to the target substance screen. However, substances are grouped by the Source Substance Name.
-
Each Target Substance system will be displayed in its own sub panel under the Source Substance.
-
If a substance match exists, a Resolution Status and Matched Term will be displayed along with the associated created and modified timestamp.
-
Each substance panel displayed shows the following information which is related to the Source Substance.
-
|
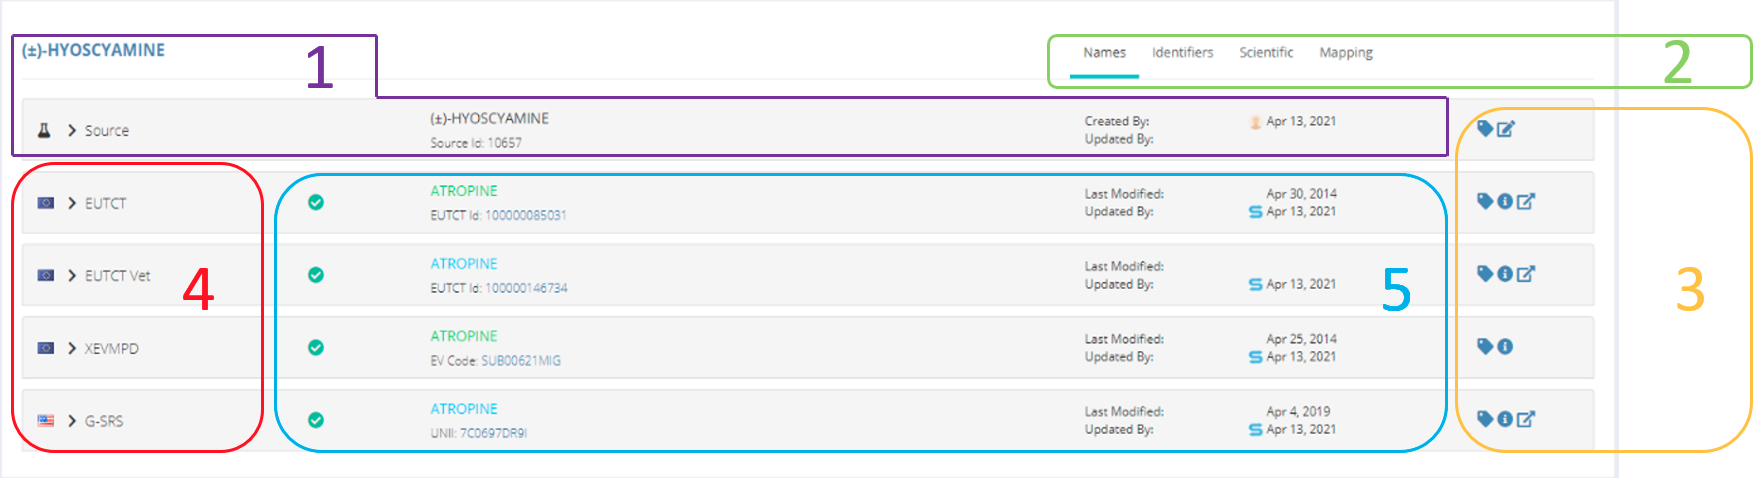
Source Substance information
-
Header: Source Substance Name provided in your import file
-
Source Substance Panel: All source substance information provided in your import file. Information will be available under each of the available Additional Information Tabs as applicable.
-
Created Date: Who created this record and when
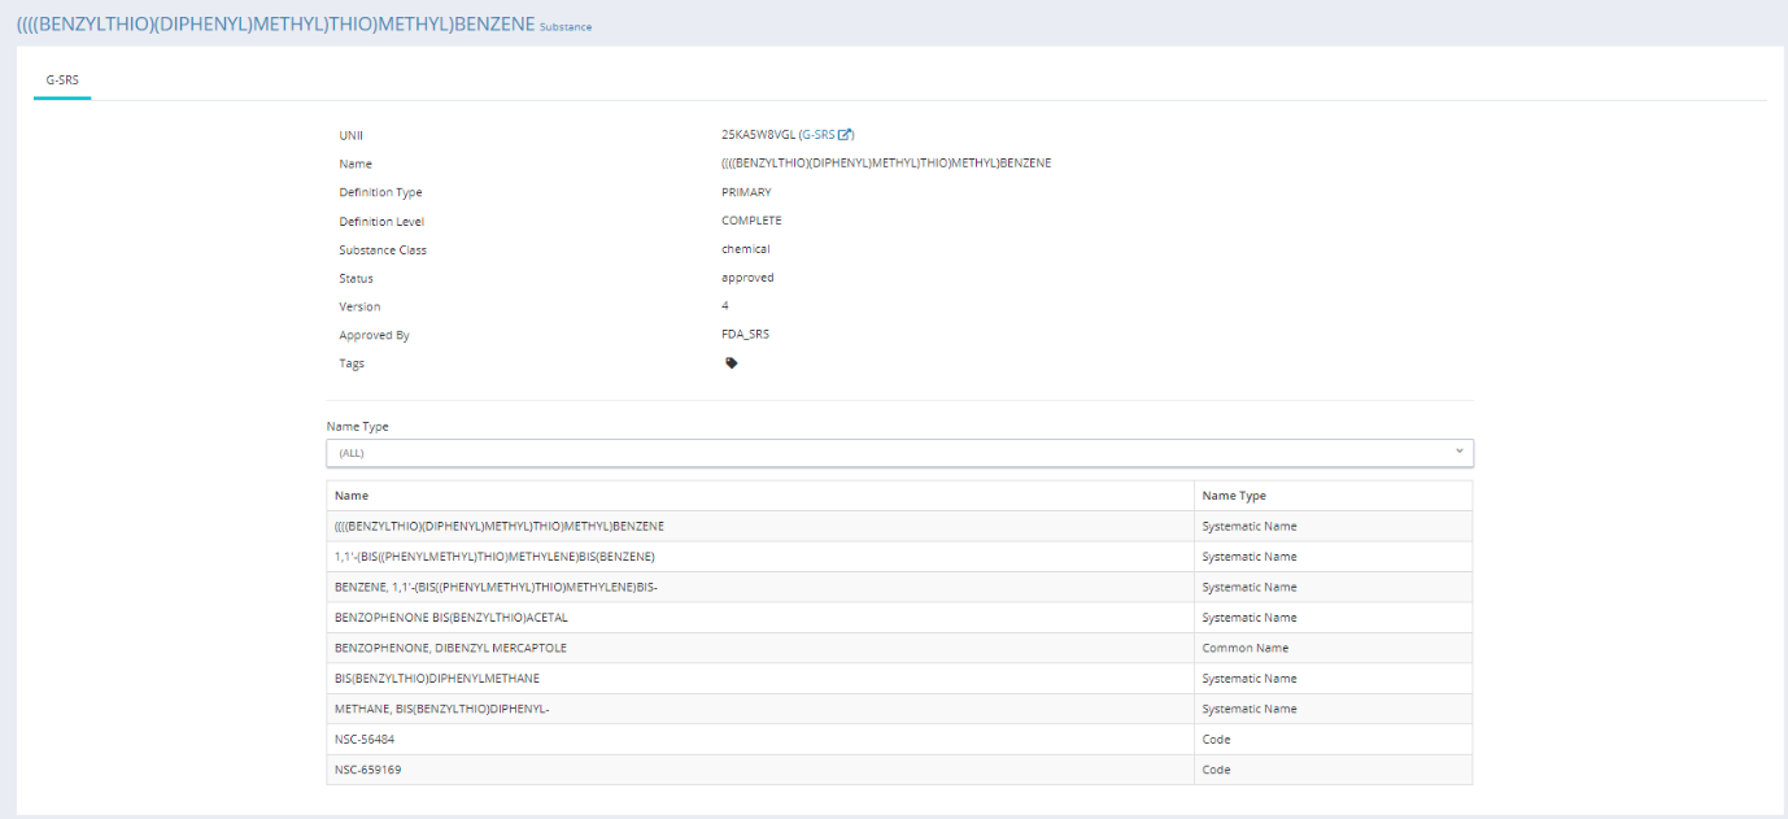
Additional Information Tabs
-
Names: Name records associated with the relevant substance
-
Identifiers: Identifiers associated with the relevant substance where applicable e.g. CAS Number, ATC Code
-
Scientific: Scientific information associated with the relevant substance e.g. SMILES, INCHI Key, Structure
-
Mapping: Area to edit or manually match a substance record or to apply a Resolution Status to a matched record
Available Options
-
Tags: Tags assigned to the substance record (source or target)
-
Edit Source: The edit icon is available only on source substance and will open a form to edit the source substance information
-
Information: Hover over the information icon for details of match type
-
External Link: The external link icon is only available on matched substances and will open an external link in the browser displaying the associated substance in the Target System
Target System Information
-
Target System Name: The name of the associated Target Substance System, e.g. G-SRS
Matched Substance Information:
From left to right the data displayed is as follows:
-
Resolution Status: The resolution status icon for the associated mapping
-
Mapped substance name: Name of the matched substance. Colour code indicates match type
-
Updated Date: Who last updated this record and when
-
Subtext: Substance ID – hyperlink to further substance detail screen
Assigning Data Tags to Substance Data
-
Assign Tags:
-
Method #1
-
Select the tag icon on the relevant substance panel.
-
Add or Remove Tags as required from the Tags control.
-
Click Save.
-
|
-
Method #2
-
Tags can also be added while editing the Source Substance Data. Refer to “#.# edit source substance”
-
Searching and Advanced Filters
-
Search across the data in the data panel using the following fields:
-
Source Substance
-
G-SRS Name
-
-
Advanced filters allow data to be filtered by the following fields:
-
Status
-
Match Type (dependent on status selected)
-
Targets
-
Sort by
-
Sort direction
-
Language
-
Tags
-
-
Refresh: Refresh the data panel with the results of the selected filters
-
Clear: Reset all filters to default
Match Types Explained
|
Name |
Description |
|---|---|
|
Exact |
Exact text match found in any available substance name for the given substance. Could be exact primary name, common name, alias etc… |
|
Suggested |
System Suggested Match Selected by User |
|
User Selected |
Manual Match |
|
System to System |
Match in Original Matching Source System Record Copied to This Record |
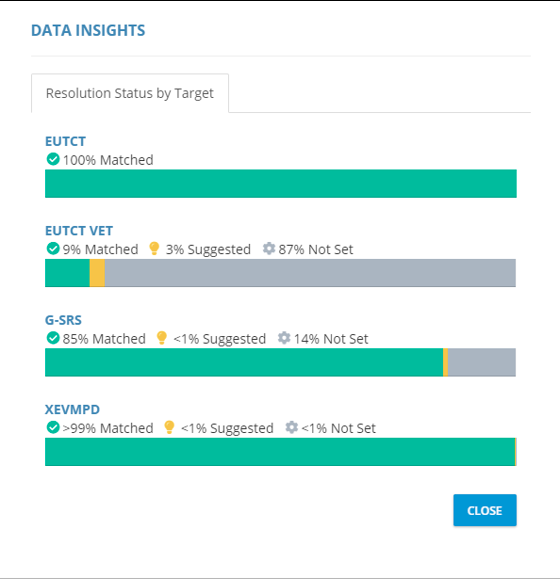
Data Insights Explained
-
Data Insight Information:
-
Data Insights show the Resolution Status for each Target System that is matched.
-
|
|
Add Substances
|
Export
Export is where you access your Mapped Data. Exports will contain your original data and also the matched data from the Target System along with any Resolution Status or Tags you have applied.
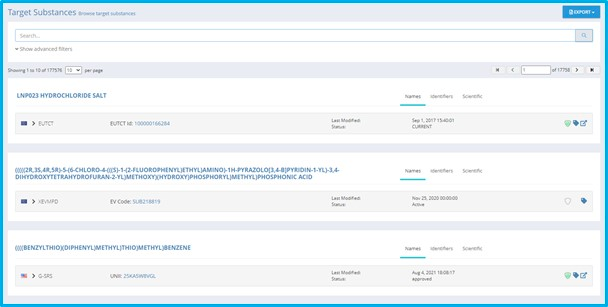
Target Substances (Browse Target Substance Lists)
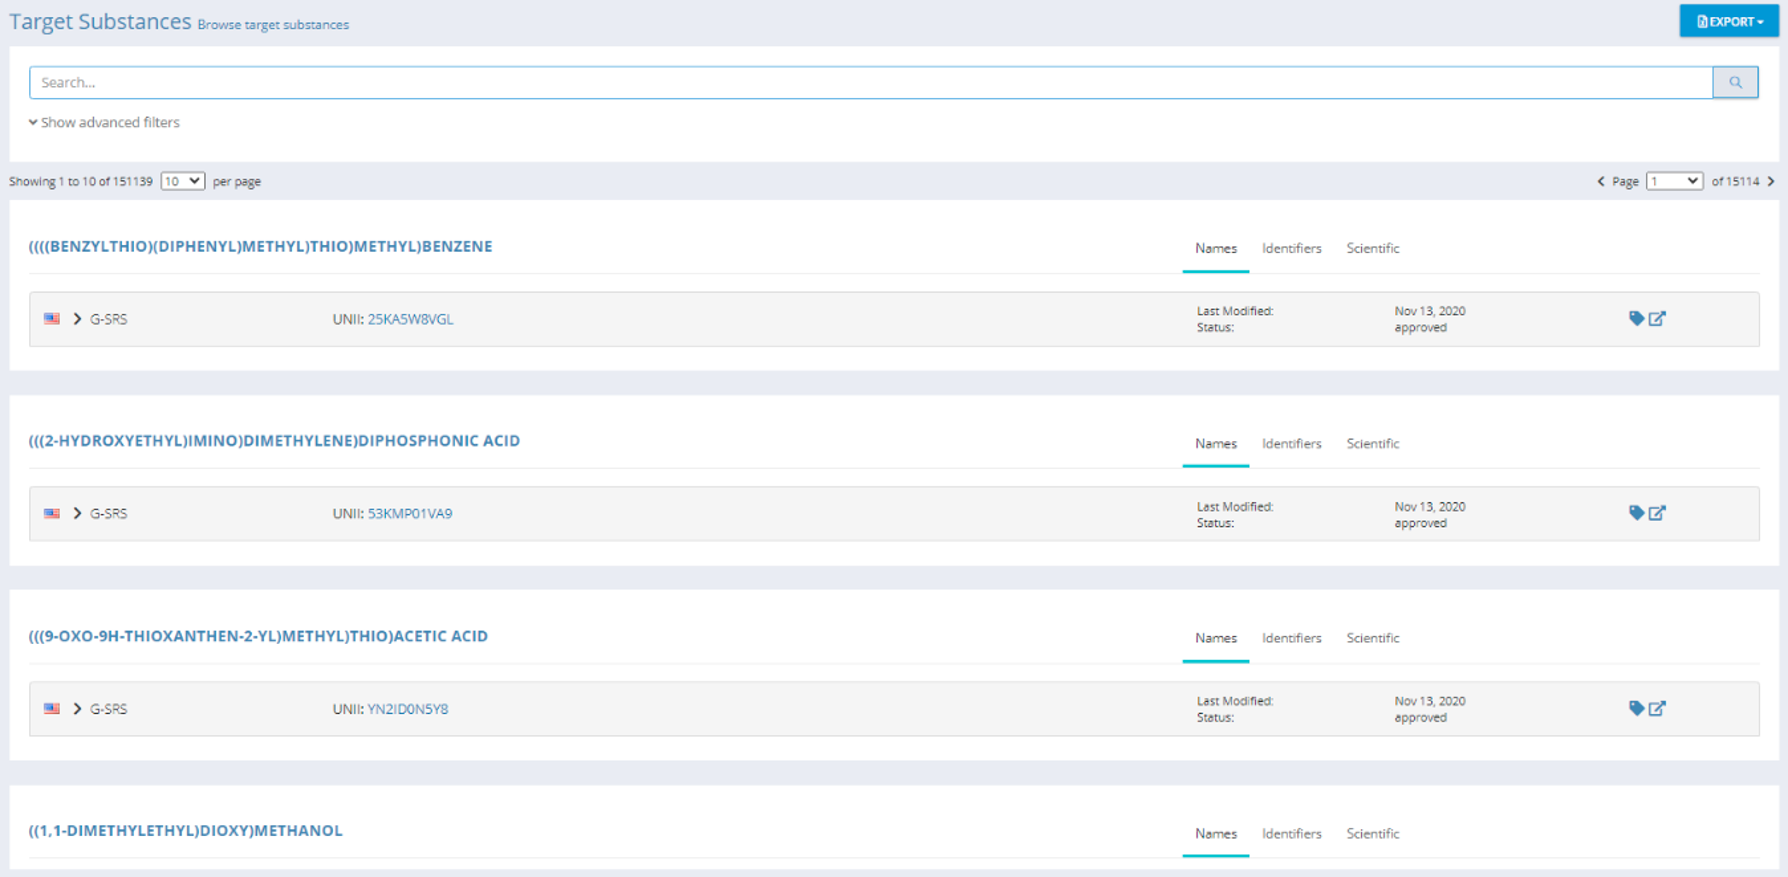
|
|
Data Governance
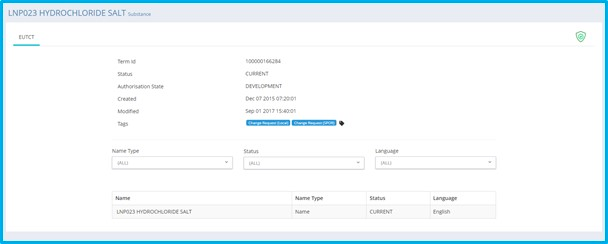
When Data Governance is switched on for this domain, target data records can be governed via Substances Source Lists, Substances Target Lists and Substances Details screens.
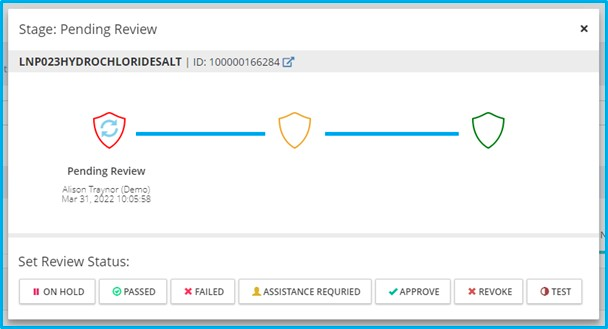
A record’s data governance status is initially set to Pending Review. The reviewer can then set a custom status and add an optional comment and the approver can thus accept or reject this status. Comments will be visible by hovering over the comment icon. If the approver rejects the status, then the record is set back to Pending Review. Any approver can also reject an item after it has already been approved to restart the process.
If the 4 eye principle is switched on, the reviewer and approver cannot be the same user.
If e-signature is switched on, the user must apply an e-signature to approve the record.
|
|
|
Available Actions:
-
Enable
-
Govern (Stage: Pending Review)
-
Set Review Status
-
Add Comment
-
-
|
|
-
Govern (Stage: Reviewed)
-
Accept
-
Reject
-
|
|
|

|