Get certified by completing our SPORIFY Users Training course which is available via the CorrIT Training Academy. Contact your local SPORIFY administrator for more information.
General Information
System Overview
The features of the system include:
Functions
-
Provide system and user administration to tenants.
-
Match preformatted Excel or CSV lists to SPOR Master Data Management Services and G-SRS controlled substance lists.
-
Provide the ability to create and set a Resolution Status to each term on your uploaded list.
-
Provide the ability to create and apply Data Tags to your Source or Target Data.
-
Export each list you have uploaded along with the set Resolution Status and any associated Mapping Data from RMS, OMS or G-SRS, as applicable to your list.
-
Provide an overview of your activity and Mapping Status via chart-based reports. These reports are known inside SPORIFY as Dashboard, Overview and Data Insight pages.
-
Provide an overview of the information available in SPOR RMS & OMS and G-SRS services.
-
Provide notifications to highlight when SPOR information is updated.
Note: Features available are dependent on the subscription plan you have licensed. Not all features are available for all subscription plans.
Browser Compatibility Settings
General Settings
-
SPORIFY makes use of modern web technology. To experience the system at its best we recommend a modern web browser listed below:
|
Browser |
Supported Version |
|---|---|
|
Chrome |
Latest |
|
Firefox |
Latest |
|
Edge |
Latest |
|
Internet Explorer |
11.70 + |
-
The system has been tested successfully in Internet Explorer 11.70. However, it is not recommended to run the system in older versions of Internet Explorer due to possible compatibility issues with the angular framework technology used by the system.
Administration Guide
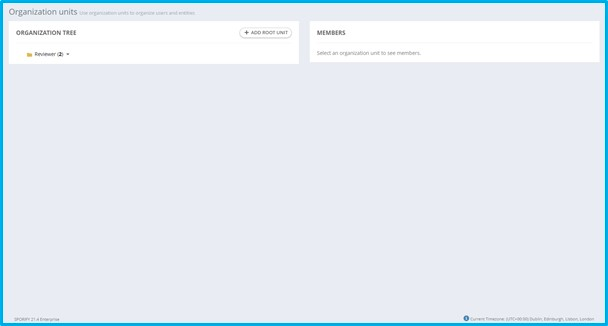
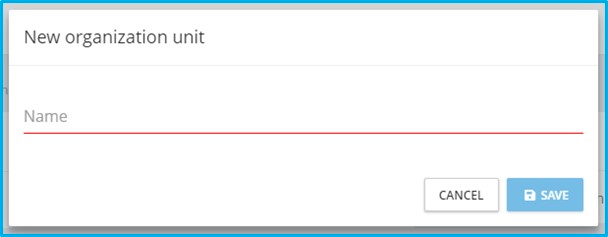
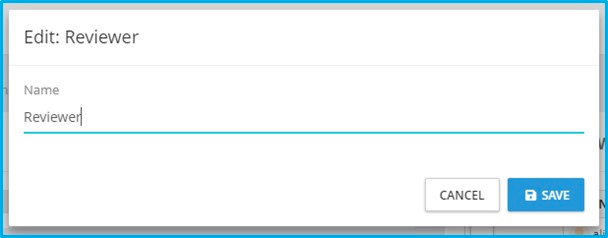
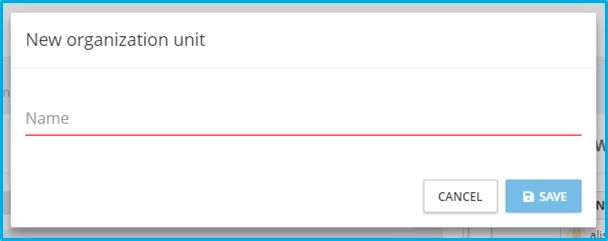
Organization units
|
Available Actions:
-
Add root unit
|
-
Edit
|
-
Add sub unit
|
-
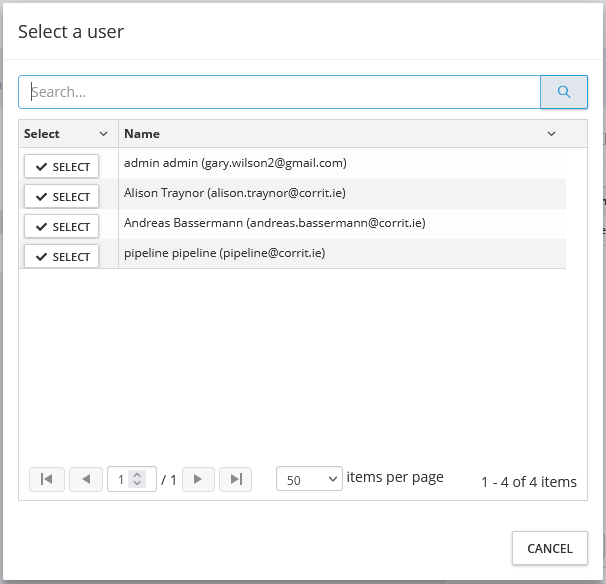
Add member
|
-
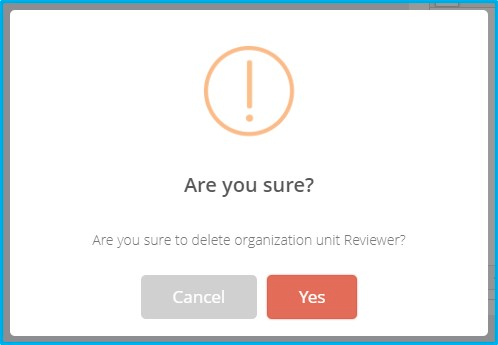
Delete
|
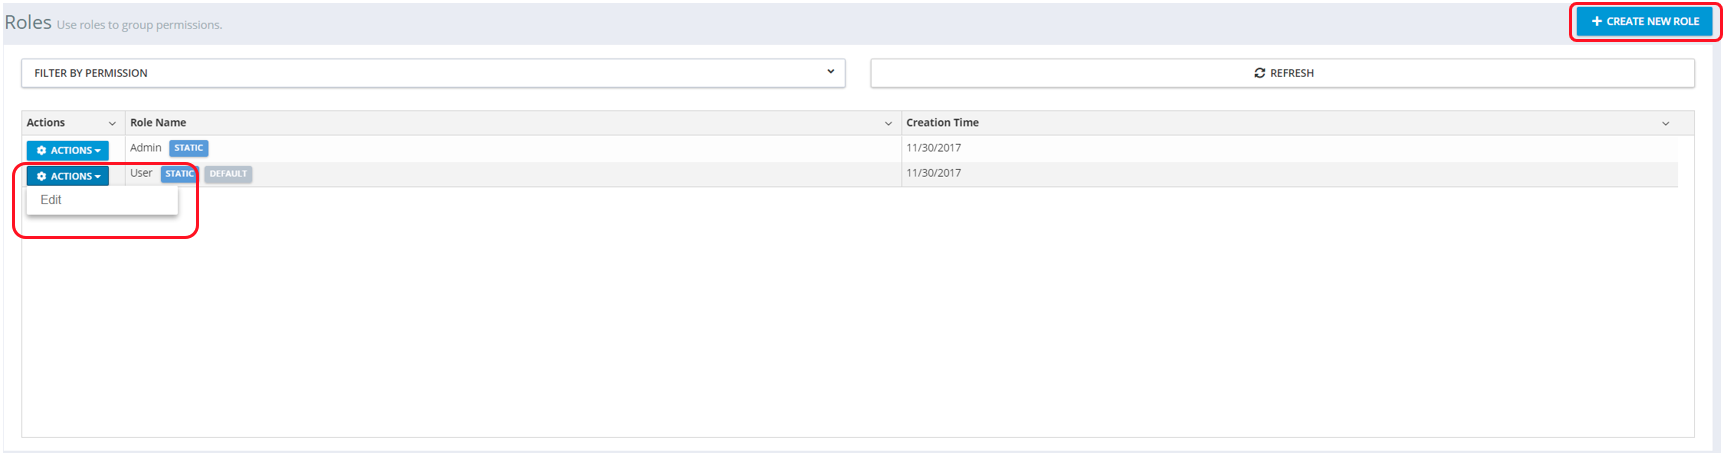
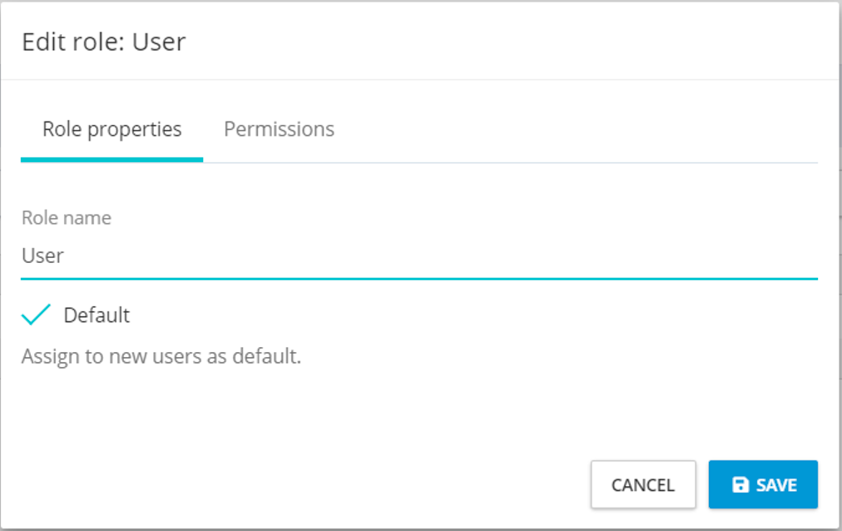
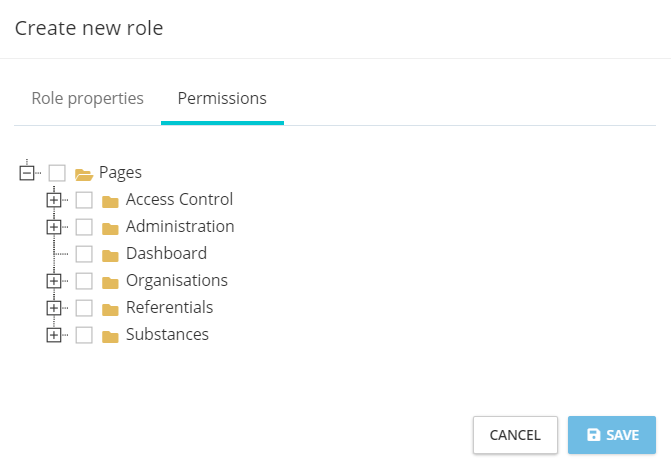
Roles
|
Available Actions:
-
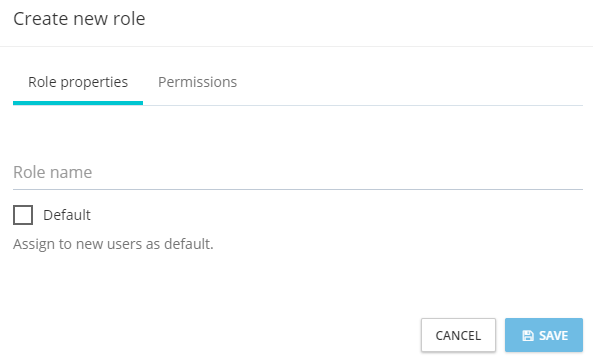
Create New Role
-
Role properties:
-
Role name
-
On/Off: Assign new users by default
-
-
Permissions
-
|
-
Edit
-
Edit role properties:
-
Edit role name
-
On/Off: Assign new users by default
-
-
Permissions
-
|
Assigning Permissions to a Role:
Select permissions from the tree view and save them to apply them to the created role.
|
Users
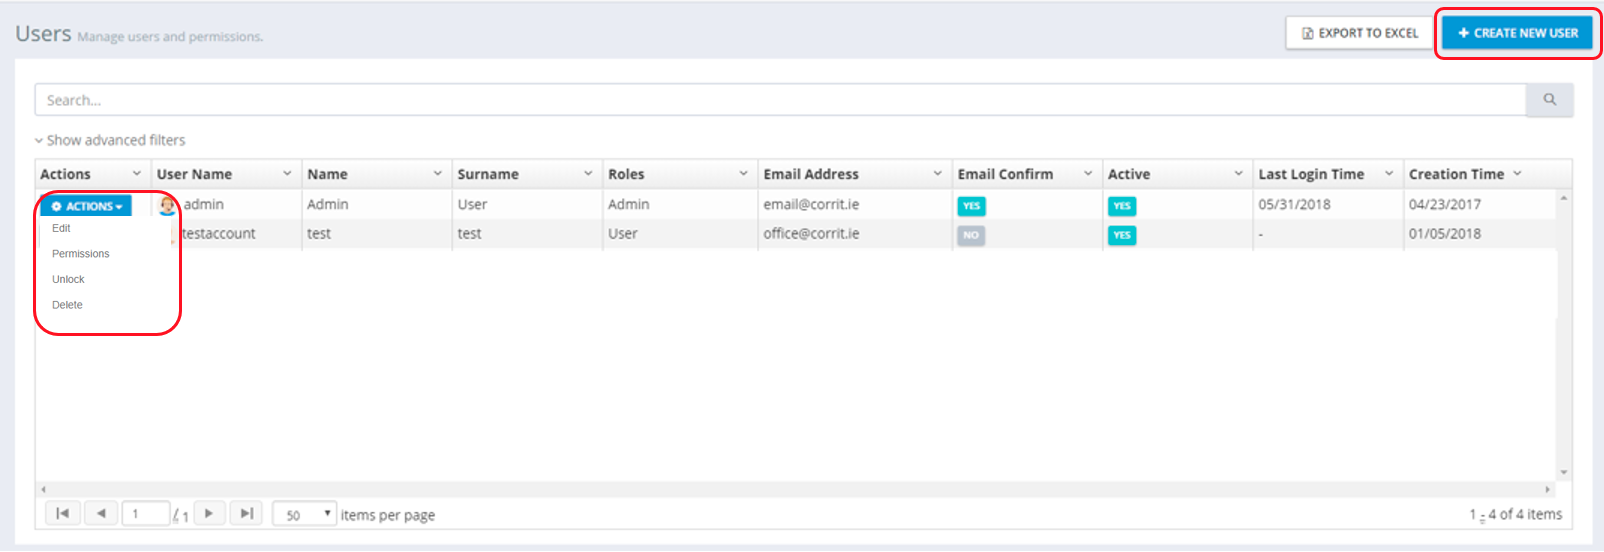
|
Available Actions:
-
Create new user
-
Edit user
-
Assign roles
-
Assign permissions
-
Unlock
-
Delete
-
Login as this user
Note: This feature is helpful when troubleshooting user queries or working on another user's behalf. All actions carried out while an administrator is logged into another managed user account are clearly labelled in the audit log: “This operation is performed by another user on behalf of this user.”
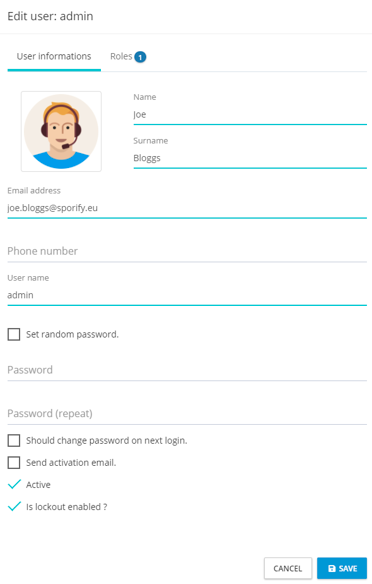
Create New User
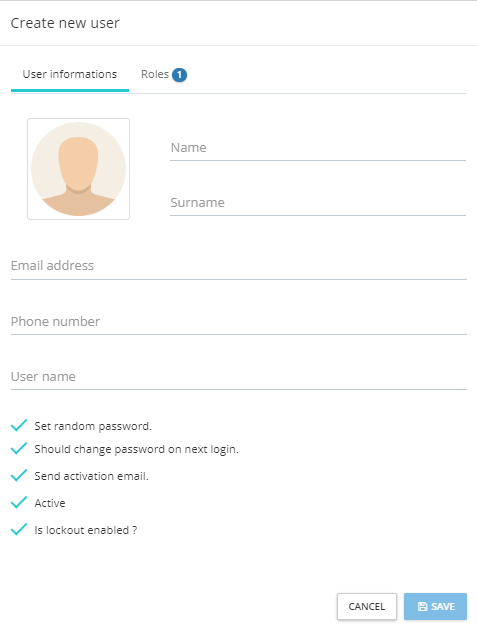
|
Available Settings:
-
Name
-
Surname
-
Email address
-
Phone number
-
Username
-
Profile picture
-
Security Settings:
-
Set random password
-
Should change password on next login
-
Send activation email
-
Account status (active)
-
Is lockout enabled?
-
-
Assign Roles:
-
Select from available roles
-
Edit New User
|
Available Settings:
-
Name
-
Surname
-
Email address
-
Phone number
-
Username
-
Profile picture
-
Security Settings:
-
Set random password
-
Set new password
-
Should change password on next login
-
Send activation email
-
Account status (active)
-
Is lockout enabled?
-
-
Assign Roles:
-
Select from available roles
-
Assign Permissions
Users can be assigned permissions outside of their provided roles if required.
Note: For a more efficient way to administer user permissions, please review the Roles section of this document. Roles allow permissions to be applied to users in groups to ease the administration overhead.

|
Available Top-Level Permissions:
-
Pages: Root level, required for SPORIFY Access
-
Access Control: Controls visibility of user data to other users within your tenant (RMS, OMS and SMS lists uploaded by this user will be shared with all users, but if disabled user data is private to their account)
-
Administration: Provides administration features to the user
-
Organisations: Permissions in the SPORIFY Organisations area
-
Referentials: Permissions in the SPORIFY Referentials area
-
Substances: Permissions in the SPORIFY Substances area
-
Dashboard: SPORIFY main dashboard and navigation bar
Audit Logs

|
Description
-
Audit Logs can be filtered based on available criteria.
-
Audit logs can be exported to Excel.
-
Audit Logs show an error state:
-
Success
-
Has Error
-
-
Information about each entry can be found by clicking the detail button on the left of the table.
-
SPORIFY support staff may request a copy of the Audit Logs when troubleshooting.
Change logs
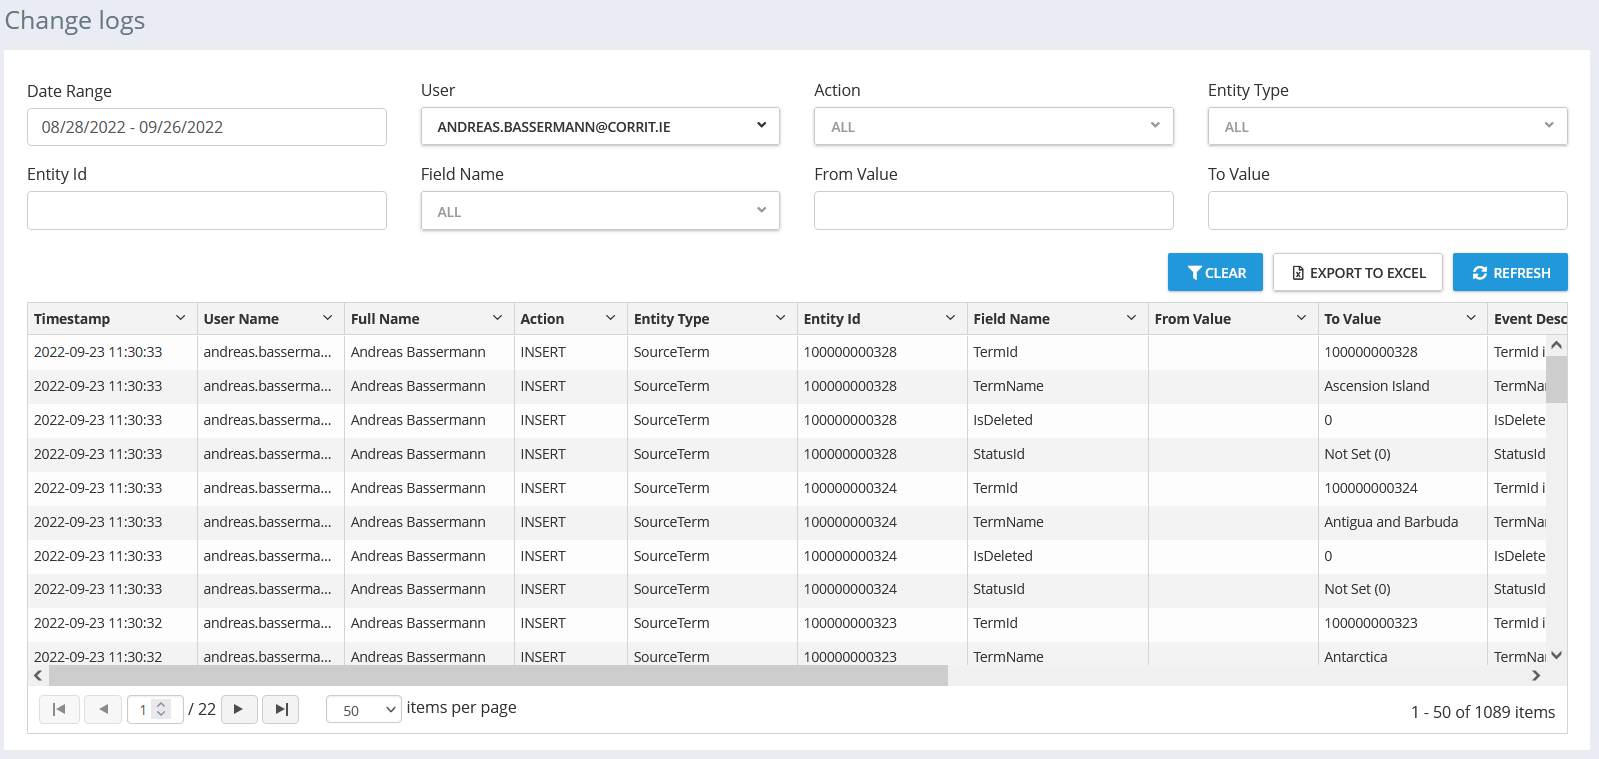
|
Available Actions:
-
Search
-
Filter
-
Date Range
-
From Value
-
To Value
-
Username
-
Action
-
Entity Type
-
Entity ID
-
Field Name
-
-
Export to Excel
-
Refresh
Authentication logs
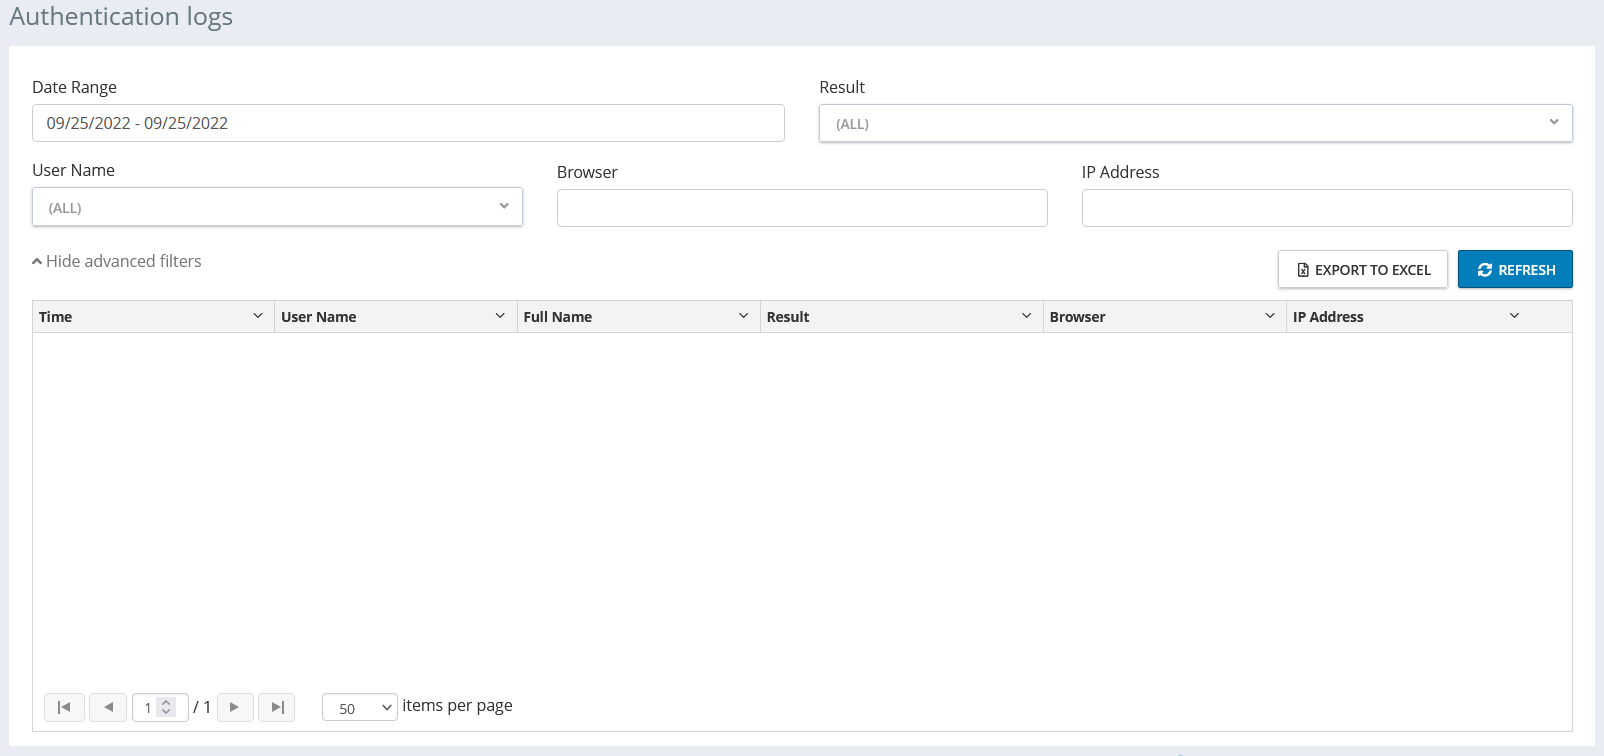
|
Available Actions:
-
Search
-
Filter
-
Date Range
-
From Value
-
Result
-
User Name
-
Browser
-
IP Address
-
-
Export to Excel
-
Refresh
Settings
General

|
Available Settings:
Timezone:
-
Choose your required timezone from the drop-down menu.
Target System Update Preferences:
-
Referential Target System Update Preference
-
If disabled, system defaults apply. If enabled, the following target data changes will impact Data Governance and Auto Apply Resolution Status: ID, Name (EN), Description (EN), Domain.
-
-
Organisation Target System Update Preference
-
If disabled, system defaults apply. If enabled, the following target data changes will impact Data Governance and Auto Apply Resolution Status. Organisations: ID, Name, Identifiers. Locations: ID, Address, Identifiers.
-
-
Substance Target System Update Preference
-
If disabled, system defaults apply. If enabled, the following target data changes will impact Data Governance and Auto Apply Resolution Status: ID, Name (Preferred Name).
-
Match Settings
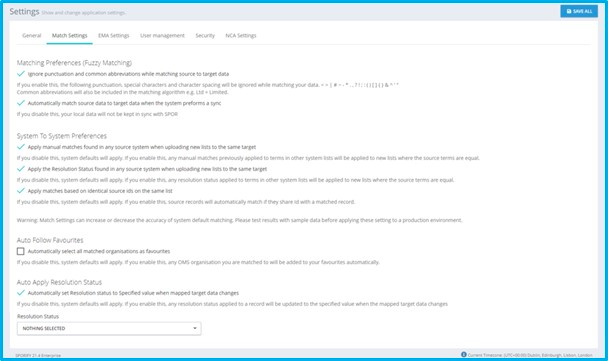
|
Available Settings:
Matching Preferences (Fuzzy Matching):
-
On/Off: Ignore punctuation and common abbreviations while matching source to Target data.
-
If you enable this, the following punctuation, special characters and character spacing will be ignored while matching your data: < > | # ~ - * . , ? ! ; : ( ) [ ] { } & ^ ' "
-
SPORIFY will also include common abbreviations in the matching algorithm, e.g. Ltd = Limited.
-
-
On/Off: Automatically match Source Data to Target Data when the system preforms a sync.
-
If you disable this, your local data will not be kept in sync with SPOR.
-
System To System Preferences:
-
On/Off: Apply manual matches found in any source system when uploading new lists to the same target.
-
If you disable this, system defaults will apply. If you enable this, any manual matches previously applied to terms in other system lists will be applied to new lists where the source terms are equal.
-
-
On/Off: Apply the Resolution Status found in any source system when uploading new lists to the same target.
-
If you disable this, system defaults will apply. If you enable this, any Resolution Status applied to terms in other system lists will be applied to new lists where the source terms are equal.
-
-
On/Off: Apply matches based on identical source IDs on the same list.
-
If you disable this, system defaults will apply. If you enable this, source records will automatically match if they share Id with a matched record.
-
Warning: Match Settings can increase or decrease the accuracy of system default matching. Please test results with sample data before applying these settings to a production environment.
Auto Follow Favourites:
-
On/Off: If you disable this, system defaults will apply. If you enable this, any OMS organisation you are matched to will be added to your favourites automatically.
EMA Settings
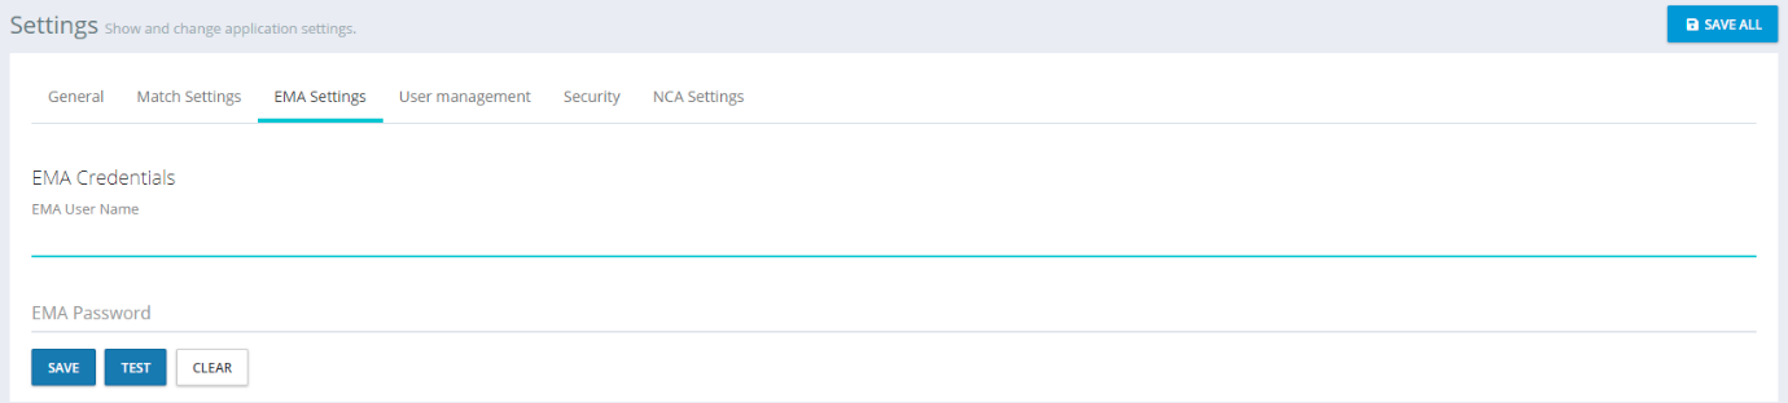
|
Available Settings:
-
EMA Credentials (User Name and Password)
-
Credentials are required for EMA SPOR API access on behalf of your organisation.
-
One EMA credential is required per tenant account.
-
Enter credentials and click Test to confirm that the account has API access.
-
To remove your EMA credentials from SPORIFY, select Clear and Save.
-
User Management
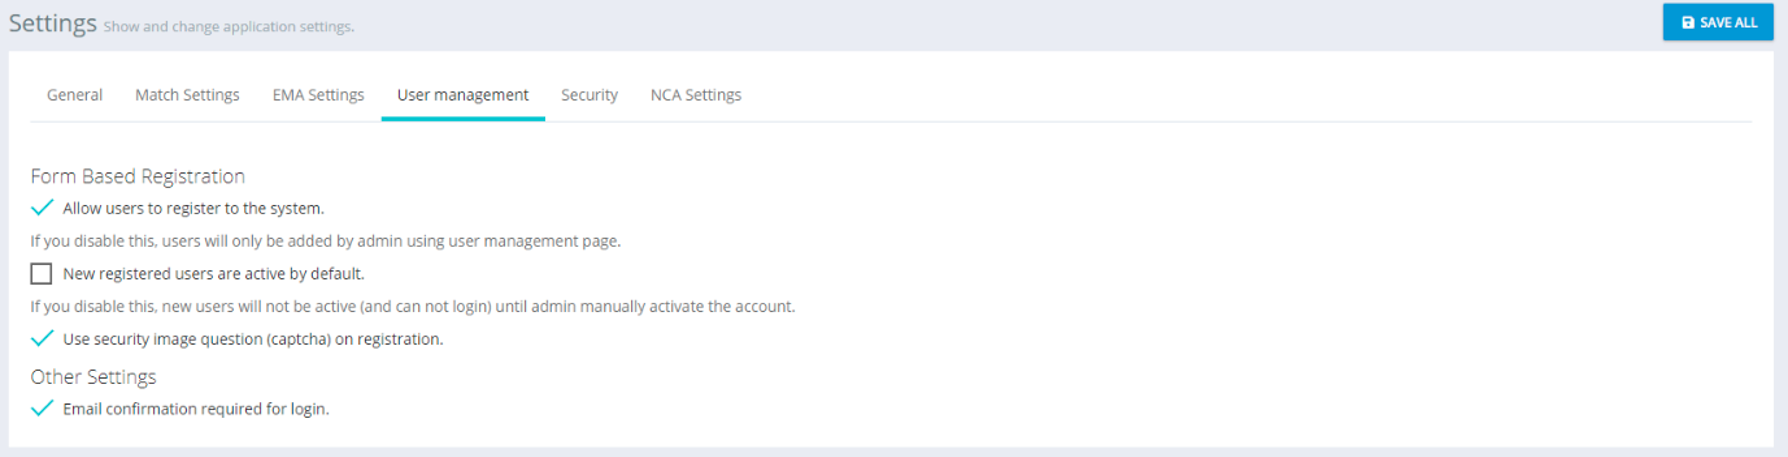
|
Available Settings:
Form Based Registration
-
On/Off: Allow users to register to the system.
-
If disabled, users can only be created by a tenant admin account using the user management page.
-
-
On/Off: Set auto-activate preference.
-
If you disable this, new users will not be active (and cannot login) until admin manually activate the account.
-
-
On/Off: Require Captcha security question.
-
On/Off: Email confirmation required for login of new users.
Security
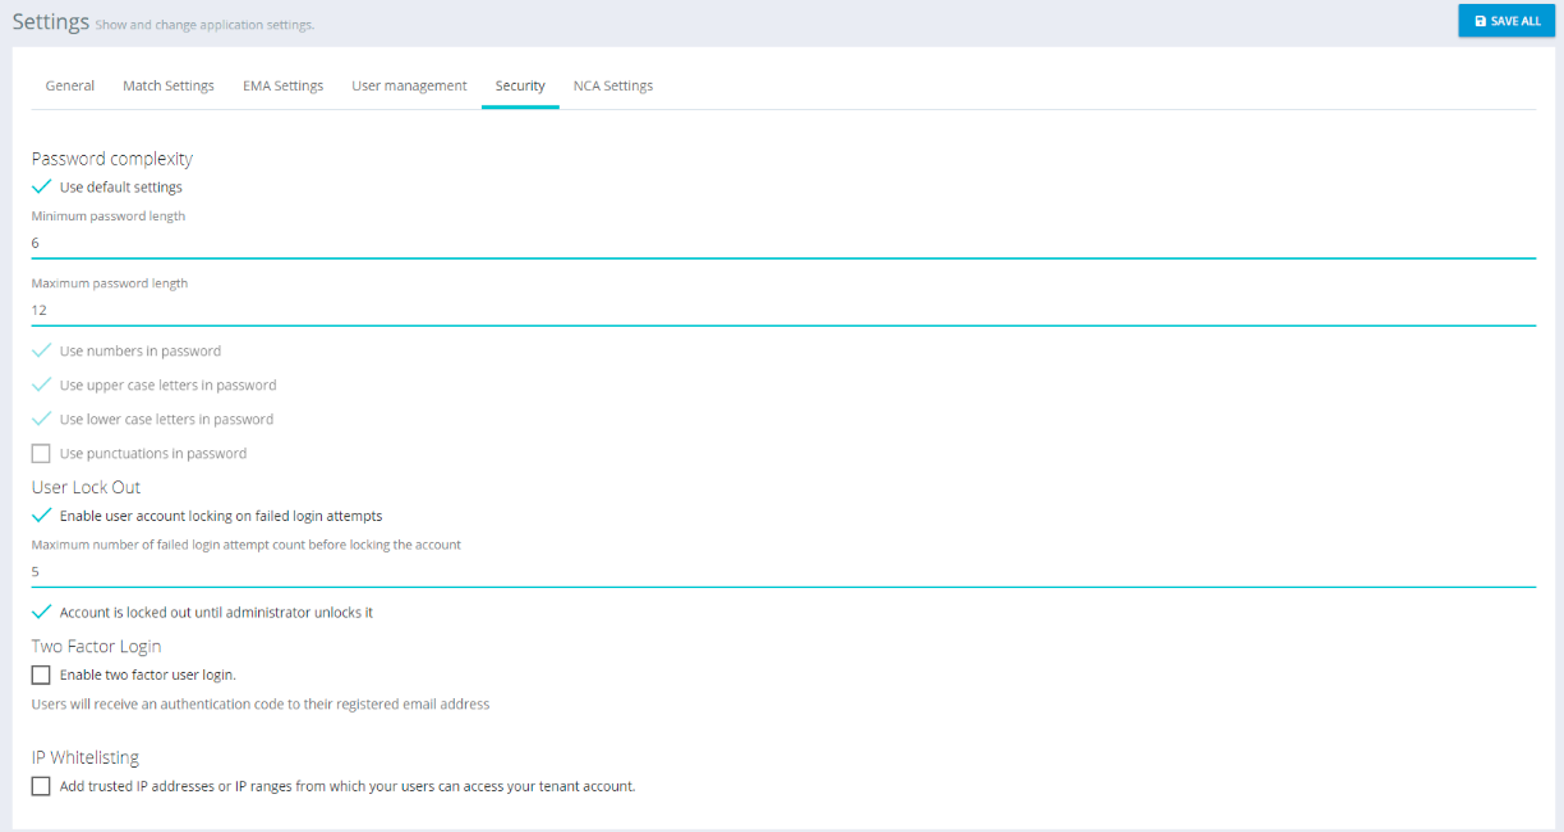
|
Available Settings:
Password complexity
-
On/Off: Use default settings.
-
If Off is selected, on-screen default settings will be applied.
-
-
Set minimum password length.
-
Set maximum password length.
-
Complexity requirements:
-
On/Off: Use numbers in password.
-
On/Off: Use upper case letters in password.
-
On/Off: Use lower case letters in password.
-
On/Off: Use punctuation marks in password.
-
Enforce Password History
-
On/Off: Limit Password Reuse.
-
Set maximum number of unique passwords before an old password can be reused.
-
Password Expiration
-
On/Off: Enable Password Expiration.
-
Set maximum number of days before users have to renew password.
-
User Lock Out
-
On/Off: Enable user lockout after failed login attempts.
-
Set maximum number of failed attempts before locking the account.
-
-
On/Off: Account is locked until administrator unlocks it.
Two Factor Login
-
On/Off: Enable two factor user login.
-
Users will receive an authentication code to their registered email address.
-
-
On/Off: Allow to remember browser.
-
If you allow this, users can select to remember the browser so that they do not have to do the two factor login twice on the same browser.
-
IP Whitelisting
-
Add trusted IP addresses or IP ranges from which your users can access your tenant account.
-
Add one entry per line in the format x.x.x.x for a single address or x.x.x.x/y for a range of addresses.
-
Session Idle Timeout
-
On/Off: Automatically Log Out User After A Set Period Of Inactivity.
-
Set maximum number of seconds before logging out the user.
-
NCA Settings
Note: NCA Settings are only available with the NCA edition of SPORIFY.

|
Available Settings:
Translation Settings
-
Default translation status
-
Choose appropriate status from the drop-down menu.
-
-
Translation Languages
-
Choose appropriate language from the drop-down menu.
-
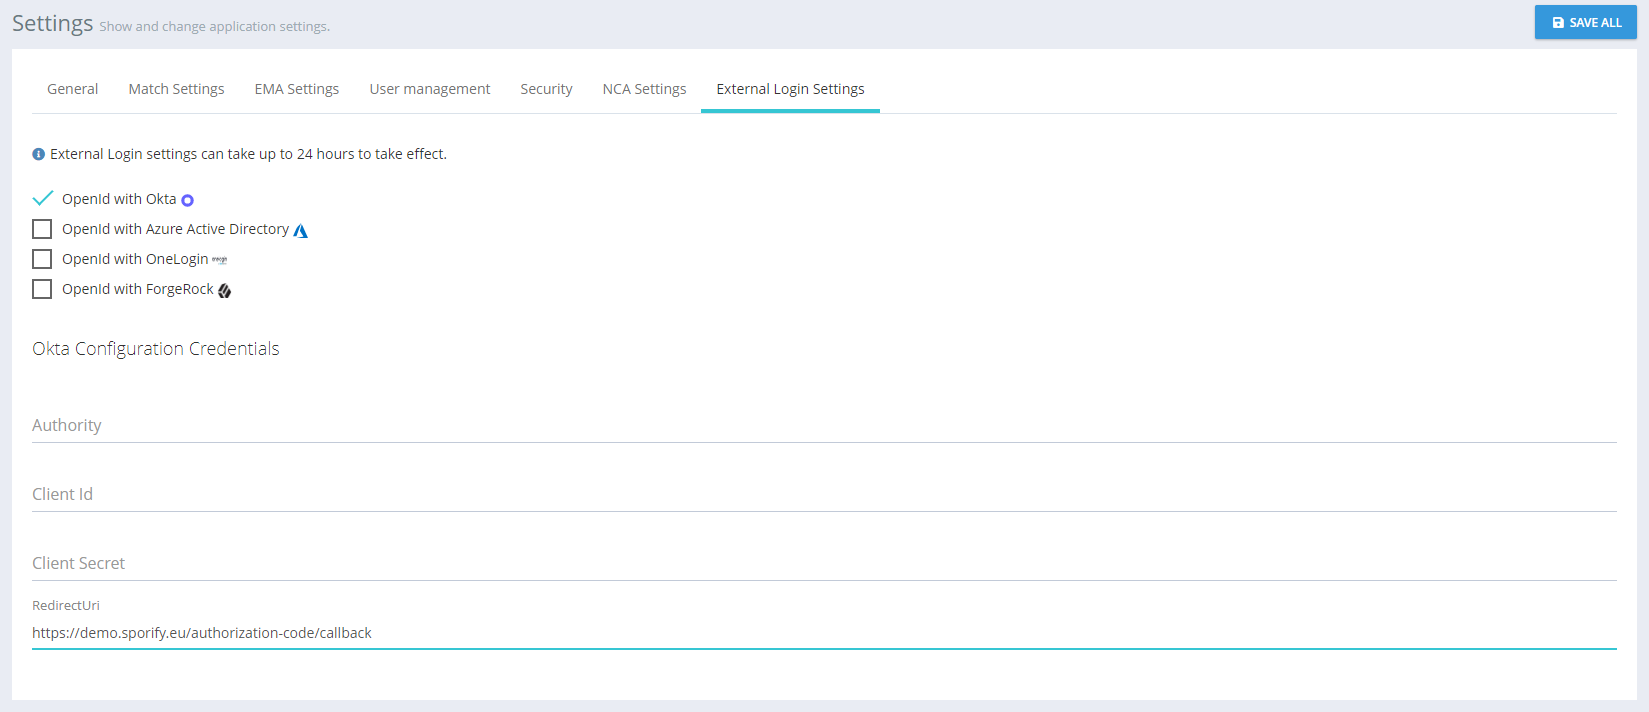
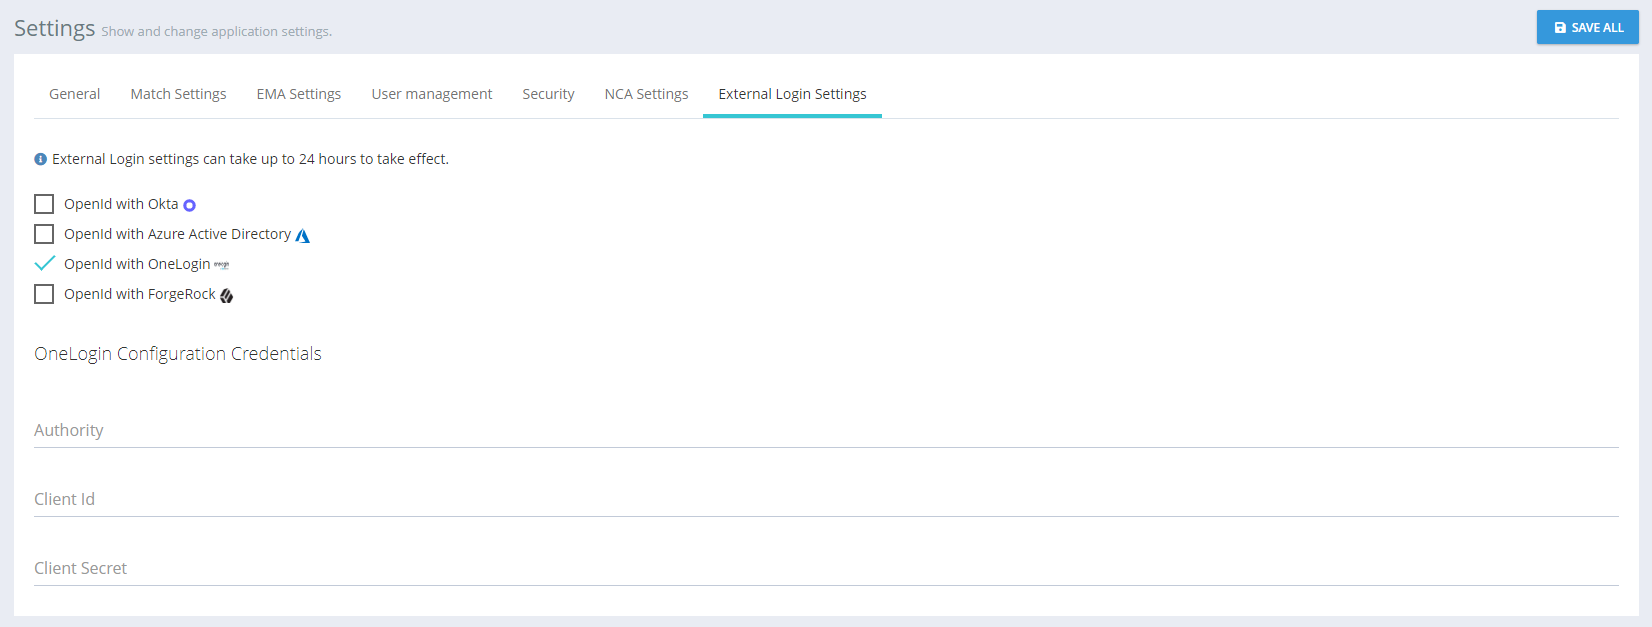
External Login Settings
With External Login Settings, it´s possible to include user accounts hosted on an external identity provider. SPORIFY supports OpenID Connect 1.0 with Okta, Microsoft Azure AD, OneLogin, and ForgeRock as identity provider.
|

|
|

|
Available Settings:
-
OpenID with Okta
-
Authority
-
Client ID
-
Client Secret
-
Redirect URL
-
-
OpenID with Azure Active Directory
-
Authority
-
Client ID
-
Client Secret
-
-
OpenID with OneLogin
-
Authority
-
Client ID
-
Client Secret
-
-
OpenID with ForgeRock
-
Authority
-
Client ID
-
Client Secret
-
Redirect URL
-
Obtaining OpenID With Okta Credentials:
-
Login to Okta.
|
-
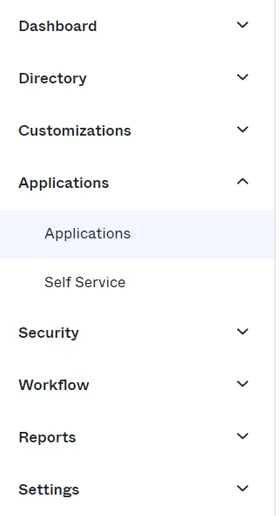
Select Applications on the navigation menu.
-
Select Applications.
|
-
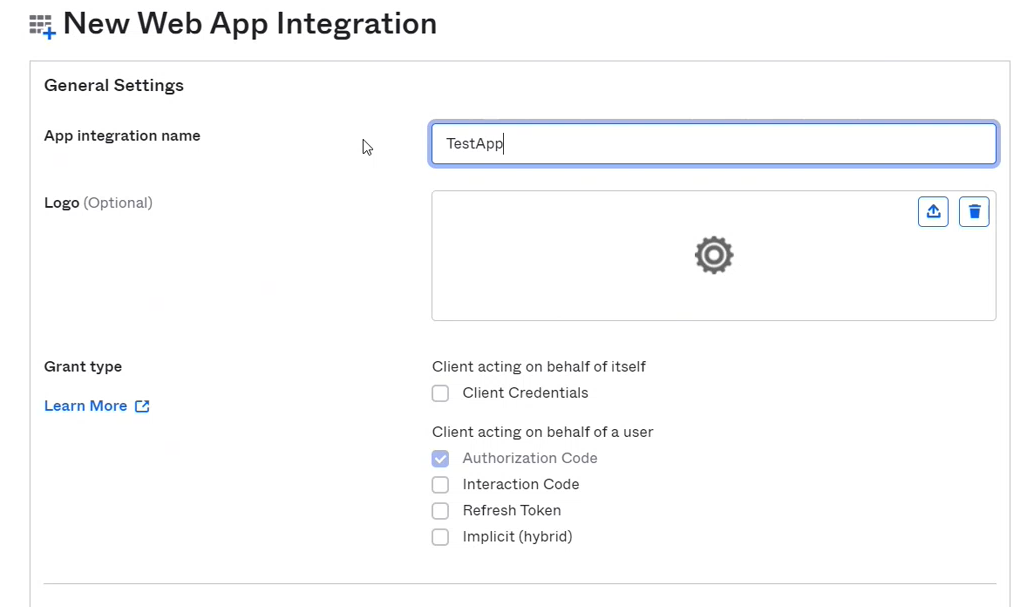
Click the Create App Integration button.

|
-
Select the following options:
-
Sign-in method
-
OIDC - OpenID Connect
-
-
Application type
-
Web Application
-
-
-
Click the Next button.

|
-
Complete the following fields:
-
General Settings
-
App integration name
-
Grant type
-
Select Authorization Code and Implicit (hybrid)
-
-
-
|
-
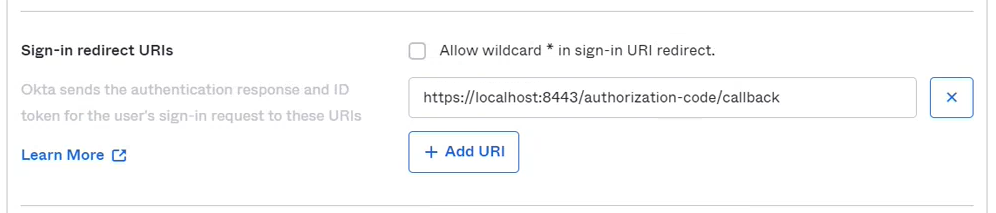
Sign-in redirect URIs
-
Insert URI.
-
For production, use https://sporify.eu/authorization-code/callback
-
For validation, use https://v.sporify.eu/authorization-code/callback
-
Note that no port number is needed for this URI
-
-
|
-
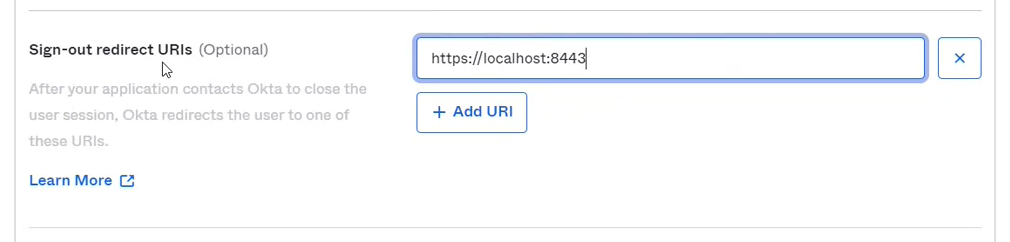
Sign-out redirect URIs
-
Insert URI.
-
For production, use https://sporify.eu/logout
-
For validation, use https://v.sporify.eu/logout
-
-
|
-
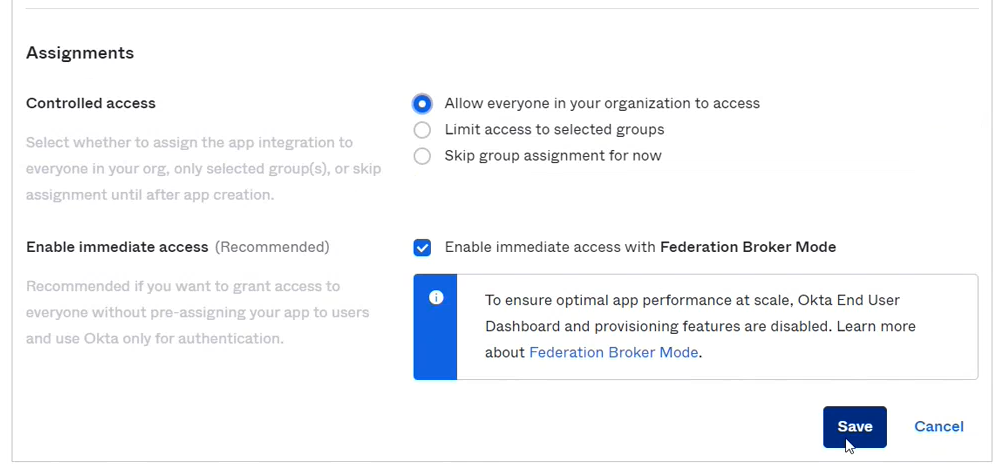
Assignments
-
Controlled access
-
Select the relevant option.
-
-
Enable immediate access
-
Check the ‘Enable immediate access with Federation Broker Mode’ checkbox.
-
-
-
Click the Save button.
|
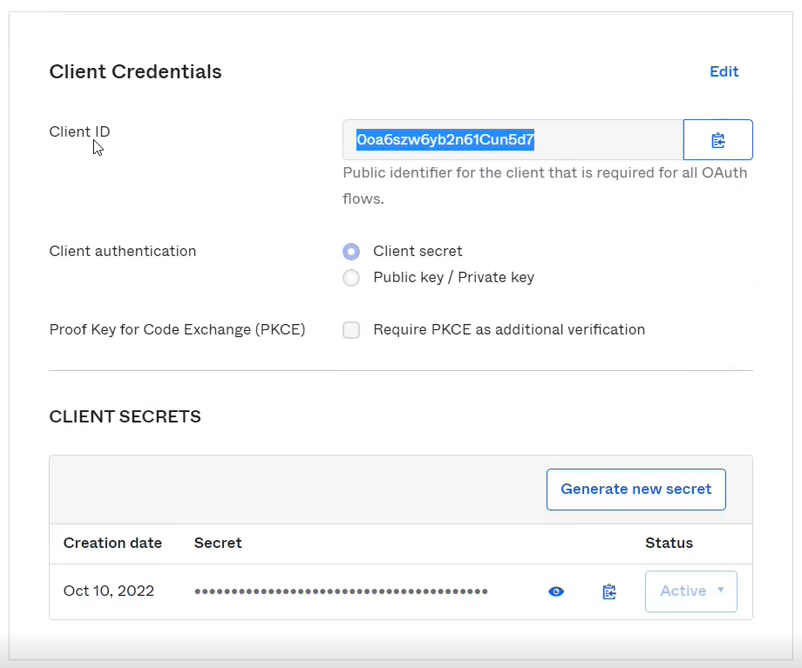
-
View the information provided about the created app, including Client ID and Client Secret.
|
-
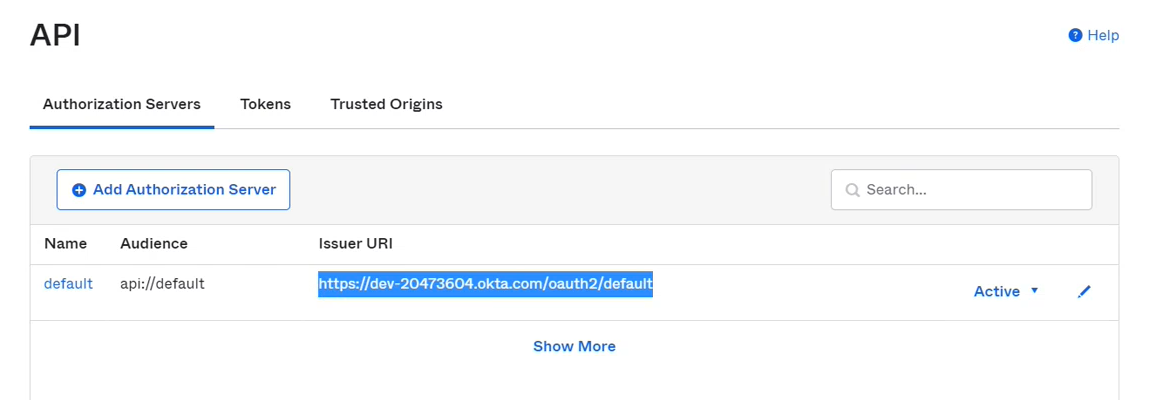
Select Security on the navigation menu.
-
View the relevant Issuer URI, which is the required Authority code.
|
-
Once the credentials have been obtained:
-
Login to SPORIFY.
-
Click Administration on the navigation menu.
-
Click Settings.
-
Select External Login Settings.
-
Check the OpenID with Okta checkbox.
-
Complete the presented fields.
-
Click Save All.
-

|
Obtaining OpenID With Azure Active Directory Credentials:
-
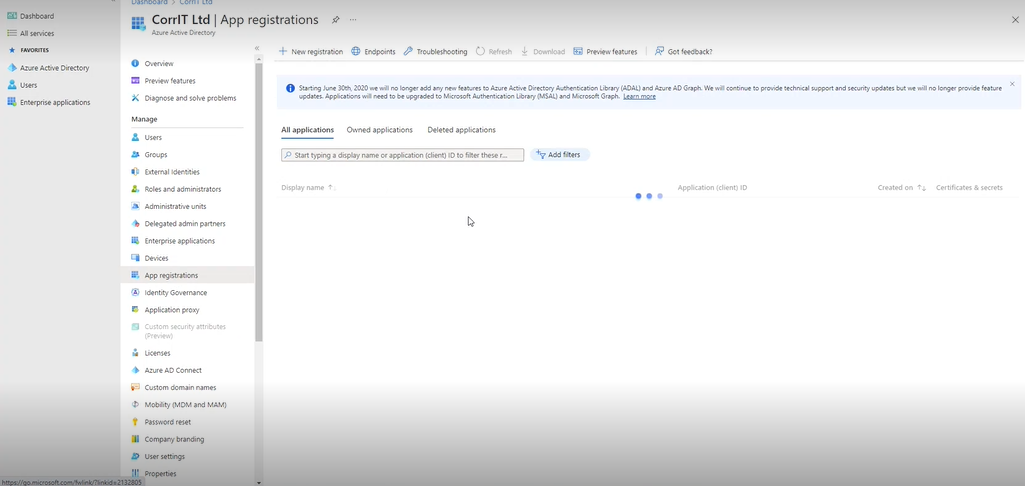
Login to http://aad.portal.azure.com .
-
Select Azure Active Directory.
-
Select App Registrations on the navigation menu.
-
Click New Registration.
|
-
Name the application using the Name field.

|
-
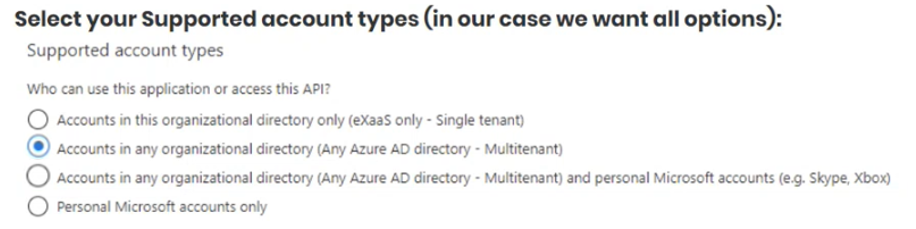
Select the supported account type ‘Accounts in any organizational directory (Any Azure ID directory - Multitenant).
|
-
Under Redirect URI, select Web using the first field.
-
Set the redirect URI to https://sporify.eu/account/externalLoginCallback for production or https://v.sporify.eu/account/externalLoginCallback for validation.

|
-
Click Register.
-
Under Essentials, click on the Redirect URIS link.

-
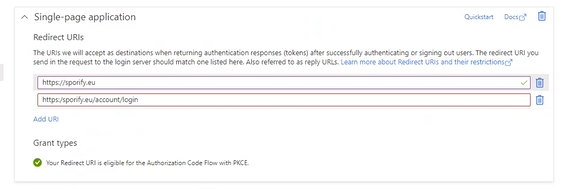
Under Single-Page Application, enter https://sporify.eu in the first field for production or https://v.sporify.eu for validation.
-
Enter https://sporify.eu/account/login in the second field for production or https://v.sporify.eu/account/login for validation.
|
-
Under Front Channel Logout URL, add the following URL: https://sporify.eu/logout.

|
-
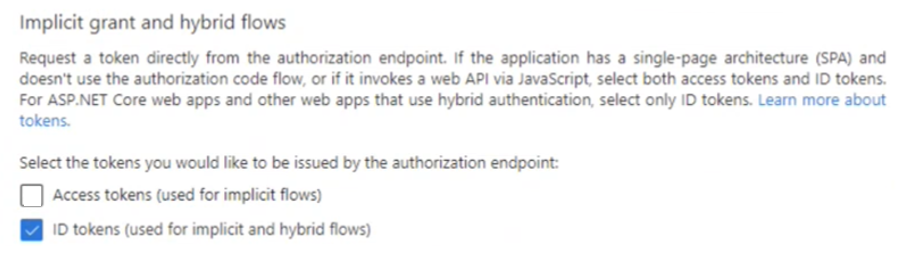
Under Implicit Grant And Hybrid Flows, select ‘ID tokens (used for implicit and hybrid flows)’.
|
-
Click Save.
-
Navigate to Certificates & Secrets.
-
Click New Client Secret.
-
Provide a description in the Description field.
-
Set an expiry date using the Expires field.

|
-
View the Client Secret that has been created.

|
-
Copy and save the Secret ID.
-
Navigate to the Overview tab to view and copy the Client ID.

|
-
Select Token Configuration on the navigation menu.
-
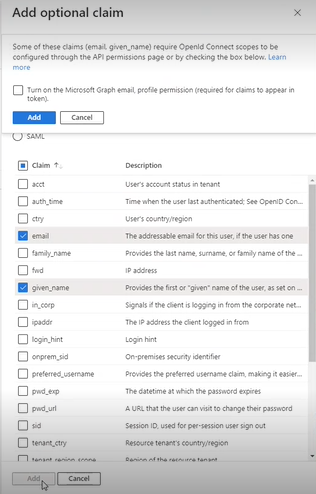
Click Add Optional Claim.
-
Under Token Type, select ID.
-
Select the following claims: email and given_name.
-
Click Add.
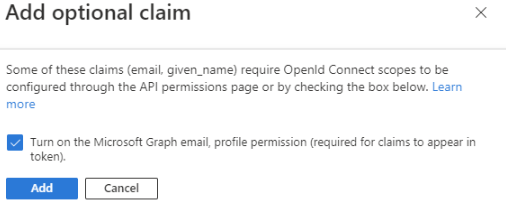
|
-
Check the ‘Turn on the Microsoft Graph email, profile permission…’ checkbox.
-
Click Add.
|
-
Click Add Optional Claim again.
-
Under Token Type, select Access.
-
Check email and given_name.
-
Click Add.
-
Once the credentials have been obtained:
-
Login to SPORIFY.
-
Click Administration on the navigation menu.
-
Click Settings.
-
Select External Login Settings.
-
Check the OpenID with Azure Active Directory checkbox.
-
Complete the presented fields.
-
Click Save All.
-

|
Logging In To SPORIFY Using SSO:
-
Insert the relevant credentials.
-
Click the Single Sign On button.
-
The user is redirected to Okta/Azure/OneLogin.
-
|
-
Login via Okta/Azure/OneLogin.
-
If the user has already signed up, they are redirected to SPORIFY.
-
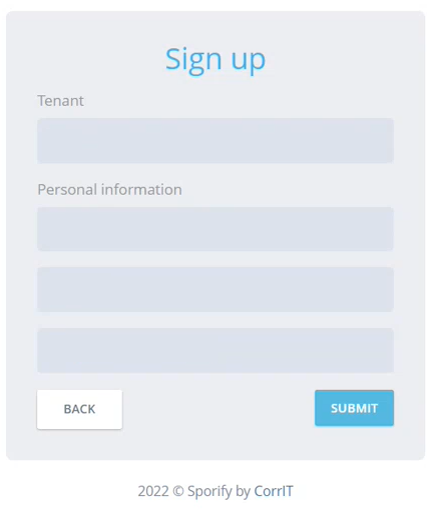
If the user has not already signed up, they are redirected to the SPORIFY Sign Up screen.
-
-
To sign up, fill in the following fields:
-
Tenant
-
First name
-
Surname
-
Email
-
-
Click the Submit button.
-
A confirmation email is sent to the user. Via this email, the user is required to confirm their email address.
-
The user must then wait for their account to be activated by system admin.
-
|
Manage Systems

|
Available Settings:
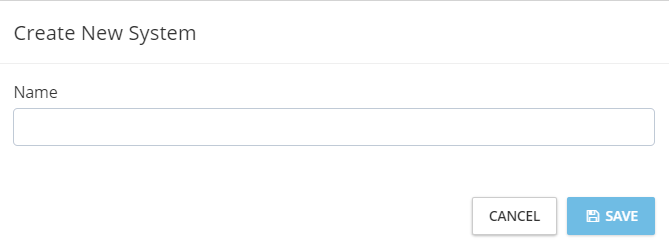
-
Create New System
-
Name system
-
|
-
Edit System
-
Edit system name
-

|
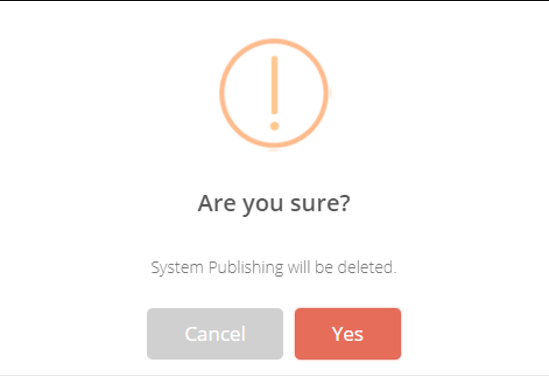
-
Delete System
-
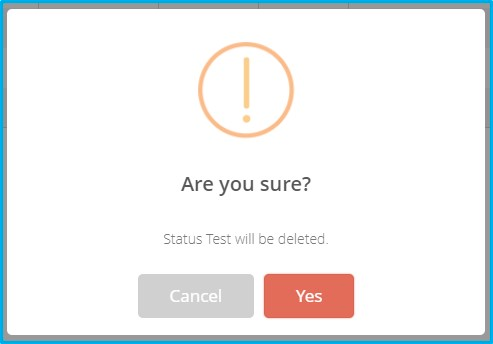
Confirm the deletion action by clicking Yes
-
|
Note: Deleting a Resolution Status will revert the status of all records in the system that the deleted Resolution Status was applied to back to their default status set by SPORIFY after matching, e.g. “Matched”, “Not Set” or “Suggested” as applicable.
Tags

|
Available Settings:
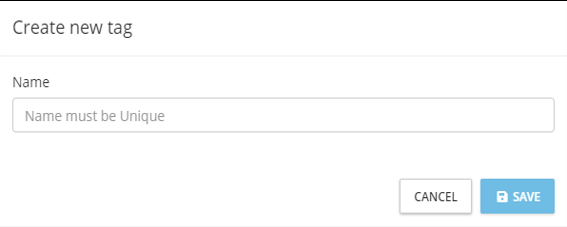
-
Create new Tag
-
Name
-
|
-
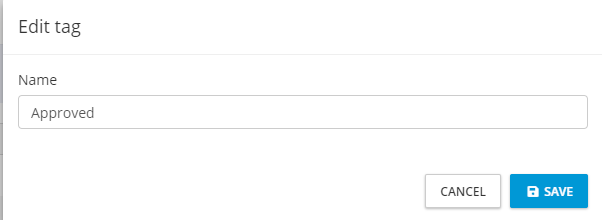
Edit Tag
-
Name
-
|
-
Delete Tag
-
Confirm the deletion action by clicking Yes.
-

|
Note: Deleting a Tag will remove the Tag from any data that it has been associated with. The system will ask if you are sure you wish to proceed with the delete action. A summary of the number of records the Tag will be removed from will be displayed for your information. You must confirm if you wish to proceed or cancel.
Resolution Status

|
Available Settings:
-
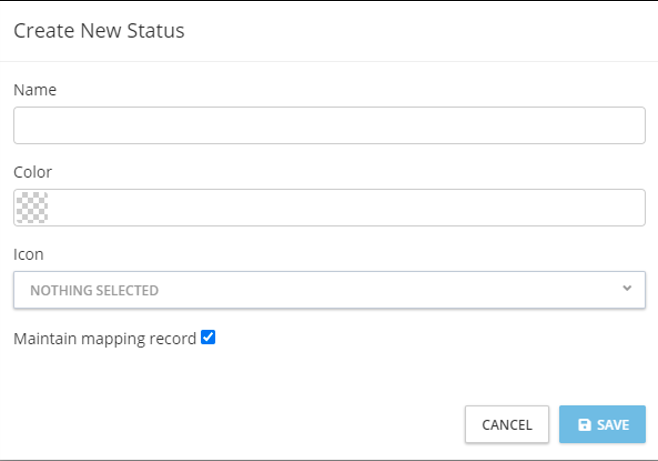
Create Status
-
Name
-
Colour
-
Icon
-
On/Off: Maintain mapping record
-
-
Edit
-
Delete
|
Note: Users cannot delete a Resolution Status if it is already in use.
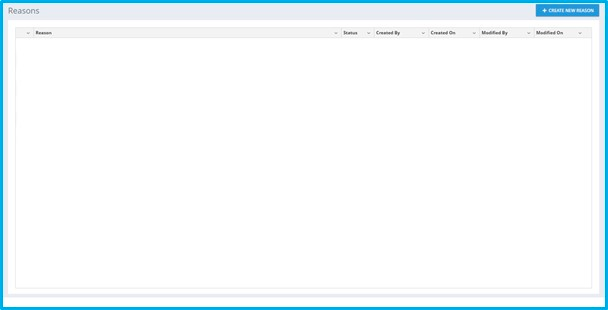
Change Reasons
Change Reasons are utilised as part of e-signature which is an optional setting under Data Governance for each data domain. When completing e-signature, a reasons dropdown is available where approvers can choose from this pre-defined reason list.
Note: By default, no reasons will be automatically created. SPORIFY administrators must create reasons suitable for their internal process.
|
Available Actions:
-
Create New Reason
-
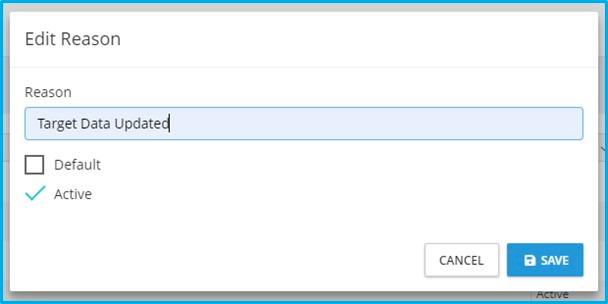
Reason
-
On/Off: Default
-
On/Off: Active
-

|
-
Edit
|
-
Delete

|
Data Governance
Settings

|
Available Settings:
-
Substances
-
On/Off: Governance Required
-
Assign Reviewers
-
Assign Approvers
-
On/Off: 4 Eye Principal
-
On/Off: Enable Governance Where Record Matched
-
On/Off: E-Signature
-
-
Organisations
-
On/Off: Governance Required
-
Assign Reviewers
-
Assign Approvers
-
On/Off: 4 Eye Principal
-
On/Off: Enable Governance Where Record Matched
-
On/Off: E-Signature
-
-
Referentials
-
On/Off: Governance Required
-
Assign Reviewers
-
Assign Approvers
-
On/Off: 4 Eye Principal
-
On/Off: Enable Governance Where Record Matched
-
On/Off: E-Signature
-
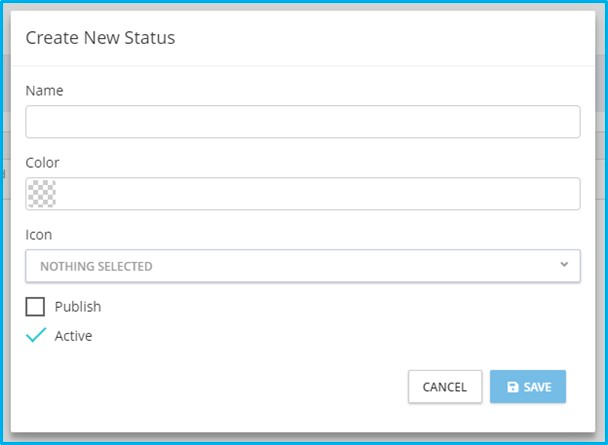
Governance Status
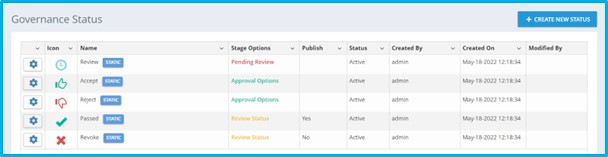
|
Available Actions:
-
Create New Status
-
Name
-
Colour
-
Icon
-
Publish
-
Active
-
|
-
Edit (Static Status)
|
-
Edit (User Defined Status)
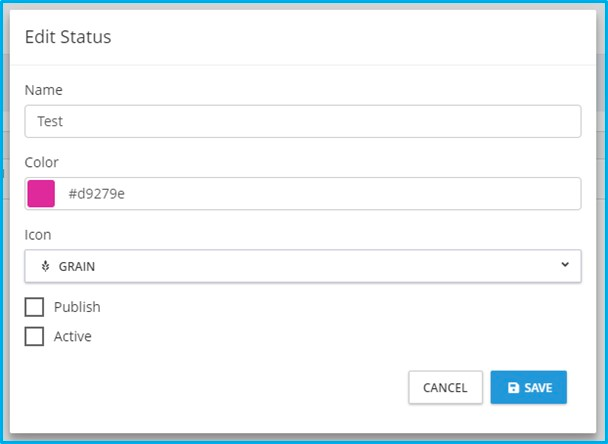
|
-
Delete
Note: Only user defined statuses can be deleted. When attempting to delete a status that is already applied to records, the action is denied and the user is presented with a usage count of the given status across Referentials, Organisations, and Substances records.
|
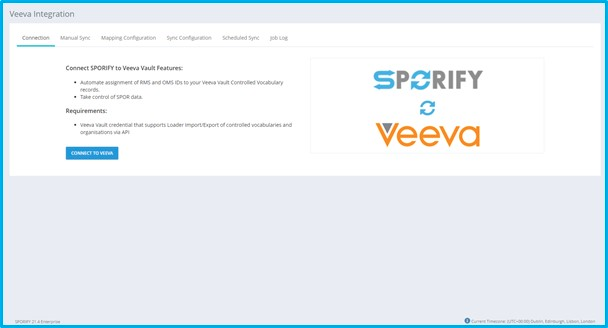
Veeva Integration
SPORIFY’s optional Veeva Integration connects SPORIFY directly with Veeva Vault RIM and synchronises Controlled Vocabularies and Organisation and Substance records with SPORIFY, where you can manage your SPOR data with Data Governance and Data Flow Control.

|
|
Prerequisites
We recommend the use of a service account for SPORIFY to access Veeva Vault RIM. In order to use SPORIFY’S Veeva Vault RIM integration, it is necessary to have access to the following Veeva Vault RIM objects and fields, all of which are required by the SPORIFY service account.
Access is required to the following Veeva Vault RIM objects:
|
Vault RIM Object Name |
|---|
|
drug_substance_v |
|
excipient__v |
|
organization__rim |
|
country__v |
|
language__rim |
|
controlled_vocabulary__rim |
The following fields must be available for import:
|
Vault RIM Object Name |
Vault RIM Field Name |
|---|---|
|
controlled_vocabulary__rim |
|
|
|
id |
|
|
name__v |
|
country__v |
|
|
|
id |
|
|
name__v |
|
language__rim |
|
|
|
id |
|
|
name__v |
|
organization__rim |
|
|
|
id |
|
|
name__v |
|
|
address__rim |
|
|
city__rim |
|
|
state__rim |
|
|
postcode__rim |
|
|
country__rim.name__v |
|
drug_substance__v |
|
|
|
id |
|
|
name__v |
|
|
ev_code__v |
|
|
spor_substance_code__v |
|
|
us_substance_code__v |
|
|
eudamed_inn__v |
|
|
cas_number__v |
|
excipient__v |
|
|
|
id |
|
|
name__v |
|
|
ev_code__v |
|
|
spor_substance_code__v |
|
|
us_substance_code__v |
The following fields must be available for export:
|
Vault RIM Object Name |
Vault RIM Field Name |
SPORIFY Mapped Data |
|---|---|---|
|
controlled_vocabulary__rim |
|
|
|
|
Vault RIM fieldname |
SPORIFY Mapping |
|
|
id |
N/A |
|
|
spor_list_id__v, |
RMS List ID |
|
|
spor_list_name__v |
RMS List Name |
|
|
spor_rms_id__v |
RMS Term ID |
|
|
spor_term__v |
RMS Term Name |
|
|
spor_status__v |
RMS Term Status |
|
|
spor_domain__v |
RMS Term Domain |
|
|
spor_version__v |
RMS Term Version |
|
country__v |
|
|
|
|
Vault RIM fieldname |
SPORIFY Mapping |
|
|
id |
N/A |
|
|
spor_list_id__v, |
RMS List ID |
|
|
spor_list_name__v |
RMS List Name |
|
|
spor_rms_id__v |
RMS Term ID |
|
|
spor_term__v |
RMS Term Name |
|
|
spor_status__v |
RMS Term Status |
|
|
spor_domain__v |
RMS Term Domain |
|
|
spor_version__v |
RMS Term Version |
|
language__rim |
|
|
|
|
Vault RIM fieldname |
SPORIFY Mapping |
|
|
id |
N/A |
|
|
spor_list_id__v, |
RMS List ID |
|
|
spor_list_name__v |
RMS List Name |
|
|
spor_rms_id__v |
RMS Term ID |
|
|
spor_term__v |
RMS Term Name |
|
|
spor_status__v |
RMS Term Status |
|
|
spor_domain__v |
RMS Term Domain |
|
|
spor_version__v |
RMS Term Version |
|
organization__rim |
|
|
|
|
Vault RIM fieldname |
SPORIFY Mapping |
|
|
id |
N/A |
|
|
spor_oms_id__v |
SPOR OMS ID |
|
|
spor_location_id__v |
SPOR LOC ID |
|
|
location_status__v |
SPOR LOC Status |
|
drug_substance__v |
|
|
|
|
Vault RIM fieldname |
SPORIFY Mapping |
|
|
id |
N/A |
|
|
ev_code__v |
ev code (XEVMPD) |
|
|
spor_substance_code__v |
EUTCT ID |
|
|
us_substance_code__v |
G-SRS UNII |
|
|
spor_term__v |
EUTCT Substance Name |
|
excipient__v |
|
|
|
|
Vault RIM fieldname |
SPORIFY Mapping |
|
|
id |
N/A |
|
|
ev_code__v |
ev code (XEVMPD) |
|
|
spor_substance_code__v |
EUTCT ID |
|
|
us_substance_code__v |
G-SRS UNII |
|
|
spor_term__v |
EUTCT Substance Name |
Account Permissions
The following account permissions are advised to provide least privilege to the service account used to connect to your Vault RIM tenant.
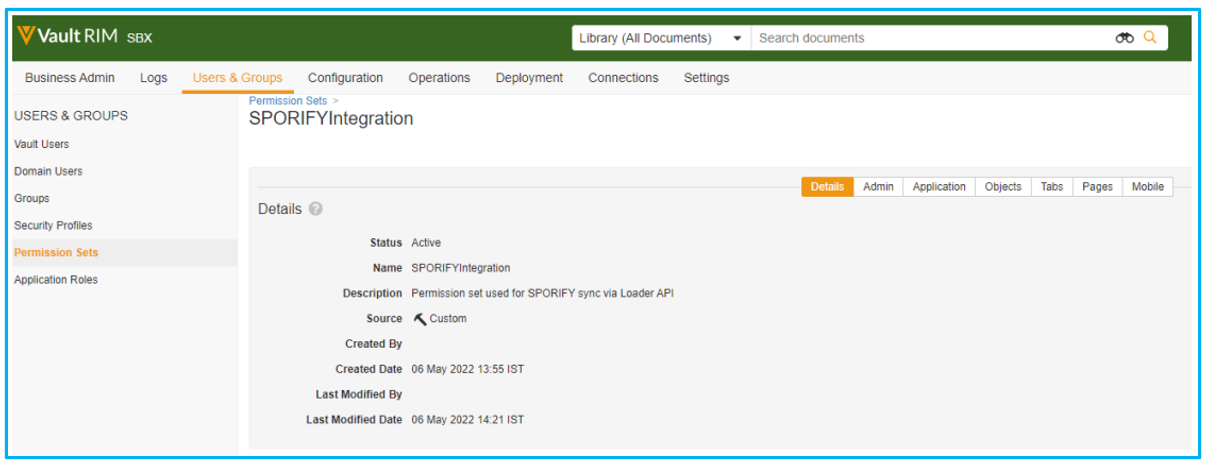
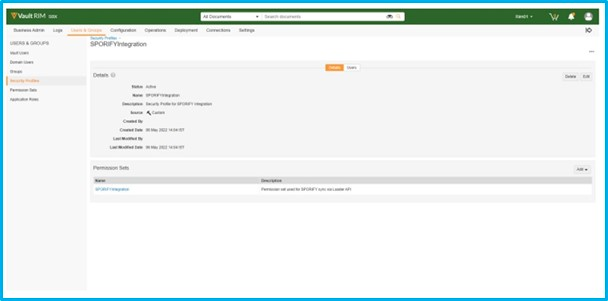
Permissions Set - Details:
-
Status: Active
-
Name: SPORIFYIntegration
-
Description: Permission set used for SPORIFY sync via Loader API
-
Created By: [Name]
-
Created Date: [Date]
-
Last Modified By: [Name]
-
Last Modified Date: [Date]
|
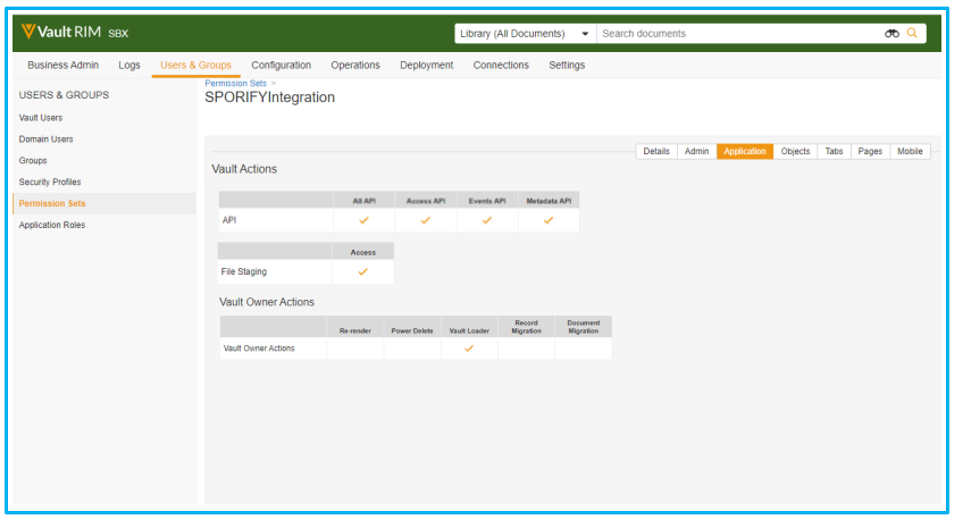
Permissions Set - Application:
API Permissions:
-
All API
-
Access API
-
Events API
-
Metadata API
File Staging Permissions:
-
Access
Vault Owner Actions Permissions:
-
Vault Loader
|
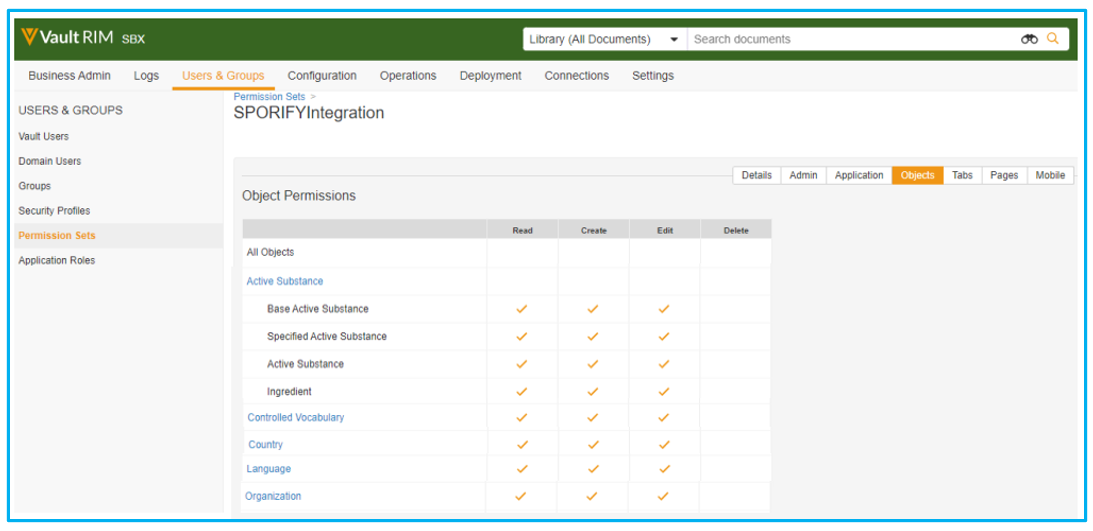
Permissions Set - Objects:
Read, Create & Edit Permissions:
-
Base Active Substance
-
Specified Active Substance
-
Active Substance
-
Ingredient
-
Controlled Vocabulary
-
Country
-
Language
-
Organization
|
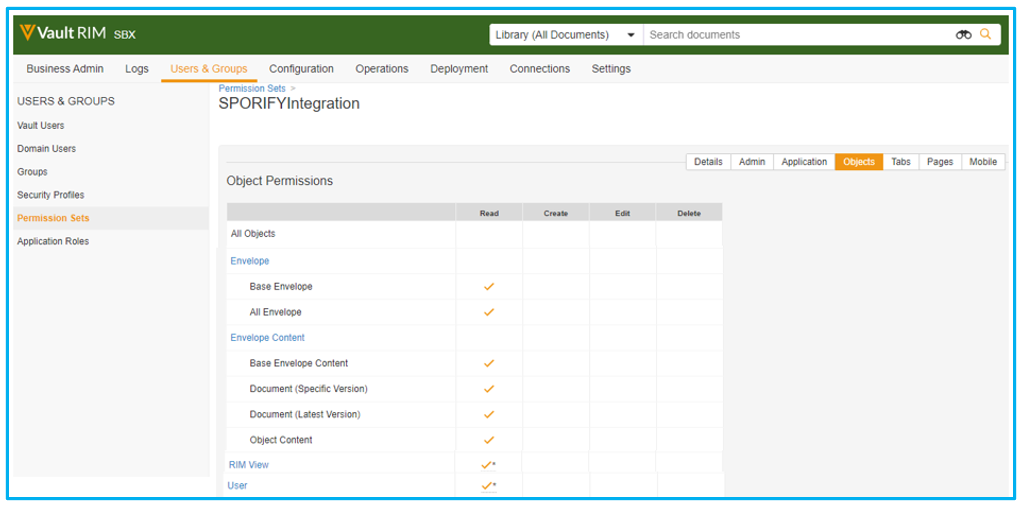
Read Only Permissions:
-
Base Envelope
-
All Envelope
-
Base Envelope Content
-
Document (Specific Version)
-
Document (Latest Version)
-
Object Content
-
RIM View
-
User
|
Profile Setup:
-
Create a security profile to use the earlier created permissions set.
|
-
Create a user profile attached to the earlier created security profile.

|
Settings
Available Actions:
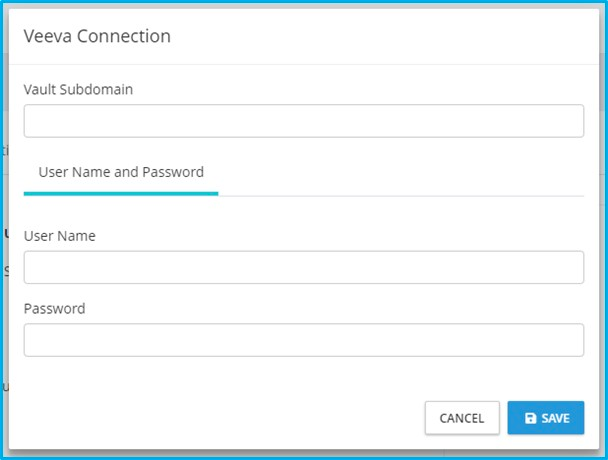
-
Connect to Veeva
-
Vault Subdomain
-
Username and Password
-
Username
-
Password
-
-
Note: User credentials are authenticated against the Veeva Vault subdomain. If authentication does not occur, the user cannot Save until valid credentials are provided.
|
-
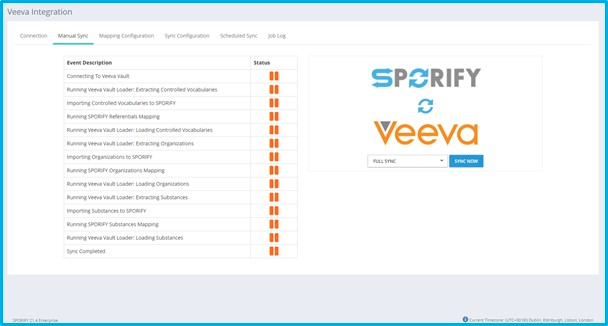
Run Manual Sync
-
Full Sync
-
Referentials Only
-
Organisations Only
-
Substances Only
-
Note: Merged IDs are now mapped to the surviving record during the Veeva sync. In the relevant scenario, this information is displayed via the record’s Data Insights.
-
-
|
-
Add New List Mapping
-
Veeva List
-
List Type
-
Mapping Target
-
Active
-
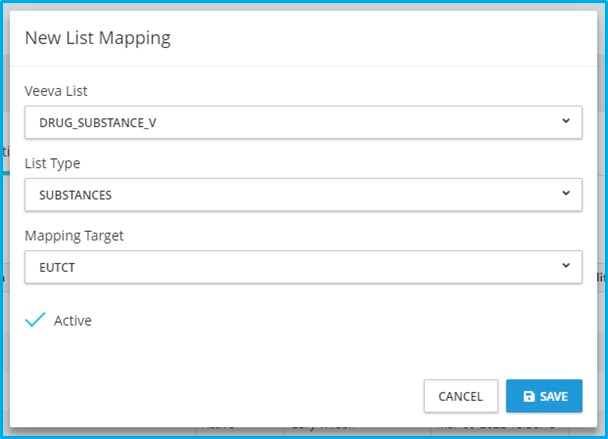
|
-
Edit
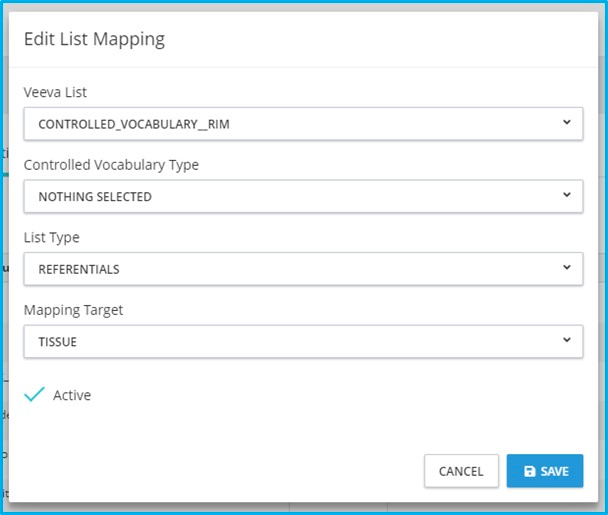
|
-
Delete
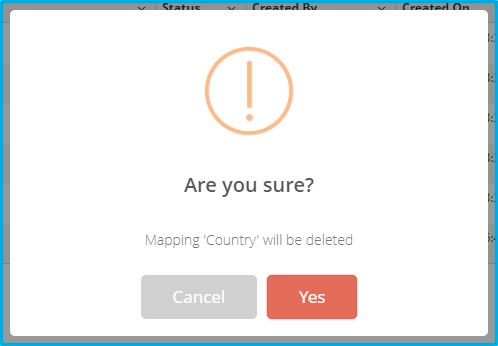
|
-
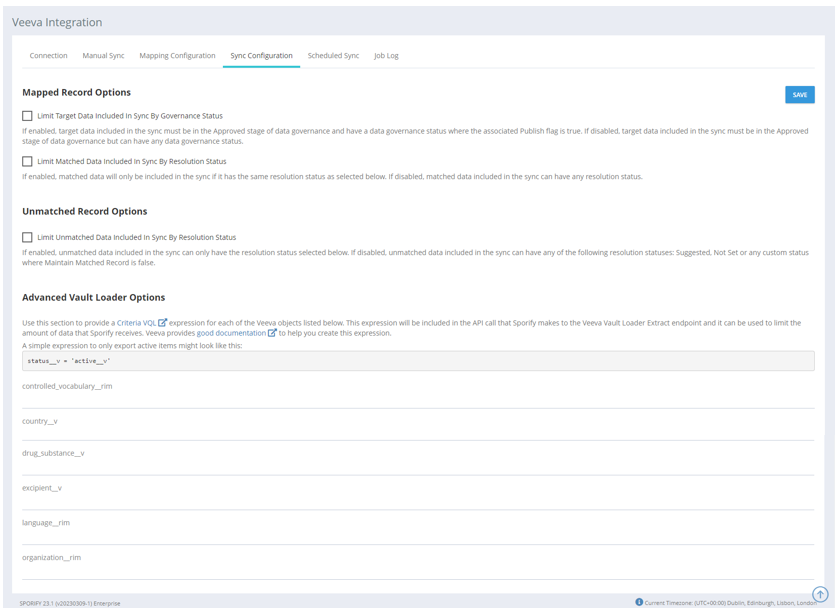
Set Sync Configuration Settings
-
Mapped Record Options
-
On/Off: Limit Target Data included in Sync by Governance Status
-
If enabled, target data included in the sync must be in the Approved stage of data governance and have a data governance status where the associated Publish flag is true. If disabled, target data included in the sync must be in the Approved stage of data governance but can have any data governance status. For domains where Data Governance is turned off, this setting is ignored.
-
If the data governance functionality and this setting was previously used in the configuration, the tick box remains as previously set, and the value is read-only. If data governance is re-enabled for any domains, the setting is retained as previously set.
-
-
On/Off: Limit Matched Data included in Sync by Resolution Status
-
-
Unmatched Record Options
-
On/Off: Limit Unmatched Data included In Sync By Resolution Status
-
If enabled, unmatched data included in the sync can only have the selected resolution status. If disabled, no unmatched data is included in the sync.
-
This setting requires at least one Resolution Status value to be selected.
-
-
-
Advanced Vault Loader Options
-
controlled_vocabulary_rim
-
country_v
-
drug_substance_v
-
excipient_v
-
language_rim
-
organization_rim
-
-
|
-
Set Scheduled Sync
-
Enable/Disable
-
Schedule Type
-
Hourly
-
Every X hour(s)
-
Starts at [HH:MM]
-
-
Daily
-
Everyday
-
Every weekday
-
Starts at [HH:MM]
-
-
Weekly
-
Week Days
-
Starts at [HH:MM]
-
-
Monthly
-
Day X of every Y months
-
The [Number] [Day] of every [Number] months(s)
-
Starts at [HH:MM]
-
-
-
Timezone
-

|
-
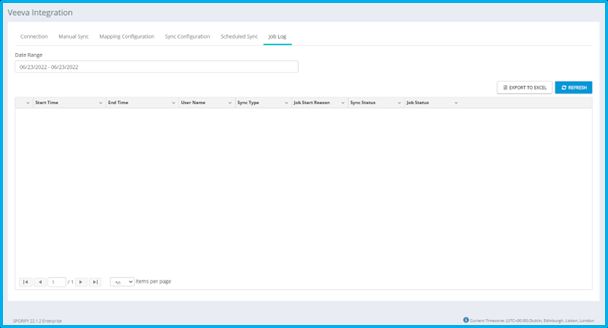
View Job Log
|
-
Export to Excel
-
Filter
-
Date Range
-