Description
A data governance feature is available in SPORIFY. Users can view and manage records' data governance statuses and administrators can manage data governance statuses and integrations settings.
-
A record’s data governance status is initially set to Review. The reviewer can then set a custom status and the approver can thus accept or reject this status. If the approver rejects the status, then the record is set back to Review.
-
If the 4 eyes principle is applied and a record is approved and then rejected, the status is set back to Review.
-
If enabled, data governance is applied after system mapping.
-
Data governance is also applied if manual mapping occurs.
Procedure
Data Governance Workflow Overview
-
When a record is Pending Review, the relevant reviewer receives a notification.
-
When the reviewer has reviewed the record, its state becomes Pending Approval.
-
When a record is pending approval, the relevant approver receives a notification.
-
If the approver rejects the record, its state is set back to Pending Review and the reviewer receives a notification.
-
Else, if the approver approves the record, its state is set to Approved.
-
Otherwise, if the 4 eyes principle is applied and a record is approved and then rejected, its state is set back to Review.
-
Colour-coding is applied to the data governance process in SPORIFY:
-
When a record is coded red, it is pending review.
-
When a record is coded orange, it is pending approval.
-
When a record is coded green, it has been approved.
-
Note: For more details about data governance notifications, see FS - 483754047 - Data Governance Notifications.
Manage Data Governance Statuses for Given Records
-
Login to SPORIFY.
-
Navigate to one of the following areas:
-
The record’s relevant source list
-
The record’s relevant target list
-
The record’s relevant details screen
-
For more details, see: https://corrit.atlassian.net/wiki/spaces/SPORIFY/pages/edit-v2/491454492?draftShareId=d54dd982-ad0f-46ce-8e2a-ed9952cf3988, https://corrit.atlassian.net/wiki/spaces/SPORIFY/pages/edit-v2/491520034?draftShareId=fdf19089-136a-46ac-a385-738424ad5304, https://corrit.atlassian.net/wiki/spaces/SPORIFY/pages/edit-v2/491454499?draftShareId=c29b339e-80c3-4967-ad6c-6b38d39fed9e.
-
-
-
Click on the record’s associated data governance (shield) icon.
-
Depending on the user’s permissions and the current status of the record, the following options are presented:
-
Enable
-
Select this to enable governance for the given record.
-
-
Disable
-
Select this to disable governance for the given record.
-
-
Govern
-
Select this to govern the given record.
-
-
-
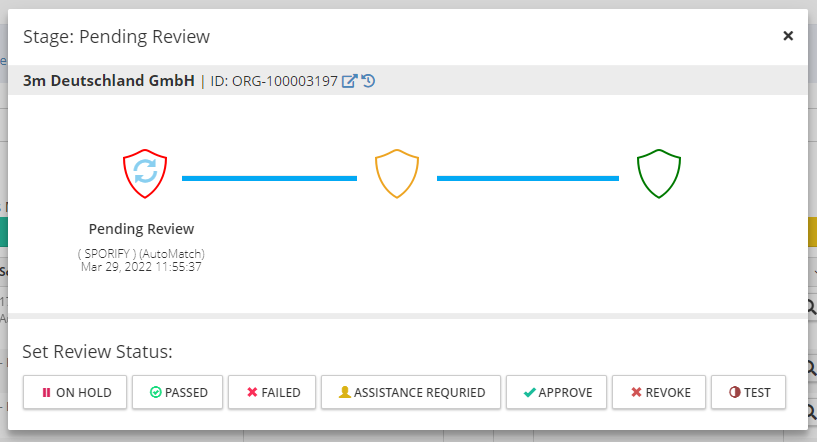
When Govern is selected, the Data Governance modal is presented.
-
This modal contains the following:
-
A heading indicating the current stage of the data governance process for the given record
-
Record details with a link to the relevant details screen
-
The record’s current status
-
Who applied the status and when it was applied is shown for each stage of the process
-
-
Status options
-
-
When reviewing a record:
-
Click on the desired status to add to the record.
-
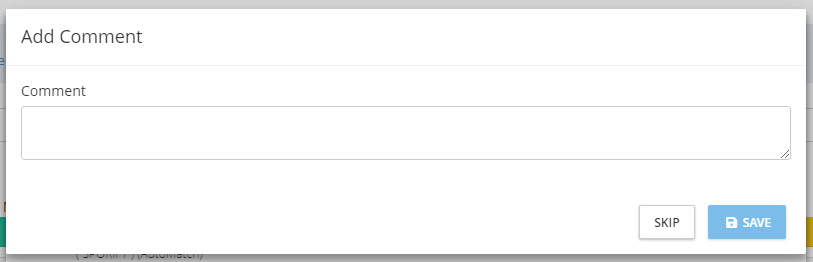
Insert a comment on the Add Comment modal.
-
Click Save, else Skip.
-
-
When approving a record:
-
Click on the desired status to add to the record.
-
Fill in e-signature details if required.
-
Else, add comment if desired.
-
Click Save, else Skip.
-
Manage Data Governance Integration Settings
-
Login to SPORIFY.
-
Select Administration on the navigation menu.
-
Select Data Governance.
-
Select Integrations.
-
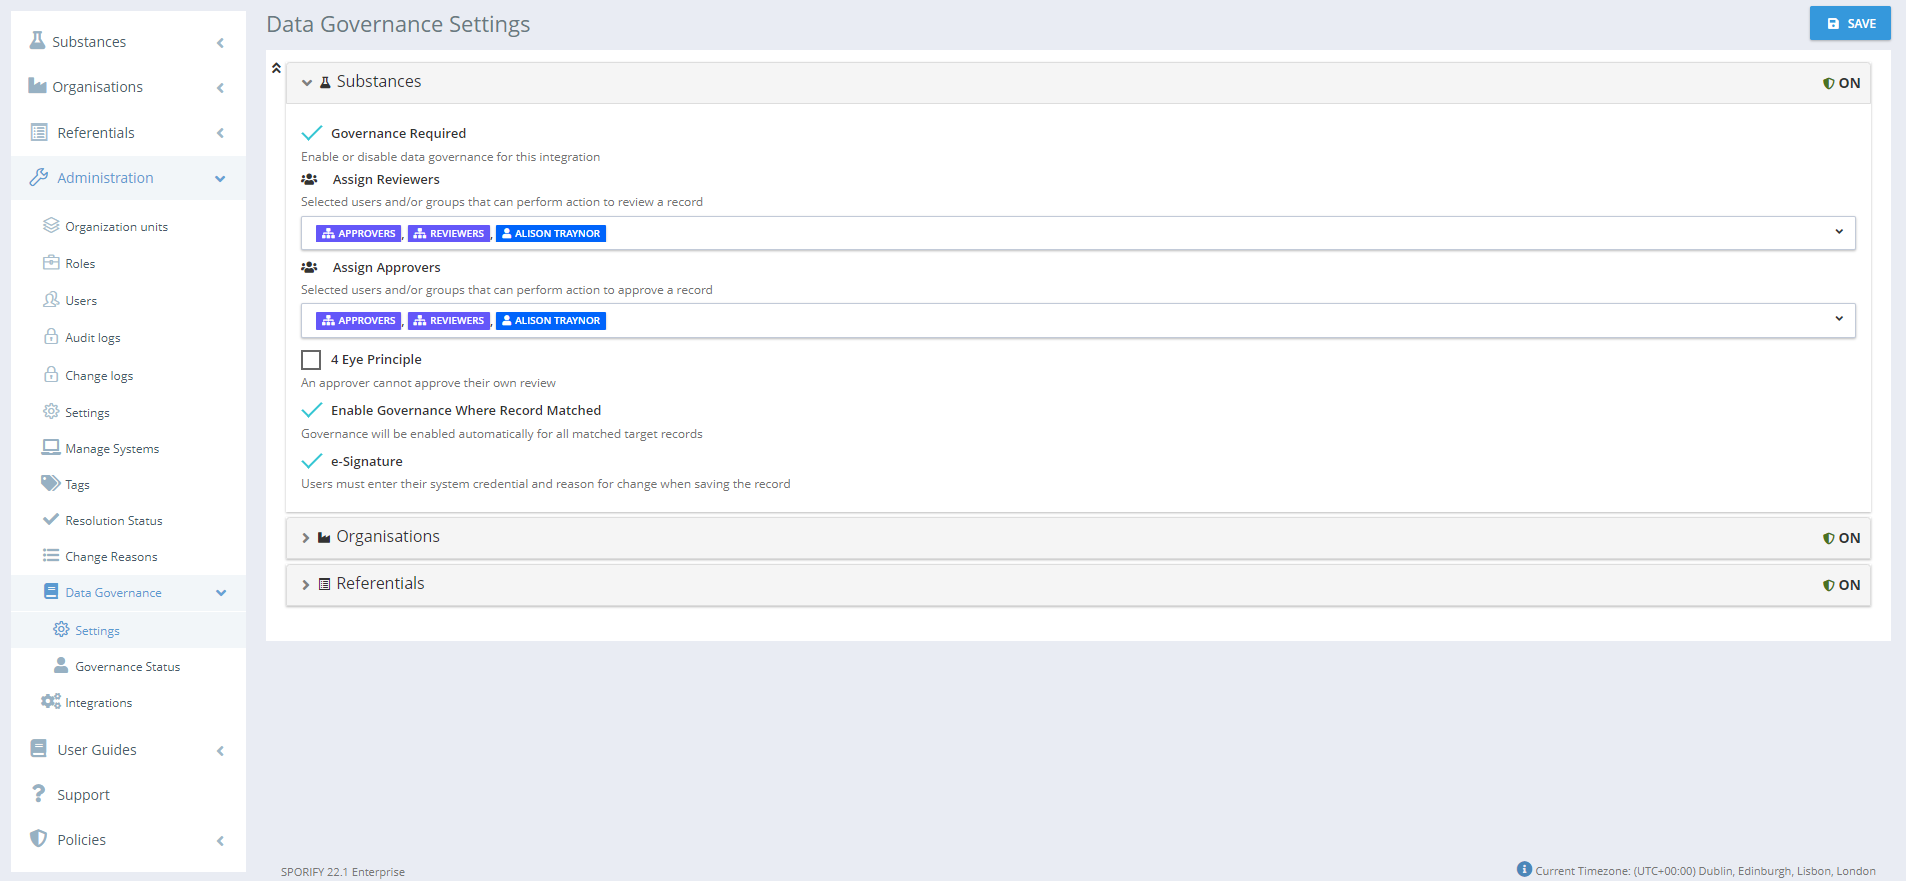
Expandable sections for Substances, Organisations and Referentials are then presented.
-
-
Click on the relevant section’s associated arrow icon to expand it.
-
Complete the following fields:
-
Governance Required
-
This checkbox enables/disables data governance for the given integration.
-
-
Assign Reviewers
-
This drop-down menu allows the administrator to select the users and/or groups who are permitted to review records.
-
-
Assign Approvers
-
This drop-down menu allows the administrator to select the users and/or groups who are permitted to approve records.
-
-
4 Eye Principle
-
This checkbox enables/disables approvers from approving their own reviews.
-
When the 4 eye principle is enabled, only a reviewer will be able to apply the status to a record and only an approver will be able to accept or reject it. Both of these actions cannot be performed by the same user, even if said user is part of both the reviewers and approvers list.
-
When the 4 eye principle is disabled, anyone from the reviewers or approvers list can carry out either step once they are in the reviewers or approvers group.
-
-
Enable Governance Where Record Matched
-
This checkbox enables/disables governance for all matched target records.
-
-
e-Signature
-
This checkbox enables/disables the requirement for users to enter their system credentials and reason for change when saving a record.
-
-
-
Click Save to save all changes.
Manage Data Governance Statuses
-
Login to SPORIFY.
-
Select Administration on the navigation menu.
-
Select Data Governance.
-
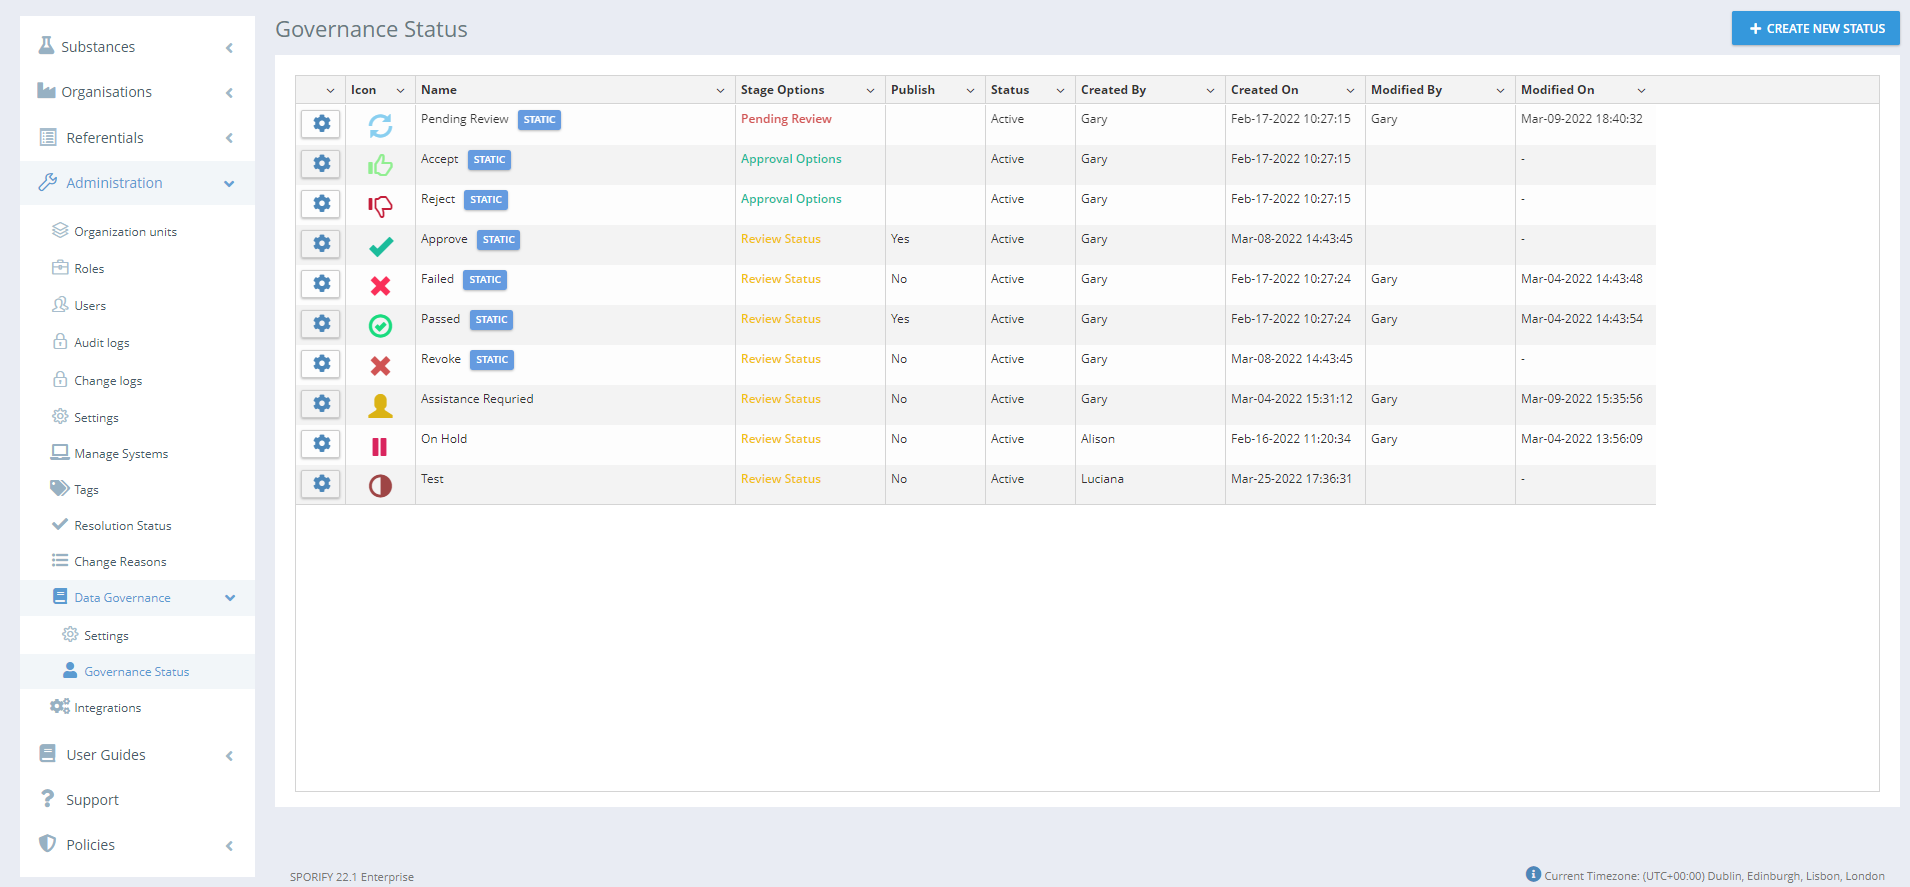
Select Governance Status.
-
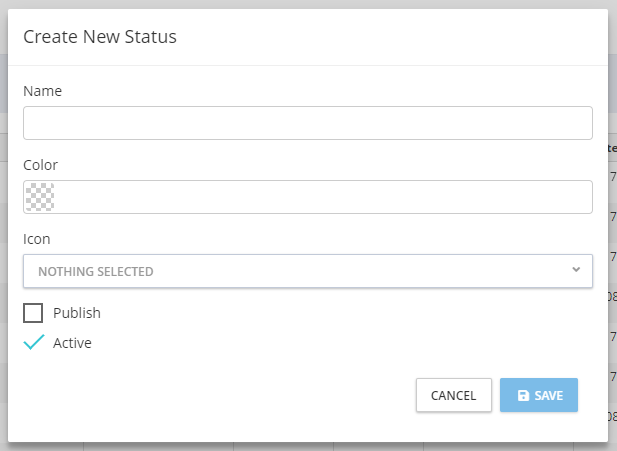
To create a new status:
-
Click the Create New Status button.
-
Fill in the following fields:
-
Name (Textbox)
-
Colour (Colour picker)
-
Icon (Drop-down menu)
-
Publish (Checkbox)
-
Active (Checkbox)
-
-
Click Save, else Cancel.
-
-
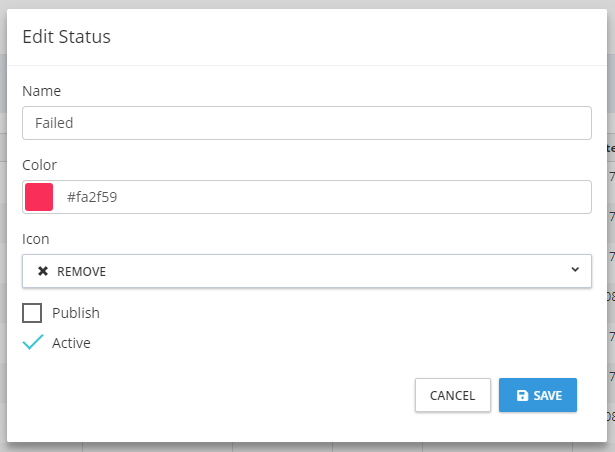
To edit a status (static or user defined):
-
Select the associated Actions (cog) icon.
-
Select Edit.
-
Make the desired changes to the status.
-
Click Save, else Cancel.
-
-
To view a status' history (static or user defined): (Note: This action is currently out of scope but may be applied in the future)
-
Select the associated Actions icon.
-
Select History.
-
Click on the associated Select icon to view a listed action’s history details.
-
Click Close to exit the modal.
-
-
To delete a status (user defined only):
-
Select the associated Actions icon.
-
Select Delete.
-
A modal reading ‘Are you sure?’ then appears.
-
-
Click Yes, else Cancel.
-
Acceptance Criteria
We succeed only if a data governance feature is available in SPORIFY.
-
Verify that SPORIFY’s data governance follows reflects that which is described in the Description chapter of this document.
-
Verify that records' data governance statuses can be viewed via source list screens, target list screens and details pages.
-
Verify that administrators can set data governance integrations settings for their users as described in the Procedure chapter of this document.
-
Verify that administrators with the relevant permissions can create new data governance statuses. Verify that they can also edit and delete currently existing data governance statuses.
-
Verify that the data governance modal can always be accessed, even when the user cannot govern the given record.
-
Verify that data governance updates are presented in the Dashboard Activity Panel.
-
Verify that data governance filters are available on source and target list screens.
-
Verify the link to the history comparison page is available, if comparison data is available for that record.
Related / Alternative Procedure
N/A
GUI Specification
Purpose of these GUI elements
The purpose of these GUI elements is to facilitate data governance in SPORIFY.
Mockups and Screenshots


GUI Elements
|
Mockup of GUI Element |
Title |
Default |
Enabled |
Type |
Data |
Description |
|---|---|---|---|---|---|---|

|
Name |
Empty |
Always |
Textbox |
String |
The status name is inserted here |

|
Icon
|
Select an Icon
|
Always
|
Drop-down menu
|
Icon
|
The status icon is selected here
|

|
Colour |
None selected |
Always |
Colour picker |
Colour |
The status icon colour is selected here |
|
|
Active |
True |
Always |
Checkbox |
Boolean |
Status is set to active or inactive here |
|
|
Publish |
False |
Always |
Checkbox |
Boolean |
Status is set to publish/do not publish here |
Available Actions And Commands
|
Mockup of GUI Element |
Title |
Shortcut |
Enabled |
Type |
Role/Permission |
Action |
Tooltip |
Audit Trail |
|---|---|---|---|---|---|---|---|---|

|
Yes |
N/A |
Always |
Button |
Administration - Data Governance |
Deletes the associated governance status |
N/A |
Yes |

|
Cancel
|
N/A
|
Always
|
Button
|
Administration - Data Governance |
Closes the Delete Status modal without deleting the status
|
N/A
|
No
|

|
Close |
N/A |
Always |
Button |
Administration - Data Governance |
Closes the Status History modal |
N/A |
No |
|
|
Select |
N/A |
Always |
Button |
Administration - Data Governance |
Expands the associated Action to reveal its history details |
N/A |
No |
|
|
Cancel |
N/A |
Always |
Button |
Administration - Data Governance |
Closes the associated modal without saving changes |
N/A |
No |
|
|
Save |
N/A |
Always |
Button |
Administration - Data Governance |
Saves the associated configuration |
N/A |
Yes |
|
|
Create New Status |
N/A |
Always |
Button |
Administration - Data Governance |
Presents the Create New Status modal |
N/A |
No |
|
|
Actions |
N/A |
Always |
Icon |
Administration - Data Governance |
Presents a list of available actions when selected |
N/A |
No |
Related Documentation and Sources
-
https://corritltd.visualstudio.com/Sporify/_boards/board/t/Sporify Team/Stories/?workitem=4512
-
https://corritltd.visualstudio.com/Sporify/_boards/board/t/Sporify Team/Stories/?workitem=4435
-
https://corritltd.visualstudio.com/Sporify/_workitems/edit/4262
-
https://corritltd.visualstudio.com/Sporify/_workitems/edit/4261
-
https://corritltd.visualstudio.com/Sporify/_boards/board/t/Sporify Team/Stories/?workitem=4252